Category Archives: week8

The Fab Lab Experience: Part 2

What?

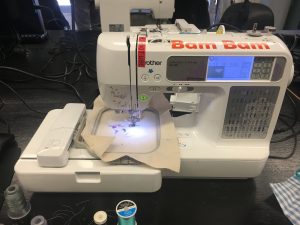
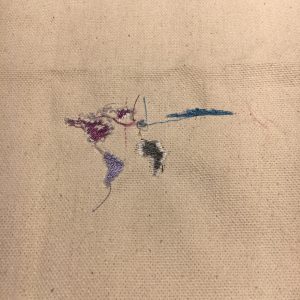
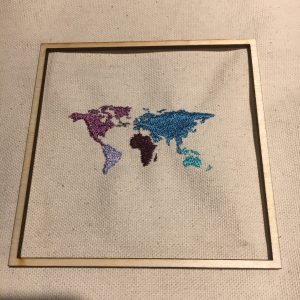
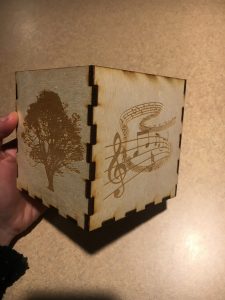
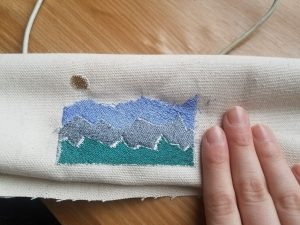
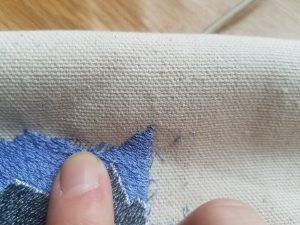
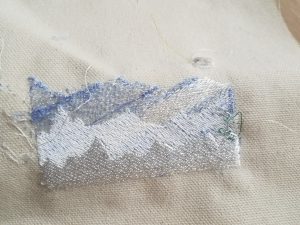
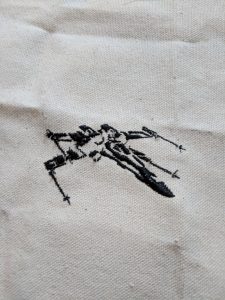
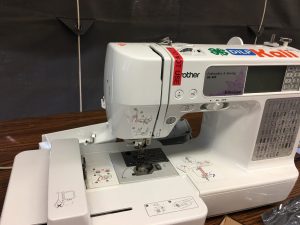
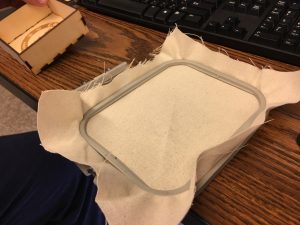
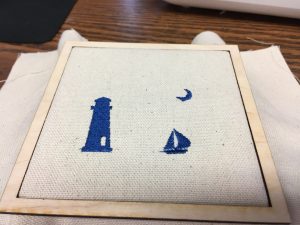
This week, we engaged in part 2 of our box making project. I experienced learning yet another new tool and software, this time picking it up a bit easier than the last. After creating the physical structure for the box last week, I had the opportunity to design my stitched cloth that will serve as my box’s top. After a few design iterations, I came up with a design that speaks to my love for sports. My ‘logo’ is a baseball field with my initials and a Nike ‘swoosh’ at the center. I must admit, I did experience some difficulty in actually getting the sewing machine to stitch my design at first – but I would attribute this to a lack of familiarity with both sewing and the machine. I left a hole where each base would normally lie on the field and plan on filling those holes with lights. I’m super excited to see how it turns out when we go back into the Fab Lab this week.

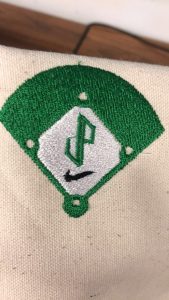
A photo of my box top cloth

Additionally, my group decided on a final project of a grocery bag holder. I think this project will force us to think outside the box in creating value from an ordinary, easily replicated object. Each of us immediately saw the value in having some sort of device to make carrying several grocery bags less strenuous. Our task will be to find a way to create the most efficient object possible. It must be optimized for comfort in carrying, maximize the capacity of bags it can hold, and be both not easily lost, nor too big to carry around. I think the 3 of us will agree on a design that meets these criteria and eventually creatively market to the target customer group.

So What?

After two consecutive weeks of learning new machines and software, we have grown comfortable with learning new technology and immediately implementing our knowledge. One of the best aspects of 3D printing has got to be the trial and error element. Making gives us the opportunity to design, create, test and evaluate extremely quickly. If at first you don’t succeed, try again. 3D printing embodies this mantra as the risk in creation is so minute that it makes all too much sense for rapid prototyping.

Now What?

Taking in what we know about 3D printing, new technologies and machines, and trial and error, I am more confident and comfortable than ever in making. After we learn the final components to completing our boxes, we will have all the tools and skills necessary to create our final project. Our skills have been learned – now, they are ready to be applied.


What Could’ve Been

This week I was feeling very under the weather after all the climate changes that have been occurring on campus as well as both of my roommates contracting Pneumonia and was unfortunately not able to attend class on Wednesday. Upon reading some of the other posts, I am very sad to know what could’ve been done in class and the awesome box I would’ve created (and will hopefully have the chance to create later).

The class learned how to design a small wooden box that will be then used as a base for the canvas that we embroidered last class. The box was to be created following the same theme as our original embroidery piece that we created last week. The embroidered piece that I made last week was one that depicted a couple dancing some sort of Latin dance, therefore, for my box I would’ve loved to design it with images of silhouettes of couples dancing to further fit the original theme as it is to represent the dance team that I am currently the artistic director to called “Dance2XS: Caliente”. If the silhouettes design did not look nice on the box I would go for maybe some sort of star design with little star shapes to go along with dancing to feel like a “dancing under the stars” theme.

The design would then go from the computer to a physical object with the help of the CnC Machine that seems to be the new technology that was introduced to the class that etches images and laser cuts them into wood. Having had worked at a carpentry as my first job growing up was sanding wood, I got to see a lot of carpenters shaping wood and turning it into some sort of furniture and this technology sounds like it could be so much more fun and interesting to have used at this workplace if the technology was available to them at that time that could’ve led to furniture that was a lot more aesthetically pleasing or creative and innovative designs that could even give the carpentry a competitive advantage up until others were to discover the technology. Furthermore, it could’ve made shaping and forming the wood into furniture more efficient as well if the laser cutter was large and powerful enough to cut through wood at the carpentry.

Adventures with Digital Embroidery

This week was the second FabLab workshop in which we got to try our hand at embroidery! During the workshop we learned several different functions within the software program in order to take an image from online and transform it into an image we were then able to embroider. I enjoy traveling, therefore I decided to embroider an image of a map for the top of my box. It did not go as smoothly as I expected going in so the rest of this post goes into the 3 main things I will look out for next time.

Lessons Learned

  1. Size Matters: One thing I did not carefully consider during this process was the size of the image. When making the map, I added an airplane and line coming from the US to signify travel while also making the image unique to me. However, when I went to load it into the embroidery machine, it turned out that it was too small to actually look like a plane but rather looks like a grey blob in the ocean. I know what it is though, so that’s what counts!

2. Double check thread before starting: My first attempt at this embroidery did not end up working. The white thread on the underside was not pulled taught when the machine started therefore about halfway through, the canvas ended up getting caught in the machine and I had to cut it out and start over with a new machine. The lesson learned here was to make sure both bobbins of thread are correctly inserted into the machine before starting.

3. Group colors within the image before exporting to machine: If you do not have all of the parts of an image that are the same color grouped within the software they may not sew consecutively, therefore you will need to change the thread color way too many times. I did not realize you can change the sewing order by moving around the items. For example, originally the machine sewed North America in pink, then South America in purple, and then went back up to sew Greenland so I had to change the thread color twice to the original pink color. In order to avoid this on my second run through, I made sure to group all of the colors and reorganize the object sewing order so that I would only have to insert each thread color once.

Overall, this experience was filled with lessons and definitely an exercise in patience but it was worth it! I have previous sewing experience however I have never made such a detailed embroidery before. I can definitely see myself creating various embroidery pieces to hang around my apartment in the future so I am glad I got the opportunity and experience with these machines and software.  I am happy with how it turned out and look forward to using conductive thread this upcoming week to add a couple lights!

Box Update: 

Another exciting part about this week was that I got to pick up my finished box from last week. We ran out of time in class to make all of the boxes so it made this class even more exciting since I got to pick up the pieces and assemble it. I’m really happy with how it turned out and look forward to displaying it in my room!

Aesthetic Embroidery

Our class was back in the FabLab this week. The Champaign-Urbana community is privileged to have these creative tools at our disposal. Instead of a tour, we headed straight to the embroidery machines in the back room. I had no previous sewing experience, which made these machines difficult to comprehend.

My instructor started by showing us how to use the design software. I thought it was similar to the software used for the laser cutter last week. I wonder if in the future there will be one universally accepted design software that is compatible with multiple digital making machines. Familiarizing ones-self with the features in each software is time-consuming. When I was creating my design, all the tips I learned last week were irrelevant. I think a common design platform would greatly expedite community innovation.

I was designing a cloth top for the box I laser cut last week. The instructor ran into some problems with my box during the cut, and it actually caught on fire. Although this happens quite often, there is nothing you can do besides restart. The second cut went fine and I managed to assemble my box without breaking any pieces. I found I enjoy the smell of the laser-singed wood.

My cloth design included a lighthouse, sailboat, and the moon. I used a spool of thread that alternated between white and blue. The sails on the boat turned out great with this alternating pattern. I didn’t realize that our mini-projects each week were going to be combined. Consequently, my combined creations aren’t the most cohesive.

Before printing, I had to wrap the thread around hooks on the machine to immobilize it. The last step is pulling the thread through the eye of the needle, which ironically felt old-school. I thought all this was overkill but was quickly proven wrong once the sewing machines turned on. They rapidly and repeatedly pulled the needle through the cloth. I didn’t want my fingers getting anywhere close to it. I was worried that the connecting thread between the three objects in my design would look awkward. The machine cuts thread itself when switching between objects, so I simply trimmed the remnants.

Luckily my first sewing project finished without incident. Other students weren’t so lucky. Sometimes the thread gets tangled or stuck. The machines are working so fast it is inevitable. My lack of sewing experience would have made me useless if that happened to me.

Fab Lab and Laser Cutting

This week I went to the Fab Lab that we have on campus.  I never realized that this place existed, but I am so very glad that I now know of it. I plan to visit it later this week to create customized stickers for an organization that I am a part of! The FabLab is opened to the public and is a space that encourages people to be makers and try out different techniques and processes.  With the wide range of tools being offered, I worked with the universal laser system X-600.

The goal was to make a customized wooden box that would use the system mentioned above. But, first I needed to create and design the different parts of the box on a software known as Inkscape which is a free and open-source vector graphics editor similar to Adobe Illustrator. As any new software, it took some time getting used to it, but it wasn’t too difficult! For my box, I wanted it to capture the highlights of my senior year. I also wanted to test how well the laser would would construct the details of a digital photo image that I took. I included that image on the bottom of the box for safe measures. Next, I needed to transfer the design to the laser system software, select my material as well as brighten the digital photo for better quality.  I placed the ply wood into the system and then began the laser process.  I was really impressed by how the final product came out and I am pleased with the overall quality of the shadow box.

One thing that I did noticed when the plywood was being lasered, was the small fire that emerged from time to time. I wondered if this was problematic with the system or if it is considered to be hazardous.  I found out that laser safety standards are well established and relatively harmonized internationally. And that those standards establish four broad classifications of laser safety for products. The classifications range from Class 1, in which the laser energy is fully contained within the laser system and the operator is not exposed to any laser energy, to Class 4, in which the laser system does not have containment provisions and the operator can potentially be exposed to high levels of laser energy.

https://www.ulsinc.com/

Final Project

Ultimately, we have decided that for our final project we would like to incorporate 3D printing into window farms. We would like to create a window farm that uses various sensors and a micro-controller to sense its environment and adapt accordingly. After doing some more research,  we would like to work with vertical hydroponic gardening systems. These plants do not use soil to grow but rather use mineral solution nutrients. I am very exciting for our project and I am looking forward of the development of it.

That concludes my blog for this week,

Thanks for reading!


Embroidery Software & Design at the FabLab

This past week, I continued working on my design for last week. Last week, I designed and created the wooden box. I decided to incorporate designs based on my passion for international travel. Below is my box design, I am extremely happy with how it turned out!

This week, I worked on designing and then sewing the embroidery pattern. I created a blue and orange “I” to represent University of Illinois. It was amazing to design the pattern and then digitally sew it by connecting a sewing machine to the computer. It was a reminder of how powerful technology is!

The software we used allowed me to manipulate an image at all levels. I was able to import various images, edit the color schemes, and control the steps in which the threading process occurred. After finalizing the design of my logo, I threaded the sewing machine. Because my design had multiple colors, I had to use blue, orange, and white thread. Below is the image that I based my design on:

Next week, I will be adding in LEDs into my design. I still have not decided where on my fabric I want to add lights. I am excited to examine my fabric design this upcoming Wednesday and figure out where to place the LEDs.

Furthermore, my group has decided to make a steering wheel ball for our final project. We plan to make a customizable, low-cost, and easy to attach product. We envision our product being used by beginner drivers and drivers over the age of 60. Below are a few designs we are considering:

As we continue to work with various technology in the FabLab, I did some more research on technology in the lab. Computers in the lab are equipped with software such as Garageband and Inkscape. All computers in the alb are capable of AV production, productivity, electronics and coding, and 3D rendering and routing.

I am excited to get back in the FabLab and complete my design this week!


Embroidery Design Software @ The FabLab (Week 8)

This week, I was able to go to the FabLab (unlike last week when I was sick!) and I worked on the embroidery machines.

My neighbor has a pretty fancy embroidery machine that has all sorts of different patterns and designs you can download onto it and make the machine sew. I never thought of designing my own embroidery pattern before this class because the machine always had ones pre-made for me!

The software we used worked much like Illustrator. You could select areas of an image, change text, and simulate what it would look like before it was embroidered. We used Brother branded machines and accompanying software. My machine got its thread caught part-way through my design, so I had a bit of a mishap the has resulted in my design not looking like it was originally intended to. I wanted to make a mountain range – the points were relatively easy to draw and layer by hand in the software. Images are below:

This first image is of the completed design. It is three layered mountains with a moon in the corner. 

This is me pointing to the areas where you can see that the machine got caught and offset my design. I had to use a thread ripper to fix it.

This is the back of my design. I used a white thread on the bobbin, so that’s why the outlines on the front of my design and the back is all white. 

Next week, we will add LEDs behind our fabric and attach it to our boxes. Since I wasn’t in the lab the first week, I think the lab techs are going to make me a plain box to use.

My group decided on our final project idea – we will be creating a “counter”, likely using infrared technology, that will count the number of people entering and leaving an establishment. Currently, only mass retail stores use them, and they can be quite expensive. If we can create a low-cost version, it can be deployed to businesses across town and tracked in an app all consumers can use to monitor when the best time to go to a restaurant, store, or other business is. Additionally, our counter can be used in a more social entrepreneurial manner – we could use it at homeless shelters or emergency waiting rooms to track capacity levels.

Here are some links that we’ll use to make our own counter:

http://www.instructables.com/id/Infrared-based-digital-object-counter-DIY-kit/

How to make a digital object counter using, infrared sensor, CD4026 and seven segment display

Because I will be working in the aerospace industry after graduation, I wanted to know if laser cutting was common in commercial plane production. It seems that, in the past, it has been used to cut the aluminum side-plates that make up the fuselage of the plane. However, I haven’t found any articles on how the increased use of carbon fiber (take the Boeing 787, for example) affects old cutting techniques. I expect laser-cutting is still used as it can reduce the jagged edges you get when you cut carbon fiber.

Week 8 Reflection

Week two at the UIUC FabLab was constructive and entertaining. When I arrived, I retrieved my laser cut box. The box says “The Force will be with you, always” a quote from Obi-Wan Kenobi in Star Wars Episode 4: A New Hope. On the bottom of the box, there’s a large Rebel logo. I was able to fasten my box together without any glue, meaning the cuts were precise enough to allow for a friction-fit. I was impressed with my craftsmanship, despite the skinny balsa-like wood.

After retrieving our boxes, we worked with Duncan to create an embroidery pattern. We used a program called PE Design that resembled Adobe Illustrator. Duncan taught us how to use the basic functions of PE Design before we got a chance to delve into our own project. Duncan helped me find a proper silhouette of an X-Wing fighter, also from the Star Wars universe. Duncan counseled me with adding an area to insert my LEDs next week. I ended up removing the front of the X-Wing’s rocket boosters, which I will replace with white or red lights on Wednesday. Duncan encouraged me to add more to my design, but I was quite content with just a simplistic X-Wing design. I explored adding an Imperial logo, but I decided it did not fit with my vision of the finished project. As much as I like my embroidery, I do not think I will end up using a box with a cloth on it for anything. I prefer ergonomics over aesthetics and I do not need the art project for anything. I’d rather use the box for storage of coins, keys, and other knick-knacks. When I return home for Spring Break, I plan on giving my box and embroidery to my little cousin, the biggest Star Wars fan I know.

Not only has laser cutting been used in industrial manufacturing, it has found a second wind in art projects. Laser cutting allows the artist to make very precise impressions that a human could not perform. I checked etsy.com to see what designs are being sold on the internet. Many of the exquisite designs can cost over a hundred dollars, but many small projects can be purchased for well under a hundred. Many artists made laser cut skylines, maps, and geometric designs. If given another opportunity to make a laser cut art project, I would likely have the skylines and maps of Chicago and Washington, D.C., my two favorite cities.

Laser Cutting at the Fab Lab

Week two at the Fab Lab certainly did not disappoint—in order to complete our projects, we learned how to laser cut wooden boxes and add our own designs as decoration. I was a bit nervous about the workshop after last week’s challenging embroidery lesson, but it was surprisingly straightforward (mostly because Clinton was such a patient instructor.)

We used a combination of Adobe Illustrator and PE Design to come up with the specifications for our boxes, starting with the dimensions. We then had to remove the “teeth” of the cutouts, since we needed the top portion of the box to be completely flat—this proved to be somewhat tricky because the software can be a bit finicky (apparently there’s a difference between double and triple clicking) but with Clinton’s guidance, I was able to modify the box the way I wanted to. We outlined the things we wanted cut out in red, and then objects filled with black were meant to be shaded in on top of the wood as a design.

Finally, we added various silhouettes to the sides of our boxes as designs. I chose images of things that were significant to me, like my hometown of San Francisco, and the otter, my favorite animal. Here’s what the final version looked like:

We uploaded our designs to a flash drive, and Clinton fired up the machine—I was amazed to see how quickly it moved back and forth to replicate the designs originating from our computers. While I couldn’t stay to see my own finished product, I was able to watch another classmate’s design come to life:

I’m looking forward to putting together my box next week, along with the embroidered top. It’s been a wonderful learning experience and I feel like I’ve gained two new skills which could serve useful in a variety of ways. I’ll be sure to post photos of the end result once it’s done next week!

Bringing our Creations Together

Overview

Hi again! This week we switched stations at the Fab Lab and got to create an additional piece to our boxes. Since I created the wooden structure of my box last week, I was able to create the cloth top this week. This is not just any regular cloth top, but one in which we were able to design the embroidery/sewing on our own (and we are even going to add LED’s to it next class!). Let’s jump into it.


Recap From Last Week

As promised, below is picture of the box that I created last week. I wanted to etch some things that I feel like describe me on the sides of the box: My name, my school, my hometown city, and my employers. I also etched the date that I made the box on the inside for nostalgic purposes.


PE Design

We began our embroidery/sewing work by working with the program called PE Design. Our instructor walked us through some of the basics on the program, and ultimately allowed us to take free reign with our designs. There were not enough working computers for each of the students, so Michael Rindler was kind enough to let me join him on his computer. We worked to create a design that we both found meaningful: a sailboat scene with a lighthouse. We figured that the lighthouse would be a really cool feature on our embroidery since we needed to incorporate out LED’s into the design. Having the lighthouse emit light would simply tie the entire scene together. We also decided that we wanted to add one additional element to our design that would fill some of the extra awkward space: a moon.

After we positioned each of our design elements, we learned how to command the program to convert the silhouette images into stitch designs. As seen in the image below, each of the items are created up of lines. These lines represented how the sewing machines were going to stitch the design on the cloth.

I also found this video for anyone who may have missed class and wants to learn some basics of PE Design: https://www.youtube.com/watch?v=ZLaa1TZWdY0. I hope you find it helpful!


Sewing Machines

With our design files completed and saved, we then moved to the sewing machines and learned how to thread the machine. This process took a few tries to get it right, but once the needle was properly threaded, we were good to go! Below is a picture of the sewing machine we utilized, and the cloth that we loaded onto the machine.

All we had to do was send the file from our computer to the machine and then prompt it to begin the stitching!


Final Result and Looking Forward

I was very satisfied with how my design turned out. Check out the picture below!

I decided to use the navy blue threading in order to compliment the nautical theme of my design. I was blown away by how accurate and precise these machines were in creating such a clean stitch print. As evident, there is a lot of excess cloth around the outside of the wooden box area. We were told that we would be removing the excess cloth next week while we also add our LED lights into our design. We are getting closer and closer to the final product, and I can’t wait to share it with you next week! Thank you for taking the time to read my post.


-Scott Provenzano


Resources

https://www.youtube.com/watch?v=ZLaa1TZWdY0

Trying My Hand At Laser Cutting

This week in class, we continued our exploration of the Champaign-Urbana Community Fab Lab.  It was my turn to try my hand at laser cutting. I have always had a huge interest in woodworking and woodcarving but I have never been able to get a chance to work with a laser cutter before so I was extremely excited. For this week, we would be making a box that would be put together without any nails or glue. The first step was to design the box on a computer. Using a specific software to make these types of boxes, we put in the specifications for the box we wanted and saved them as a file we could then edit. We then used a program I have never used before called Inkscape to edit the box and add images to it. I found it very easy to use the image editing software after our instructor gave us some simple tips to navigate it. Adding images to the box was as simple as finding an image online and dragging it into the software. I decided to stick with the Bison theme I chose last week with my embroidery and added different images of bison to each side and I put the coolest picture I found on the bottom side of the box because it was the biggest surface. We were then taught how to prepare the file so that the laser cutter could read it. In seemingly no time we were ready to see the laser cutter in action.

I found watching the laser cutter fascinating. It seemed to cut plywood with ease and etch virtually any image we chose with incredible accuracy. I was also surprised at how quickly it would create a cut. My box only took about ten minutes. If I were to attempt to create it by hand, it would’ve taken my hours of work and it would not look half as good. While cutting my box, I got to talk to our instructor a little more about the laser cutter and everything that it could do. He told me that the machine we used easily cost as much as a car which led me to think of how lucky we are that we get to use such an expensive piece of equipment. The Fab Lab really does remove a lot of barriers for the people in this community and allows us opportunity to create endless ideas.


Fab Lab: Sewing Machine Creations

What?

This week we were back in the Fab Lab. We rotated projects; my task was to print a design on a piece of cloth for the top of my wooden box. I expected this to be similar to my project last week, but I thought it was more challenging. We were introduced to a software that allows you to create designs such as shapes, symbols, letters, initials, and import your own photo. I thought this software was more complicated than what we used to design the wooden box. I imported a picture and struggled with manipulating it how I wanted too. The picture I chose was a converse shoe and we had to cut holes in areas for the LD lights. The teacher had to help me with creating these holes. I learned that these software’s are extremely delicate. I had to work very slowly to make sure I did not change something. They can focus in on minor details too. For example, I was able to add small shoelaces to my design that did not show up before.

The printing process was quick and accurate. We had to set up the machine, which required a lot of different loops and steps. Once the machine started working it was awesome to watch. The needle works really hard to thread a solid color. My shoe looked really big on the computer screen, but turned out smaller than expected. It is important to pay attention the measurements. Overall, I am happy with my sewed cloth design.

So What?

These past two weeks at the Fab Lab are relatable to my professional experience. The software’s at the Fab Lab were foreign to me at the beginning, but I took time to understand different concepts. I failed a lot designing at the Fab Lab, but I learned from my mistakes and changed moving forward. Next year starting a new job, I will be challenged and I will fail. Adapting from these obstacles and working hard to improve will allow me to grow. This is what I saw in the Fab Lab too. The Fab Lab and at your first job it is important to be persistent and patient with yourself.

Now What?

The Fab Lab has made me more confident in testing out new software’s and technology. Technology can be very intimidating and steer people away. I noticed how it is possible to teach yourself rules and tools on the computer. I will avoid asking so many questions and using trial and error. I am excited to see what we are learning at our final week in the Fab Lab. I know I will be prepared to take on the challenges.