Tag Archives: Design Process

Prototypes Galore

During this week’s class, everyone was able to meet in their groups to work on the design of their projects. After meeting with our team, we were to look over each other’s designs and critique them with constructive criticism. We first met with a team that was working on creating a simple 3D printable device that would count the number of people inside and outside of a building for businesses to use. This team was currently struggling to get the device to display on a 3 digit display screen. Although we weren’t able to give much feedback as we do not know much of the mechanics for the wiring of this device, we were able to give some adjustments for the future to consider like the actual storing of this data as opposed to just displaying it that can be implemented in the future to add value to this product.

We then met with a group that is working on a sort of smart plant holder. It was a very interesting design for a plant holder that would make the use of a pump to raise water to the top of the holder so it trickles down to the rest of the plants as this is a vertical plant holder. One concern the group had was on how to split the water evenly among the plants, we advised them to check in with the FAB lab to see if they had anything that could help as well as got them to think about how to not only distribute the water evenly but the nutrients in the water as they plan on putting plant food in the water. As the water trickles down to the next group of plants, there will be less nutrients in the water  since the higher plants would soak it up.

Additionally, both groups gave us substantial feedback on our design in terms of the physical design as well as improvements to think about. Most feedback involved the design of the legs for our coffee contraption as the current prototype does not allow for a cup to be placed under it to catch the coffee. This is something for us to look in further prototype versions. We were thinking of potentially taking another group’s advice and making a tri-pod design for the contraption.  Tune in next time to see what direction we went in!

The Iterative Design Process

Hello everyone!

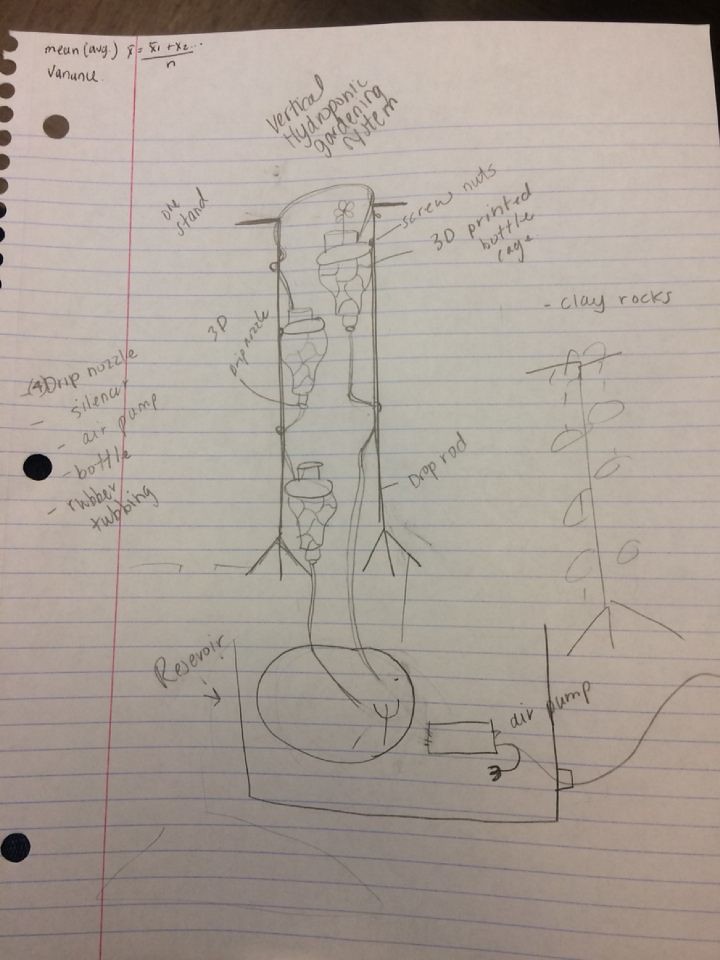
This week we spent time with our project teams really solidifying our prototype and ensuring we have all the correct materials and skillsets to be able to build and complete the project. Our team is working on building a hydroponic vertical garden since we all enjoy indoor plants and thought it would be a great way to gain a new set of skills not only building a plant watering system/ vertical garden but also incorporating sensors into the product to make it more user friendly and set it apart from the current vertical gardens that many people already have in their homes.

One main takeaway I have from this project so far is that design and prototyping is an iterative process. Many factors play into how the final product actually turns out, some of the factors that have changed our prototype so far have included:

  • Available Materials
  • Skillset Required
  • Timing needed to print certain parts
  • Resources available to learn from
  • Feedback from potential users
  • Personal design preferences

There are many moving parts with our product since we have the structure that will act as the backbone for the watering system and the plants (including the piping and drip water system as well as the base and water reservoir), the cages to hold the plants, and finally the electronics used in making our plant system a “smart” hydroponic system. Our ideas for the structure changed when we visited the FabLab last week and picked up a large PVC pipe that would be ideal as the main support. We then adjusted our prototype to include this since it was free and available material, decreasing our material costs. We also decided to incorporate a water level sensor into the product to track how much water is left in the reservoir over the air quality sensor (dusduino) due to the availablility of materials and user feedback. The water level sensor provides valuable information to the user as to when they need to fill the water whereas the dust sensor would have purely been to see how effective the product was. Our design and idea for the sensor changed again when we visited the FabLab on Thursday and learned that instead of buying a water sensor online, it is easy enough to build one out of wires within our water reservoir bucket for much cheaper than the initial sensor cost. This week we will be focusing on putting all of the moving parts together and testing out our product. After we have the backbones for the system in place, we will be getting the plants and other necessary items for them to present during the final presentation.

I’ve already learned so much from this project and all of the others in the class, I look forward to seeing how the other products progress this week and in the coming weeks! Thanks for reading!

Putting pen to paper: Prototyping

This week really put things into perspective on how much detail will be required for our final project. That being said, our team 3Dream put pen to paper and started prototyping! By completing all of the readings and watching the videos, it was clear that prototyping is a must even if you are not sure on all of the details.

Why prototype?

Creating a prototype is crucial to the design process. It allows for the users to put their ideas into a model and make revisions if needed, omit aspects, keep others, and include additional components. Futhermore, by prototyping before production begins, it is possible to see what specifics parts, materials, and additional resources will be needed and be ordered in advance.

3Dream’s prototype

We created a lo-fi prototype which was a quick and simple hand-drawn sketch to demonstrate the core functionality of our project. We actually developed two sketches. The first prototype really helped us get a sense of what we wanted out project to look like.  It was a rough sketch but really helped in the process of fine tuning and simplifying our project to a cleaner model. We got an idea of what materials will need to be purchased as well as which can be found at the FabLab or even printed ourselves! Below, you can get a sense of what our project will look like and see the differences in our first model to the second one.

Prototype 1

Prototype 1 Continue reading Putting pen to paper: Prototyping

Design Thinking

This week, the required reading titled “Design Thinking”  by Tim Brown addressed how businesses are requiring innovative thought processes in order to stay at the forefront of its competitors. A firm that specializes and is often used by companies to acquire innovations is IDEO. IDEO is a global design and innovation company that hopes to create a positive impact through design.

IDEO is so innovative because they do not have a standard way of creating solutions…

Design for America 

To get a better understanding of design thinking, we had workshop from the University’s Design for America team. The team consisted of a diverse group with different majors and different ages. We were tasked to create a product for a visually impaired university student who wanted to feel more connected to her peers and attend social events held by the university. In order to to create a product, we had to go through a design process.  The first stage was to understand our consumer, then create the product.

This design thinking was foreign to me, and I found it challenging not to create a product after hearing the problem from our “client”. But, DFA’s process allowed for a much better understanding of our client and to dive deep into their world and struggles.

Create /Prototyping 

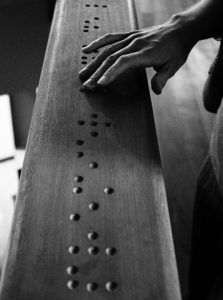
Our team brainstormed and wrote out potential solutions on sticky notes until we were ready to create.  We focused on making football stadiums more of a friendly environment for the the visually impaired and decided to add brail all around the sports arena. It doesn’t sound that innovative, yet it has not been done. One thing that the DFA’s team kept reminding us was that if helped at least a few people, then that was good enough. So, we stuck with our brailed railing at the sport arena since we figured it could be easily implemented around the facility and braille could be added to the existing railing for a tactile experience.


Readings 

Fascinated by IDEO, I looked more into the firm and its current projects centered on design thinking. Recently, the challenge they faced was to expand Zalando’s human-centered design capability. The outcome was “The Studio”, a jointly run innovation lab that prototypes and builds digital products.

https://www.ideo.com/case-study/cultivating-creative-competitiveness-for-europes-biggest-fashion-platform

Thank you for reading my blog and I hoped you learned something! See you next week!


Inspiration, Ideation & Design

This week’s class was made me feel as inspired and creative as I did when I was little and the world was my playground. Design for America came in to give a presentation on the Design Process and walked us through the process for a certain group and issue from understanding the client to crafting a solution.

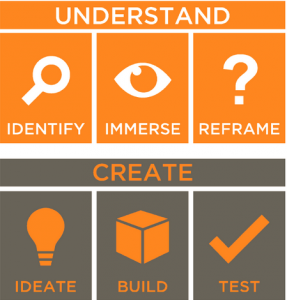
I have learned and utilized the design process once before in an industrial design class, taught by David Weightman who also introduced the idea of design thinking in our pre-class video. I really enjoyed this Design storm session because it completely encompassed and quickly introduced us to each step of the design process in a condensed form. Below you will see the 6 steps in the design process that Design For America (DFA) follows when working on any of their projects.

They walked us through each of these steps with an example situation by introducing different personal stories who each struggled with a certain aspect of life due to their blindness disability. They had already completed the first step by identifying our target group and users for the design. Our group chose to focus on solving the issue of anxiety when in unknown social situations for Jess, a blind college student. The second step in this process was immersing ourselves in our user’s world by making assumptions about how she sees the world, what she feels, thinks, hears, says, does, wants, and needs. Part of the design process is coming up with a bunch of ideas each on separate post-it notes to visualize and determine the most important ideas. After making assumptions, we were able to build “How Can We… statements” to better narrow our focus for the project. Our group came up with  a few statements focusing on bettering the social environment of Football games for students who are visually impaired.

Ideation

After framing and understanding the issue and potential client, we delved into the ideate portion with an individual and then longer group brainstorm sessions. In this part of class, we came up with as many solutions to the issue as we could find. One of the ideas I came up with was a railing with various textures that would differ depending on the place where you are in the stadium. We ended up adjusting this idea in our group brainstorm session to become our product and mockup in the Build portion of the process.

Prototyping

We ended up designing a railing that would surround the entire stadium and have brail labels for each different area (such as student section, hot dog stand, ect.) to help with navigation throughout the stadium hopefully decreasing uneasiness of the unknown. We presented this to the class and they had mainly positive feedback however during the ideation stage we wished we could ask questions to the user group to determine whether our solution would be useful.
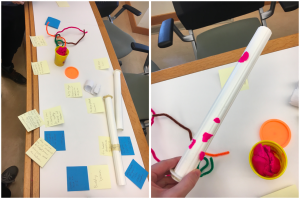
Overall, this class opened our eyes to the design process and I look forward to transferring these skills towards our own ideation process towards our semester project.

Further Learnings from Printing Fusion Design: Nozzle Size

As a side note: Last week I printed the desk cord organizer that I had designed using Fusion 360 and have included pictures of the final product as well. With each print, I learn something new. This, like the phone stand had a balance issue however I could solve that by using a command strip to attach the organizer to my desk so that the cords would not immediately pull it towards the floor and it works quite well.
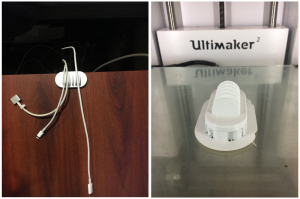
Additionally, the first few prints I didn’t understand how the nozzle size impacted the print, however I now know that using a 0.4 nozzle is typically the standard however will be much slower to print than the .8 nozzle. This makes sense, thinking about it as the .8 extrudes twice as fast due to the larger size, it is able to cut the print time in half. The down side of this is that it may not be able to capture as many small details if there are thin lines. Additionally, I learned that if using supports, it is quite difficult to remove .8 supports however .4 supports are easy to remove due to thinner lines and less strength in the material. If interested in learning more about how the nozzle size impacts the print you can refer to the 2 links below that I used.

https://craftunique.com/forums/view-thread/1254 

https://rigid.ink/blogs/news/what-3d-printer-nozzle-size-should-i-use-the-pros-and-cons 

Learning the Design Process

Design for America Overview

Hello! This past week our class was able to learn the Design Process from our University of Illinois peers at Design for America (DFA). “Design for America is an idea incubator, a motivated community, and a way of approaching complicated challenges. DFA shapes the next generation of social innovators” (http://designforamerica.com/). The individuals representing DFA were very knowledgeable in guiding us through the process and offering great insight. I have a good friend who has worked closely with DFA; this relationship has actually resulted in a successful startup company: Therapalz. Check out the company’s website here: http://www.therapalz.com/. Essentially, Therapalz creates smart therapeutic companion animals for patients with Alzheimer’s. These customizable animals have realistic heartbeats, lifelike sounds, and calming vibrations to provide additional comfort for patients working through this challenging disease. Please keep this success story in mind as I guide you through the Design Process we learned from DFA because it gives a strong indication about how perseverance through this process can produce great results.


The Design Process

The stages of this process are: Identify, Immerse, Reframe, Ideate, Build, and Test. Identifying involves simply observing or researching a challenge. Once it is identified, we must immerse ourselves into learning every piece of information about the challenge. Then we move into the reframe stage which is where the problem is further narrowed down through the insights we have gained through the previous two steps. Once we understand the specific challenge, we then begin creating in the ideate stage. This means writing down each and every possible solution to the problem. We then begin building prototypes based off of these potential solutions. None of these prototypes should be considered final because they should be built up, torn apart, and iterated to better model a viable solution to the challenge. Finally, we test the model with the end-users. We will go back and forth between building and testing until a final solution is pinpointed.

We were able to go through this process by analyzing a case involving an individual named Brian. Brian is an aspiring entrepreneur in the Austin area who faces challenges when navigating the city due to being blind. My team was able to simulate the Design Process by going through each of the steps with a goal of figuring out the best plan for Brian. We came up with the idea of helping Brian navigate by teaching him with two of his senses other than sight: touching and hearing. This would be accomplished by giving Brian a 3D-printed map of his route with depth features indicating roads, buildings, turns, etc. along the path. The 3D-printed object would allow him to become comfortable with his route before having to take it; his sense of touch will give him further confidence in memorizing the path. Second, we would leverage his sense of hearing to guide him step-by-step in real-time while he is walking his route. This will be aided by his phone-based GPS and headphones. Ultimately, we believe Brian will gain much more comfort and confidence through leveraging two of his stronger senses and the technology we designed.


Wrap up & Thank you

Overall, learning the Design Process helped bridge the gap between the real-world challenges that our class has been identifying and the skills we have learned in regard to 3D printing. Prior to this session, we did not have a specific path to follow when connecting our challenges to 3D printing (we simply 3D-printed without much end-user consideration/prototyping in mind). Now, we have the skills necessary to Identify, Immerse, Reframe, Ideate, Build, and Test our ideas. As evident in Therapalz, a challenge was identified, the Design Process was leveraged, and now patients with Alzheimer’s are living more comfortable lives (see video below). I am excited to use this framework to get started on our class’s semester project with my teammates. Thank you for taking the time to read my post this week.


-Scott Provenzano


Sources:

http://designforamerica.com/

http://www.therapalz.com/