
Week two at the Fab Lab certainly did not disappoint—in order to complete our projects, we learned how to laser cut wooden boxes and add our own designs as decoration. I was a bit nervous about the workshop after last week’s challenging embroidery lesson, but it was surprisingly straightforward (mostly because Clinton was such a patient instructor.)
We used a combination of Adobe Illustrator and PE Design to come up with the specifications for our boxes, starting with the dimensions. We then had to remove the “teeth” of the cutouts, since we needed the top portion of the box to be completely flat—this proved to be somewhat tricky because the software can be a bit finicky (apparently there’s a difference between double and triple clicking) but with Clinton’s guidance, I was able to modify the box the way I wanted to. We outlined the things we wanted cut out in red, and then objects filled with black were meant to be shaded in on top of the wood as a design.
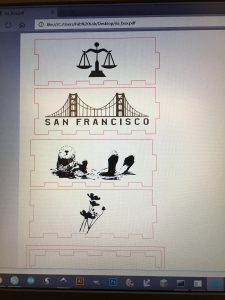
Finally, we added various silhouettes to the sides of our boxes as designs. I chose images of things that were significant to me, like my hometown of San Francisco, and the otter, my favorite animal. Here’s what the final version looked like:
We uploaded our designs to a flash drive, and Clinton fired up the machine—I was amazed to see how quickly it moved back and forth to replicate the designs originating from our computers. While I couldn’t stay to see my own finished product, I was able to watch another classmate’s design come to life:

I’m looking forward to putting together my box next week, along with the embroidered top. It’s been a wonderful learning experience and I feel like I’ve gained two new skills which could serve useful in a variety of ways. I’ll be sure to post photos of the end result once it’s done next week!