Tag Archives: Fusion 360

Week 4: Fusion 360 Introduction

This week in class we had a guest presentation on Fusion 360 from Dan Banach, who has more years of experience with modeling software than most of us have been alive. Although I have some experience with modeling objects on a computer before, Fusion 360 was a completely new software for me and by far the most complex. Going through the process of modeling an object with Dan was incredibly helpful because he showed us how simple it is to create something on Fusion and a lot of tips and tricks that make Fusion much easier to use. His presentation made me a lot more comfortable with my ability to effectively use Fusion.

http://a360.co/2BTNxcA

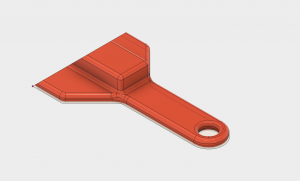
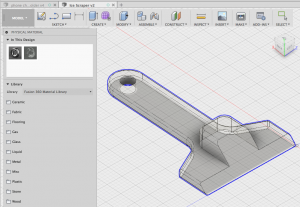
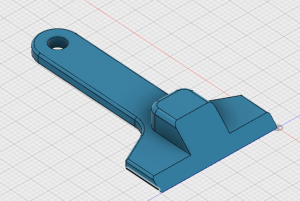
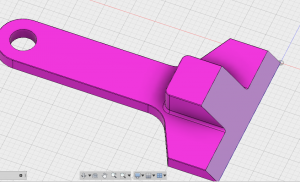
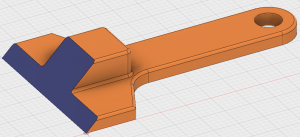
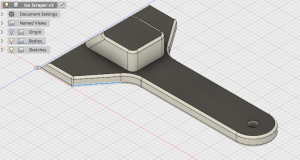
The ice scrapper we modeled together in class was really cool to go through. For the most part I kept up with Dan as he moved through the steps of creating the object but I did learn that it is easy to make a simple mistake that will essentially stop your progress. As I was creating the 2D shape of the ice scrapper, I forgot to put a restriction on one of the lines and that prevented me from being able to create the thumb grip that goes on top of the ice scrapper. Luckily, due to the ability to go back to previous steps in the design in Fusion, Dan was able to figure out what I did wrong and help me fix it quickly. I also struggled with getting some of the edges to fillet as I kept getting an error telling me it was not possible. Somehow I got it to work although I still don’t know how I got it to work. Overall, this ice scrapper is something I definitely want to print because I can see myself using it a lot.

http://a360.co/2BU36RK

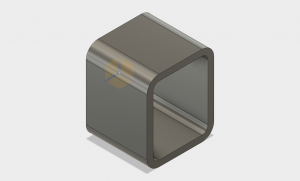
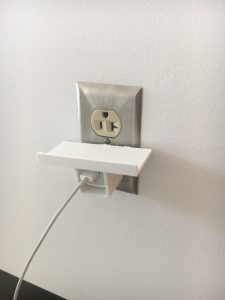
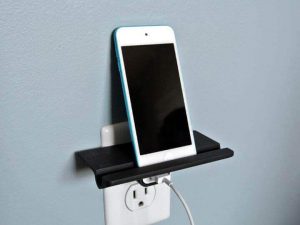
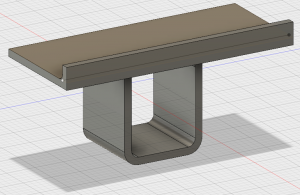
While attempting to make the phone shelf, I struggled with getting the actual shelf to merge to the charger mount. For some reason it kept going into the middle of the mount and would not sit on top. Unfortunately my laptop died before I could finish it so all I have is the shape of the mount.

http://a360.co/2BsHGtA

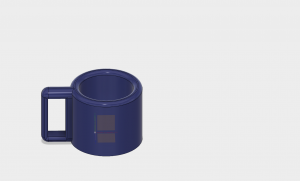
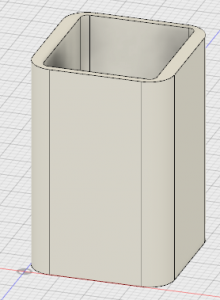
When thinking of an everyday object to make I immediately thought of a coffee mug because I drink at least 4 cups a day and tend to collect mugs. I also figured it would be relatively easy to model. I’m not sure how effective a 3D printed coffee mug would be but modeling one is great practice.  While making this I used a lot of the steps that Dan showed us and it really made a difference.

https://forums.autodesk.com/t5/autocad-forum/view-cube-stops-working/td-p/3026626

While researching some issues I had with Fusion 360, I found that the forums on the Autodesk website are very useful for finding solutions for bugs or other issues. There are hundreds of people out there that use Fusion so if you have a problem there’s a good chance someone else has it and already found a solution.

Discovering the Beauty of Autodesk Fusion 360

Overview:
This week we had Dan Banach from the Autodesk 360 company run a workshop introducing Fusion 360 software, the uses for it as well as walk us through creating our own models. We went through and made 2 different items, which I will discuss in detail later, while introducing many different functions and tools within Fusion 360. Dan had a slide discussing the various industries and companies that use Autodesk software, one I was surprised by was the movie industry and special effects. Many films use Autodesk software to design and create special effects. I am absolutely amazed by the capabilities this one software has and look forward to honing my skills in the coming months to be able to better design and create objects of value.

Fusion 360 Creations:

Our first item we designed was an ice scraper. In this workshop we walked through over 20 different tools within the software in order to create the exact look we wanted. One neat feature within Fusion 360 is that you can change the material of your creation. This then allows you to determine the specs, for example how much it weighs, which would then tell you how much it would cost in time and money to 3D print. I was also amazed by how many material options there were to model items in including metals, ceramics, paper, canvas, and even water.

In class we designed 2 items: an ice scraper and an iPhone charging stand. The phone charger I kept as the plastic PET material (since that is typical for 3D printing) thus why it is transparent, while the ice scraper I applied a “paint” layer to color it teal.

Ice scraper: http://a360.co/2snHF7x
Iphone charging stand: http://a360.co/2BpSWas

I thought the iPhone charging stand would be a useful item for my everyday life and was interested in seeing how the fusion file transferred into Cura to 3D print. I ended up printing this model and was excited to try it however, it is not very functional. The section that goes around the charger is too large to stay easily and when you put a phone on the shelf it is thrown off balance and falls to the floor. I was happy that I printed it because I got to see the iterative process, not everything comes out exactly as planned however you are easily able to go back to the drawing board and adjust the design for improvements. 3D printing is a series of trial and errors which makes it that much more exciting when you print something that works exactly as planned.

My Own Fusion Creation:

As for my own creation, I decided to make something to keep my electronic cords organized on my desk. I plug quite a few different cords into an outlet below my desk and have been getting annoyed that they fall off my desk and get tangled thus I’m constantly picking them up. This figure is a way to help keep the charging ends of cords on my desk. I incorporated a small shalf to keep it from sliding all over my desk however I still think it will need to be secured with a command strip. Hope this is of use to others! I’m excited to try printing this this week and will share updates on how it goes!

http://a360.co/2Bov1bl

Resources:

The most useful resource I resorted to throughout this small project is actually Autodesk’s Support & Learning page. They provide wonderful tutorials, explanations and examples of many different tools as well as products that you can use when creating your model. I found the tutorials quite helpful.

http://help.autodesk.com/view/fusion360/ENU/

3D Modeling with Fusion 360

Another software has been learned!

This week, our class focused on gaining the skillset and an understanding of the Fusion 360 software. We did this by watching beginners tutorials and learning the interface of Fusion before class which made it easier to follow the guest lecturer Dan Banach. Dan is an instructor  from Autodesk and he is very much experienced with this software. He did a great job at explaining the locations of each function, shortcuts to reach them, the purpose of each tool, as well as providing an understanding of the capabilities that Fusion has to offer. Fusion is the first 3D CAD, CAM, and CAE tool of its kind. It connects your entire product development process in a single cloud-based platform that works on both Mac and PC. ( I recommend using a mouse, I assume it’s easier than my touchpad).

Now, onto the fun stuff! Dan displayed two objects that we would be creating in class: An ice scrapper, and a wall outlet shelf. At first, I didn’t think it was going to be possible to create two objects given the time constraint, but I’m glad to say that we were able to design, test, and fabricate them both.

Ice Scrapper 

The Ice Scrapper was the first object we created and I was very proud of myself for how it came out! I ran into one complication designing it since I created the object on the wrong plane. With assistance from Dan, and a little arithmetic, the ice scrapper is on par and  ready to get 3D Printed.

Wall Outlet Shelf

As for the Wall Outlet Shelf, I had much more difficulties creating it and unfortunately did not complete it. But, I do have an image on what it was intended to be. The shelf fits around most standard outlet charger adopters but it can be customized on Fusion. It is a very clever design with a practical benefit.

The Making of The Martian

One thing that stood out to me during Dan’s lecture was when he mentioned how the film, The Martian incorporated Fusion.  Apparently, there were work flow challenges in creating the stereo 3D world of The Martian which was  fixed using Fusion Studio!

“The shots would come from our artists as EXRs, and we would then run them through our Fusion script which would bake in a new color grade and a heavy sharpen. This meant I could view not only the plate version as provided by the client, but also a heavily graded and heavily sharpened version in the theatre, so I could easily identify any of these small edges. What we produced really hit the nail on the head for the client.”

Prime Focus World, the company tasked with creating post 3D conversions for the film.

Fusion is a very powerful software that I never thought I would learn, but I’m glad that I did. I hope you enjoyed reading,

See you next week!

Learning Autodesk Fusion 360

Overview

Hello! This week we learned how to use Autodesk Fusion 360. I originally thought that Tinkercad online was the coolest software, but now I understand how much more superior Fusion 360 is in comparison. While both of these programs are owned by the same company, I was ecstatic to jump into Fusion 360 because of the extended capabilities within the program.

We were fortunate to have Dan Banach come talk to our class and walk us through creating a few designs (shown in the next section). Dan is an instructor from Autodesk,  and he was extremely knowledgeable and helpful as we learned this (to most of us, completely-new) program. One of the neatest things I learned from Dan is that Fusion 360 is used by many large movie production companies to add in animations and special effects to films. As someone who would love to work in the entertainment industry someday, I found this extremely interesting. I think it is so neat that a company can essentially create a character within this program, animate it, and make it come to life in a film. I plan to dive deeper into the animation aspect of this software as I gain more expertise in designing objects. Check out some of the designs I’ve created over the past week in the next section!


Autodesk Fusion 360 Designs

Valentine’s Day Paperweight – I created this when I was playing around with Fusion 360 because I figured that with Valentine’s Day coming up, some of my peers might find it useful. As a college student, it’s easy to let holidays creep up on us. Thus, I thought it’d be useful to share this idea with the class incase they would like to print a Valentine’s Day 2018 heart paperweight for their significant other: http://a360.co/2FVSKP6


Ice Scraper – This was the first object that we created with Dan. He walked us through each and every step, so we were able to learn a lot of crucial details right off the bat. This design essentially consists of two shapes: a long T-shape on the bottom and a rectangle block on top. We used the fillet tool, used the chamfer tool, and created a hole. It was also neat to learn how to apply paint to the object. This skill will definitely come in handy when using this program to create objects and present to clients/managers! http://a360.co/2GTF1JP


iPhone Charging Holder – This was another one of the designs that we created in class with Dan. It was surprisingly simple to make after extruding the rectangle on the bottom, putting a hole in it, and then extruding a rectangle on the top. With some minor tweaks with the fillet tool and some additional details, we were able to come up with the following design: http://a360.co/2EqneLX


Pen Holder (Everyday Object) – For my everyday object assignment, I chose to create a pen holder. I chose this object because I was looking at my desk and brainstorming what I could use on it. With many pens/pencils laying around, it was a no-brainer. I began by extruding a square (2” x 2”) up by 3”. I used the fillet tool to smooth out the side corners, and then extruded a smaller square from the top of this block down towards the bottom (thus creating the open space within the pen holder). I stopped extruding before I hit the bottom so that this object would not be open the entire way through; I used the fillet tool once more to smooth out the inside walls and was left with the following object: http://a360.co/2G3LQHJ


Further Thoughts

Overall, the skills I have learned over the past week have been very useful in my path to becoming a better creator. My plan is to stay fresh with the content that I have learned and continue creating more in-depth/complex objects.

Since I noted how interested I am in this software being used for animations in movies, I found the following video that shows how animations work (for beginners) in Fusion 360. Definitely check out this short video because it shows how simply we can now animate the designs that we create: https://www.youtube.com/watch?v=iJkI6N8VAiY

Thank you for taking the time to read my post. I hope you are having a great day, and I look forward to checking back in with you in a week!


-Scott Provenzano

Putting Skills Behind The Idea (Week 4)

What happened this week?

This week, Dan Banach from Autodesk led a workshop on Autodesk’s Fusion 360. Fusion 360 is a 3D CAD, CAM, and CAE tool. The software allows modeling for both on and off-screen objects – you can create an onscreen model to share across the cloud or create a model intended to become a physical reality. I’ve used a couple of simple CAD software before, but Fusion 360 has a lot more capabilities than Sketch Up or other beginner CAD programs.


What did I learn?

The workshop was indeed helpful. Sometimes students just need someone to go through the material slowly and work the problem all the way through. This is exactly what Dan did when he taught us how to make an ice scraper and phone charger/holder. Throughout my college experience, I’ve found that there is little I can’t learn myself if I have the material. But as a student in several classes, a member of RSOs, and a student worker, I know I do NOT have the time to teach myself everything I’d like to know! That’s why Dan’s workshop was so effective for me. I technically could have sat down and learned all the beginning commands for Fusion 360 by myself (and I did a bit through looking at the prep videos), but having an instructor take you through step by step kind of forces you to learn it. I have so many programs and things I want to learn about myself, but I never seem to get to it. I guess this commentary lends to the overarching reason I’m taking this class – not only does Vishal and his speakers, students workers, and lab resources provide me with incredible learning tools, it forces me to confront this interest of mine and actually do something about it.


That being said, my ice scraper turned out perfectly, but my phone charger/holder very much did not. I spent the last 15 minutes of class trying to figure out how to change the plane my rectangle (to become the phone rest part) was on. I’ll attach the pictures of both designs below. As you can see, the ice scraper is pretty cool, but my phone charger/holder is not finished. I’ll need to figure out how to move that plane and finish my design, so I know what to do when that problem pops up again in the future. Unfortunately, I do not own a car and when I do get a car this summer when I begin work, I won’t need one (I’ll be in L.A. where it never snows)! So, I won’t waste the material and print out my ice scraper, but I hope to design something I can use out in L.A. in the future.


So what?

Truth be told, I was really inspired by Jeff Ginger’s talk last week and am still thinking about the incredible work he and the FabLab does. The past two weeks, I’ve been more focused on “how can I use 3D printing and the making world to create a job for myself and help others”. But this week was really about adding to my technical skills, so I can make that a reality in the future. I realize I am not an engineer and don’t have the base-level technical skills many people in entrepreneurship and the more technical making world have. So, while I will continue to think about my big, long-term business ideas, I’ll shift more of my focus to adding to my technical skills so I can actually carry out those ideas.


Now what?

My group needs to start narrowing down our product ideas in the next couple weeks. As we learn more about the printers and design programs, it’s becoming clearer which of our ideas can and can’t become realities based off our current capabilities. Next week, our class is centered on design thinking, something I’ve covered in a T&M product design class before. I’m excited to hear about how the 3D printing and making world changes the framework of this lesson.

Learn More about Fusion 360:

Why 360 over other softwares?

The 5 Things That Made Me Take Another Look At Fusion 360

Beginner Projects for Fusion 360:

https://gallery.autodesk.com/fusion360/projects/beginner-project


Fusion 360 Assignment

I used a tutorial to make a lampshade for a cord and light kit I have. Here is the shared link: http://a360.co/2G3q2vS.

I learned how to create a circular pattern, how to insert planes, and how to rotate a parameter to create a 3D image. I hope I can actually print this!