Tag Archives: Inkscape

Fab Lab and Laser Cutting

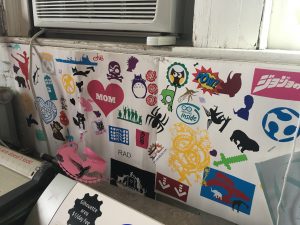
This week I went to the Fab Lab that we have on campus.  I never realized that this place existed, but I am so very glad that I now know of it. I plan to visit it later this week to create customized stickers for an organization that I am a part of! The FabLab is opened to the public and is a space that encourages people to be makers and try out different techniques and processes.  With the wide range of tools being offered, I worked with the universal laser system X-600.

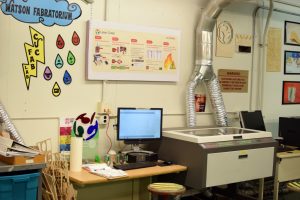
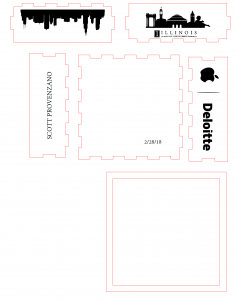
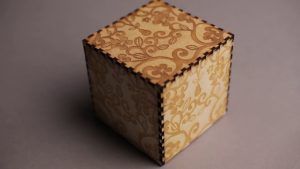
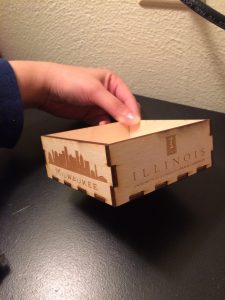
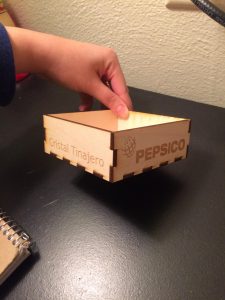
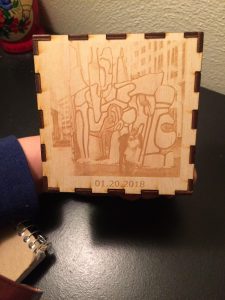
The goal was to make a customized wooden box that would use the system mentioned above. But, first I needed to create and design the different parts of the box on a software known as Inkscape which is a free and open-source vector graphics editor similar to Adobe Illustrator. As any new software, it took some time getting used to it, but it wasn’t too difficult! For my box, I wanted it to capture the highlights of my senior year. I also wanted to test how well the laser would would construct the details of a digital photo image that I took. I included that image on the bottom of the box for safe measures. Next, I needed to transfer the design to the laser system software, select my material as well as brighten the digital photo for better quality.  I placed the ply wood into the system and then began the laser process.  I was really impressed by how the final product came out and I am pleased with the overall quality of the shadow box.

One thing that I did noticed when the plywood was being lasered, was the small fire that emerged from time to time. I wondered if this was problematic with the system or if it is considered to be hazardous.  I found out that laser safety standards are well established and relatively harmonized internationally. And that those standards establish four broad classifications of laser safety for products. The classifications range from Class 1, in which the laser energy is fully contained within the laser system and the operator is not exposed to any laser energy, to Class 4, in which the laser system does not have containment provisions and the operator can potentially be exposed to high levels of laser energy.

https://www.ulsinc.com/

Final Project

Ultimately, we have decided that for our final project we would like to incorporate 3D printing into window farms. We would like to create a window farm that uses various sensors and a micro-controller to sense its environment and adapt accordingly. After doing some more research,  we would like to work with vertical hydroponic gardening systems. These plants do not use soil to grow but rather use mineral solution nutrients. I am very exciting for our project and I am looking forward of the development of it.

That concludes my blog for this week,

Thanks for reading!


First Time at the Fab Lab

Overview

Our class had the pleasure of being hosted by the Champaign-Urbana Community Fab Lab this past week. I have mentioned this lab in a previous post, but as a recap: The Fab Lab is “an open and collaborative workshop space for computer-driven innovation, design and fabrication” (http://cucfablab.org/). Essentially, this establishment allows individuals of all ages to utilize making resources to bring their creative ideas to fruition.

We began our class with a tour of the Fab Lab. The space is located in the second oldest building on U of I’s campus, so there was definitely an historical feel to it! We got to see some of the different machinery such as a sticker laser cutter, 3D printers, wood laser cutter, threading machines, etc. (see pictures below with sticker examples and other creations). I am very thankful to have had the opportunity to explore this space before graduating because it exemplifies some of the most technologically advanced equipment available to the Champaign-Urbana community–I only wish I had known about/visited the Fab Lab sooner!


Creating at the Fab Lab

Our class was split up into two groups so half of us could learn a certain skill this week and then another next week, while the other half of the class would learn vice-versa. This week, I was a part of the group that got to learn about laser cutting on wood. We began by learning how to navigate the program called “Inkscape”. Inkscape is essentially a free, open-source version of Adobe Illustrator. We utilized this program to build the design for our boxes (see my design below).

The red lines in the picture above represent where the laser cutter will cut straight through the wood (similar to cutting out a puzzle piece). The black silhouettes represent where the laser cutter will etch the drawing. What this means is that the black silhouette designs will not be cut all the way through the wood like the red lines will be, but rather etched to appear as an image. See the image below to get an idea of how our boxes will look:

I should be able to utilize the laser cutter next week to create my box, so I will include a photo in an upcoming post showing the object come to life! One of my biggest takeaways from utilizing Inkscape was understanding the amount of time and attention to detail that the creator must have in order to successfully create an object. While the programs that we utilize are powerful, there is still tremendous room for human error. I think this takeaway stood out to me because I had the preconceived notion that we would be able to just click a few buttons on the program and have it spit out a box. The reality was that I had to create this box with proper dimensions, modify each of the notches/outlines, and ensure that each of the lines were as straight/aligned as possible (which was a lot harder than expected). I enjoyed learning on Inkscape so much that I actually downloaded the program on my personal computer! Going forward, I plan to explore the different capabilities in this program along with some of the previous softwares we have learned in this class (e.g. Fusion Autodesk 360 & Cura). I firmly believe that this has been the most valuable course I have taken in college to teach me tangible skills. I love that I am genuinely interested in the area of technological making, and I am confident these skills will come in handy next year when I am starting full-time as a Technology Consultant.


Thank You & Looking Forward

Thank you for taking the time to read my post. Next week, we’ll be learning about conductive thread. Specifically, we will learn how to sew conductive thread into cloth, which will allow us to add another feature to our laser-cut boxes. I can’t wait to share pictures of my creations with you next week!


-Scott Provenzano


References

http://cucfablab.org/