Tag Archives: 3D Modeling

Shapeways and Shaping The Way to Our Project

We had the privilege of hearing from an employee at Shapeways and even got to get an inside view of the company! While we set up to have a presentation, the employee showed us around the company and the different things they were working on. It was really amazing to see people working with 3D printing in so many ways and different methods of coming up with the same product. She mentioned how there is an efficient way to print multiple projects at the same time using some sort of 3D printing using compression and cohesion of some sort of dust or powder using the Binder Jetting Technology available.

Its great to find out that improvements are still being made within the 3D making industry that can make things more efficient and faster and waste less of our resources that make it more of a possibility for future projects and developments to make use of 3D printing!

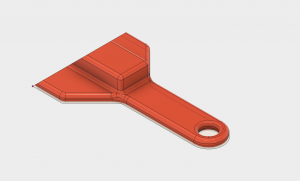
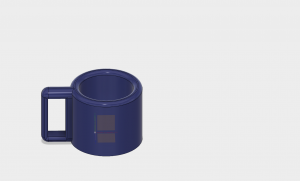
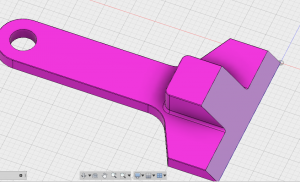
After the presentation from Shapeways, we went into our groups to begin the actual specific blueprinting for our project! We began with the base design which we intend to be a sort of 3 part design for the pour over coffee project we are working on that will ease the process of making pour over coffee as well as making it a lot more time efficient. Once we got the base design we started thinking of modifications and improvements for the design that include resizable base legs for different sized cups and mugs as well as screens that we can slide into the design that will help control the speed at which the hot water from the pour-over coffee contraption is falling through to the actual coffee and mug.

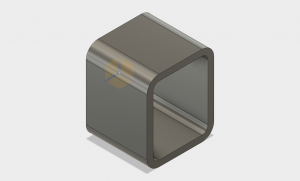
After designing our device, we went to discuss with Vishal more specifics including the issue of using hot water with the PLA material we have in class. He gave us the idea of using thin sheets of metal to use inside of the PLA printed structure to withhold the heat of the water. We are planning on meeting with people from the FAB lab to help us with our design as well as with the idea of using the thin metal sheets in our design!

Sewing Constellations

This week we had another visit to the FAB Lab in order to continue with the workshop where we are creating a box with a canvas that has an embroidered design all designed by us. This class was focused on the final step of the workshop where we are to sew on a design to place lights onto our embroidered canvas where the lights will add to the creativity of our design.

In order for us to successfully create a piece with lights in it, we first learned a bit about circuits and how the battery and lights we are sewing on to our piece are working together. One of the students from the FAB Lab that was assisting with the workshop named Duncan began to teach us about circuits a bit before we began sewing. We learned about the difference between parallel circuits and series circuits, where parallel circuits have lights that are independently connected to a power source and do not need each other to light up and series circuits have lights connected to each other and the power source, so they all need to work in order for them to light up. We also learned about the dangers of crossing negative and positive ends of the battery as they can cause the entire circuit to not work. Once we understood that, we were able to design our lighting plans for our canvas on paper, which we then used as the foundation for the actual sewing design for our piece.

Once we had our design and understood how the battery and circuits worked, we were handed some LED lights (2 or 3 depending on our design/preference) and some conductive string that can pass an electric current through itself in order to reach the lights and light them up. We thread the needle and proceeded to sew in our design. Many people in the classroom had amazing and creative designs. One of my favorites was a student who had the embroidered design of a lion’s face from the lion king and had placed the two lights perfectly on the spaces for the eyes of the design. After a lot of trial and error and many mistakenly crossed negative and positive wires, I too, was able to finish my design and place two lights at the top of my embroidered design. Since my design for my canvas was a couple dancing together on a sort of stage, I decided to place the two lights on the top right and left corners of the “stage” to seem like stage lights and complete the theme of my design. I was overall very happy with my design and grateful to have learned as much as I did from the workshop.

Week 4: Fusion 360 Introduction

This week in class we had a guest presentation on Fusion 360 from Dan Banach, who has more years of experience with modeling software than most of us have been alive. Although I have some experience with modeling objects on a computer before, Fusion 360 was a completely new software for me and by far the most complex. Going through the process of modeling an object with Dan was incredibly helpful because he showed us how simple it is to create something on Fusion and a lot of tips and tricks that make Fusion much easier to use. His presentation made me a lot more comfortable with my ability to effectively use Fusion.

http://a360.co/2BTNxcA

The ice scrapper we modeled together in class was really cool to go through. For the most part I kept up with Dan as he moved through the steps of creating the object but I did learn that it is easy to make a simple mistake that will essentially stop your progress. As I was creating the 2D shape of the ice scrapper, I forgot to put a restriction on one of the lines and that prevented me from being able to create the thumb grip that goes on top of the ice scrapper. Luckily, due to the ability to go back to previous steps in the design in Fusion, Dan was able to figure out what I did wrong and help me fix it quickly. I also struggled with getting some of the edges to fillet as I kept getting an error telling me it was not possible. Somehow I got it to work although I still don’t know how I got it to work. Overall, this ice scrapper is something I definitely want to print because I can see myself using it a lot.

http://a360.co/2BU36RK

While attempting to make the phone shelf, I struggled with getting the actual shelf to merge to the charger mount. For some reason it kept going into the middle of the mount and would not sit on top. Unfortunately my laptop died before I could finish it so all I have is the shape of the mount.

http://a360.co/2BsHGtA

When thinking of an everyday object to make I immediately thought of a coffee mug because I drink at least 4 cups a day and tend to collect mugs. I also figured it would be relatively easy to model. I’m not sure how effective a 3D printed coffee mug would be but modeling one is great practice.  While making this I used a lot of the steps that Dan showed us and it really made a difference.

https://forums.autodesk.com/t5/autocad-forum/view-cube-stops-working/td-p/3026626

While researching some issues I had with Fusion 360, I found that the forums on the Autodesk website are very useful for finding solutions for bugs or other issues. There are hundreds of people out there that use Fusion so if you have a problem there’s a good chance someone else has it and already found a solution.

3D Modeling with Fusion 360

Another software has been learned!

This week, our class focused on gaining the skillset and an understanding of the Fusion 360 software. We did this by watching beginners tutorials and learning the interface of Fusion before class which made it easier to follow the guest lecturer Dan Banach. Dan is an instructor  from Autodesk and he is very much experienced with this software. He did a great job at explaining the locations of each function, shortcuts to reach them, the purpose of each tool, as well as providing an understanding of the capabilities that Fusion has to offer. Fusion is the first 3D CAD, CAM, and CAE tool of its kind. It connects your entire product development process in a single cloud-based platform that works on both Mac and PC. ( I recommend using a mouse, I assume it’s easier than my touchpad).

Now, onto the fun stuff! Dan displayed two objects that we would be creating in class: An ice scrapper, and a wall outlet shelf. At first, I didn’t think it was going to be possible to create two objects given the time constraint, but I’m glad to say that we were able to design, test, and fabricate them both.

Ice Scrapper 

The Ice Scrapper was the first object we created and I was very proud of myself for how it came out! I ran into one complication designing it since I created the object on the wrong plane. With assistance from Dan, and a little arithmetic, the ice scrapper is on par and  ready to get 3D Printed.

Wall Outlet Shelf

As for the Wall Outlet Shelf, I had much more difficulties creating it and unfortunately did not complete it. But, I do have an image on what it was intended to be. The shelf fits around most standard outlet charger adopters but it can be customized on Fusion. It is a very clever design with a practical benefit.

The Making of The Martian

One thing that stood out to me during Dan’s lecture was when he mentioned how the film, The Martian incorporated Fusion.  Apparently, there were work flow challenges in creating the stereo 3D world of The Martian which was  fixed using Fusion Studio!

“The shots would come from our artists as EXRs, and we would then run them through our Fusion script which would bake in a new color grade and a heavy sharpen. This meant I could view not only the plate version as provided by the client, but also a heavily graded and heavily sharpened version in the theatre, so I could easily identify any of these small edges. What we produced really hit the nail on the head for the client.”

Prime Focus World, the company tasked with creating post 3D conversions for the film.

Fusion is a very powerful software that I never thought I would learn, but I’m glad that I did. I hope you enjoyed reading,

See you next week!