Category Archives: week7

Week Seven Class Summary – Introducing the Fab Lab

Week seven marked the start of a very exciting couple of weeks for the class as we begin our three-week stint at the Champaign-Urbana Community Fab Lab. Seeing everyone’s reactions as they walked in, I could tell that this was a new type of space for most of us and that we were all in for a great experience. To start off the day, Jeff Ginger, the director of the Fab Lab, gave us a quick tour of the different types of spaces the lab has and showed us all of the different types of projects and items that could be created and examples of cool things that have come out of the Fab Lab. We were then spit up into two groups to gain experience on either embroidery or laser cutting as a part of our overall project for our time in the Fab Lab.

Embroidery

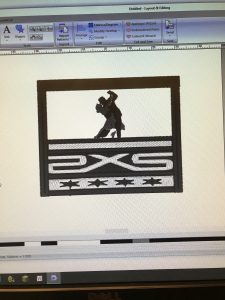
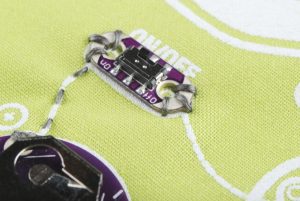
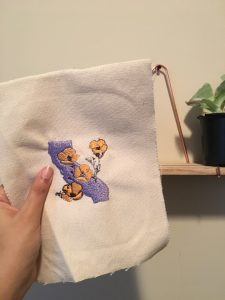
For this section of our class, we learned how to design and create embroidery designs using computer software and a specific type of sewing machine. To start, we were shown how to use the computer software to create an embroidery design. We all found it very simple to create and import images into the software and transform them into embroidery designs. Our instructor was incredible at giving us a lot of tips on how to get the most out of the software and how to customize the design to exactly what we wanted.  We were then shown how to load our design into the sewing machine and the tedious process of loading the thread into the machine.  After some time, we were all able to get our machines set up and watch them create our designs in front of us. Admittedly, many of us were surprised at how cool it was to watch the needle rapidly punch through the cloth and quickly create a physical representation of what we had designed on a computer. As with any type of machine, some of us did experience some issues with our embroideries and were forced to try again. In my case, I had to restart it twice after the cloth bunched up and got stuck the first time and an issue with the thread caused a failure the second time. Overall, we were amazed at what this technology could do. For example, Ajie said “I slowly started to see my lion come to life and I was amazed – though this wasn’t a 3D printer like I was used to, I was still creating ‘something’ from ‘nothing!’ The finished product was actually amazing – the lion looked exactly as I imagined it, and I never expected that I would have loved using a sowing machine so much. This session truly showed me that ‘making’ is much more than meets the eye”.  (Post Link)

Laser Cutting

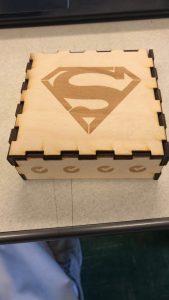
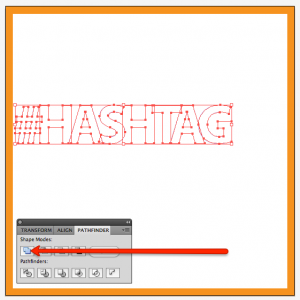
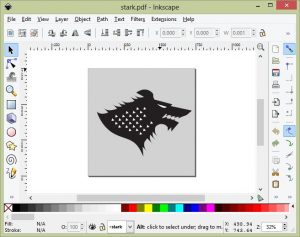
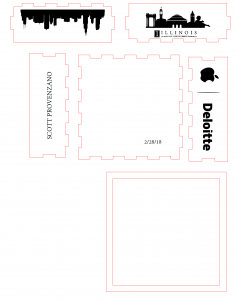
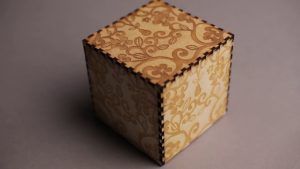
The second of three parts for our three-week project involves learning how to design and laser cut a box for the embroidered design to go on. We first used a program to input the dimensions of our box and create a file that we could then edit. Then our instructor showed us how to use a program called Inkscape to edit some of the edges of the box and then add images. Once we all had our boxes customized, our instructor showed us how to change the lines of the box to tell the laser cutter what to cut versus what to engrave. Overall this process was much more difficult than we had thought. Scott put it in a good way in his post as he says “One of my biggest takeaways from utilizing Inkscape was understanding the amount of time and attention to detail that the creator must have in order to successfully create an object. While the programs that we utilize are powerful, there is still tremendous room for human error.” (Post Link)  Once we had all of our designs finished our instructor taught us about the safety precautions of the laser cutter and then we got to watch as a powerful laser cut through wood like it was butter and engrave images with such incredible precision. It dawned on me then how incredible laser cutters are and how lucky we are to have access to one let alone learn how to use one.

Summary

Overall this was an amazing week for the class as we got our first taste at incredible things that the Fab Lab can produce. Some of us got to create our own laser cut boxes while the others were able to create their own embroidery designs.  The next few weeks will be filled with even more learning and experimentation as we see what potential technologies we can use for our final project.

Getting Creative in the Fab Lab

In class this week, we had the opportunity to spend time in the Fab Lab. I did not know what to expect, but this class period was extremely fun and educational. There are art projects in every corner of the Fab Lab. The environment promoted creative and expressive learning. It was a space that I felt very comfortable. Jeff Ginger gave us an entire tour and showed some projects that were made in the Fab Lab. He showed us a backpack that lit up as turn signals to help kids be safe riding bikes. It was an extremely impressive idea and I think it could be very helpful. Overall, my first introduction to the Fab Lab was successful.

We split into groups and I was given the assignment to create a wooden box. We were given the freedom to pick our own designs; this was a time for us to put our creative ideas to work. We created the dimensions of the box then imported it into Inkscape. This platform allowed us to design and shape our box. I thought it was confusing to navigate and I kept missing a step. These tools take time to get the hang of and a lot of practice. Our teacher, Clinton, was very patient and helpful walking us through the steps. I put a mountain range, globe, “lookin good”, and a sea horse on my box. Printing the box is what was really impressive.

The laser cutter was extremely accurate and detailed. It printed every little piece of the image. It was so cool watching it move and carve. Sometimes the laser would catch on fire, but quickly go out. Clinton told us it was important to monitor the printer because it can easily start a fire. My box turned out perfect; accept some of my pictures were upside down. This was definitely an experiment that I really enjoyed. I am looking forward to returning to the Fab Lab next week.

Check out this article I found that talks more about laser cutting. I have never done a project like this before, but it turns out that there was a lot of information on it. You can do many different projects with a laser-cutting printer. The article talks about how it allows products to reach markets quickly on a lower cost. This could be a great tool for the future and a way for companies to save money.

https://www.manufacturingtomorrow.com/article/2017/11/the-benefits-of-laser-cutting-to-the-design-for-manufacturing-process/10581

Lazer Vision

Rather than our normal location in the BIF, the class ventured over to the FabLab. Once all the stragglers found their way into the lab, Jeff Ginger took the class on a brief tour. Most students had previously heard about the lab because Jeff, the lab’s director, was our guest speaker in Week 3. My tour experience felt like somewhat of an information overload having missed that class. I didn’t have any time to be awestruck however.

Clinton, the lab assistant, began showing me how to design a box for the laser cutter. I was glad to be in Clinton’s group because I love the smell of burnt wood. I was confident I would be able to design a box without trouble after tinkering around with Fusion360. Inkscape, the laser cutting software we were using, turned out to be more difficult. I struggled to measure the box to my liking, despite the simpler Inkscape software interface. Part of the reason I think I had trouble with Inkscape is that I was designing in 2D. Spatial reasoning has never been one of my strong suits, and I had to picture assembling the pieces of the box in my head.

The box design included a wooden base, 4 sides, and a cloth lid that would be fastened by a frame. The laser cutting machine cut these pieces from a single sheet of wood. The speed and precision of the cuts were astounding. Furthermore, the machine has another lower temperature setting for engraving. I placed the Chelsea logo, my favorite soccer team from London, on the largest face of my box. The machine seamlessly switches between its two different lasers and carved the components of my box in no time.

Total cutting time for each box was less than 15 minutes. While we were waiting for a cut to finish, Clinton made a point about how much faster laser cutting would be than 3D printing a box. In class our focus has often been on 3D printing, but this moment showed me that other digital making methods can excel in their own ways. Using the appropriate technology for your projects can end up saving you both time and money.

I didn’t have time to physically assemble my box due to time constraints (hence the lack of pictures). I was shocked that the wooden joints could naturally be joined without any adhesives or nails. This technique reminded me of past readings about construction and furniture manufacturing techniques that don’t require any materials other than wood. I dug deeper into some woodworking techniques and discovered that our boxes are held together by the aptly named box joint. If you are interested in other woodworking techniques without any fasteners, you should check this out.


New Tools, Skills at the Fab Lab

Class Summary

In class this week, we had our first opportunity as a group to explore the community’s Fab Lab making space. I was pretty surprised to find some extraordinary machines and creations in what looked like the oldest building on campus. Our day started off with a tour guided by Fab Lab director (and former guest speaker) Jeff Ginger. We saw several cool creations including a backpack that acted as a turn signal with a face for students who ride their bikes to school. It was empowering to hear that those students were far younger than us and that we would soon be able to create something even more complex. The Fab Lab was much larger and more complex than what we are used to in the MakerLab in the BIF. Yes, the Fab Lab has its own 3D printers, but it also has a plethora of other technology including a wood laser cutter, raspberry pi, and threading machines.

After the tour, the group was split into two groups. Each group was given a different task. Mine was to create a box with no top to it. First, we created the dimensions of the box before importing it into Inkscape, a software that works similarly to Adobe Illustrator and other design tools. We created our box, manipulating various-sized rectangles so that there were interlocking pieces. Then, we were given the chance to import designs onto our box. I chose the Superman logo as well as the logo of my startup, Cover’d. I happily volunteered to be the guinea pig and print my box first. I attached a photo below – I was pretty pleased with the way it came out!

It was really cool to see the laser cutter in action as my box began to take shape.  One mistake that I made was in not mirroring the small logos on the top part of my box. Because the top and bottom sides fit in such a way onto the box, it caused my logos to appear upside down on the unseen side of the box. It was most definitely a lesson learned for next time.

I’m excited to get back to the Fab Lab this week for part two of our learning. It seems that with each week in this course, we unlock new and more powerful learning tools that further widen the possibilities of 3D printing technology.

Week 7 Reflection: BADM 395 takes the FAB LAB

This week in class we took a trip to the FAB LAB that is located on campus right by the ACES library. Although a lot of us were late because we didn’t know of where the lab was (or if they were like me, had just opened the announcement that we had class in the FAB LAB right before leaving to class), it was a very fun and interesting workshop where we learned a lot about the capabilities that the FAB LAB has when it comes to 3D-making and other sorts of making.

We began the class with a tour of the lab led by Jeff who had previously spoken in our class. He showed us the different rooms and sections in the FAB LAB and what was created or experimented with in each section. We learned about 3D printing, laser cutting, sewing and embroidery, as well as about all the projects that were currently being worked on in the lab. One thing that was mentioned again which I got excited for was the project that some people in the lab are working on where they are creating a dress for the famous drag queen Sasha Velour (who her father happens to teach at this university).

After the tour, we went on into two separate rooms where  we had a workshop on how to use the embroidery tools that were available for us at the lab and had to use them to create a design to be embroidered and then later used to cover a laser cut box we will make in the next visit. I was amazed at the possible images and shapes that could be embroidered after fooling around with some tools and I began to get very excited to make this object! I wanted to make a design for the dance team that I am currently a part of on campus called Dance2XS: Caliente

After multiple attempts and many many many changes of thread to change colors, I was able to embroider a box with my dance team’s logo on it as well as the Chicago flag as we perform in Chicago and I am also born and raised there, then there is a dancing couple on top (which was so small some thought was a pigeon, but I think is great!). Although in text this does not sound like a fun design, it is actually really nice! To prove such, here is a picture and a video I got on my snapchat of it:

Snapchat Video of Embroidery

Week 7

This week the BADM 395 class had the pleasure of working with the technicians at the UIUC FabLab. Previously in BADM 395, we had the director of the FabLab, Jeff Ginger, visit our class to speak about his lab and the artistic creations they’ve recently made. Because of this meeting, I was quite excited to work with Jeff Ginger this week in his lab. Upon arrival, Jeff and his assistants gave us an in-depth tour of the different features of the FabLab. They showed us some of the new 3D printers that had the capability to print with an eclectic range of materials. Jeff showed us some of the patches that had been printed on backpacks, jackets, and pants. I was most interested in some of the 3D printed projects that featured Arduino boards and flashing lights. For instance, Jeff showed us a backpack that had sensors in the straps to detect when the user touches them. When touched, the Arduino sends a signal to lights in the back of the backpack indicating that the user intends to turn on their bike. The FabLab had an extensive supply of finished projects on display. In the middle of the FabLab, a carefully carved piece of wood peaked my interest. This board featured a fractal engraving on it and arrows jutting out from each end. Since a young age, I have been very interested in fractal patterns and their practical uses. Using the same math concepts employed by the creator of the board, you can create perfectly meshing gears.

In week one of three, we bifurcated the class to work on embroidery and 3D printing a box. I found myself in the latter group, using laser cutting to produce a small box. The assistant taught us how to use Inkscape, which I picked up quite quickly. He urged us to design our box around something we really enjoy. Although the new movies leave something to be desired, the original three Star Wars movies will always have a special place in my heart. As a result, I designed my box to have the Rebel Alliance logo on the bottom of the box with the words “The Force will be with you, always” wrapped around the side. I did not have a chance to print my box during class, so I’m excited to see the final project come Wednesday. For my embroidery, I hope I can put a Rebel X-Wing on the top of the box. Once printed, I want to give my box to my little cousin, the biggest Star Wars fan I know. I look forward to working with my group again next week to turn our ideas into finished projects.

Laser Cutting & Conductive Thread (Week 7)

This week, our class met at the Fab Lab and learned how to laser cut wood and how to sew conductive thread into fabric. Unfortunately, I was sick this week and was not able to attend. Therefore, for my weekly reflection, I’ve researched these two activities and will share what I’ve learned.

Laser Cutting Wood

I am not sure which laser cutter the Fab Lab uses, so I researched a little bit on the machines themselves. Makezine published an article called A Guide to Buying Your First Laser Cutter, which talks about how laser cutters are popular in maker spaces and guides you through the first steps of buying one. A laser cutter can power through many materials with consistent, high precision. This is something drag knife cutters, paper cutters, and vinyl cutters can’t do. And while a CNC router may be able to make the cut deep enough, it cannot do it with precision. Laser cutting requires some design on the computer before printing – just like 3D printing. The laser operates much like the print head in a 3D printer. In fact, MakerBot, Printrbot, SeeMeCNC, Ultimaker, and many other companies started out producing 3D printers made from laser-cut parts. Epilog and Full Spectrum are popular brands for individuals buying their own, smaller laser cutters.

I’ve found that Illustrator’s Pathfinder and Inkscape are popular software programs used to design laser cuts objects. The two pictures below are screenshots of the programs. This website takes you through everything from setup of your laser cutter to designing on Illustrator. It is an article specifically targeted towards makerspace laser cutters.

Conductive Thread

I found an article literally titled Sewing With Conductive Thread, which is very helpful considering that’s exactly what one group learned in class this week. Conductive thread carries current like wires can, so it can be used like a circuit if arranged the correct way. With this thread, you can create a flexible circuit that requires no soldering. There are many types of thread with conductive metals in then, but you should know what size and give you want your thread to have before sewing. 2-ply silver-coated thread is small enough to be threaded in a sewing machine and fine enough to allow fabrics to hang normally. Another popular material for thread is stainless steel.

I know how to sew both by hand and machine, and it looks like sewing with conductive thread is not much different. I’ve read a few warnings about how the ends can fray easily and how the thread is not insulated. It is recommended that thick fabric, fabric paint, or electrical tape be used to cover the thread. You should be very careful not to create a short circuit, which can lead to heat, smoke, scorching, or smoking. Sewable components like LilyPad, Aniomagic, and Flora lines are available to purchase and are made from printed circuit board (PCB).

I’ve used a laser cutter before, so I hope to learn more about conductive threads in class next week (if I get to choose my rotation). I think both of these are important skills to know in the makerspace. I can see immediate uses for laser cut prints and products, but the I believe the application of conductive thread lies in the future where we all have wearable electronics. I’m excited to see how conductive thread will be included with fashion and tech in the future.

Digital Embroidery- More Challenging Than I Thought!

This week’s trip to the CU Fab Lab was highly anticipated–after hearing so much about it, I was eager to work on a hands on project and use the various tools that are available. We started off with a workshop on digital embroidery–I was so confident that I’d be good at it, but the overall experience was humbling, to say the least.

We got to learn more about the software SewArt, which allows users to upload photos of designs and then provides a preview of what the final sewn product will look like. It was difficult to find a logo that was simple enough for the software to pick up every detail on. I’d originally chosen an otter logo (since otters are my favorite animal) and it seemed quite simple given the fact that it had only two colors, which were highly contrasted.

However, when the software revealed the print preview, the poor otter’s face was somehow mutilated by its own whiskers—it seems as though there were too many fine details, so I opted for a simpler design instead. I ended up choosing the California state outline and then overlaid some California golden poppies to add some color and complexity.

After settling on the design, the next step was to thread the actual machine—sadly, this part has yet to be automated. It took a couple tries and some help from my peers, but I finally mastered the art, and was able to hit “go.” Within minutes, the California state outline was finished and it was time to switch the thread color for the flowers.

A quick video of the machine working its magic: IMG_2439

What I learned in the process, however, is that there is a difference between embroidery thread and sewing thread, which happens to be much thicker. Blissfully ignorant of that difference, I happily watched my design come to life until I heard a terrible noise come from the machine. The sewing thread was too thick and was causing the machine to jam. On top of that, I had forgotten to “remove the overlay” from my design on the California state outline, so the embroidery on that portion was really thick as well, and made it difficult for the machine to move across it.

Since I was running short on time, I decided to call it a day and settled for this final product.

Although there were a few hiccups, I’m happy with how it turned out. I now know that like everything else we’ve learned about design so far, working with digital embroidery machines is an iterative process, prone to mistakes and unexpected challenges. That being said, I’m looking forward to the laser cutting workshop next week—hopefully, I’m better at it than I was at embroidery!

First Time at the Fab Lab

Overview

Our class had the pleasure of being hosted by the Champaign-Urbana Community Fab Lab this past week. I have mentioned this lab in a previous post, but as a recap: The Fab Lab is “an open and collaborative workshop space for computer-driven innovation, design and fabrication” (http://cucfablab.org/). Essentially, this establishment allows individuals of all ages to utilize making resources to bring their creative ideas to fruition.

We began our class with a tour of the Fab Lab. The space is located in the second oldest building on U of I’s campus, so there was definitely an historical feel to it! We got to see some of the different machinery such as a sticker laser cutter, 3D printers, wood laser cutter, threading machines, etc. (see pictures below with sticker examples and other creations). I am very thankful to have had the opportunity to explore this space before graduating because it exemplifies some of the most technologically advanced equipment available to the Champaign-Urbana community–I only wish I had known about/visited the Fab Lab sooner!


Creating at the Fab Lab

Our class was split up into two groups so half of us could learn a certain skill this week and then another next week, while the other half of the class would learn vice-versa. This week, I was a part of the group that got to learn about laser cutting on wood. We began by learning how to navigate the program called “Inkscape”. Inkscape is essentially a free, open-source version of Adobe Illustrator. We utilized this program to build the design for our boxes (see my design below).

The red lines in the picture above represent where the laser cutter will cut straight through the wood (similar to cutting out a puzzle piece). The black silhouettes represent where the laser cutter will etch the drawing. What this means is that the black silhouette designs will not be cut all the way through the wood like the red lines will be, but rather etched to appear as an image. See the image below to get an idea of how our boxes will look:

I should be able to utilize the laser cutter next week to create my box, so I will include a photo in an upcoming post showing the object come to life! One of my biggest takeaways from utilizing Inkscape was understanding the amount of time and attention to detail that the creator must have in order to successfully create an object. While the programs that we utilize are powerful, there is still tremendous room for human error. I think this takeaway stood out to me because I had the preconceived notion that we would be able to just click a few buttons on the program and have it spit out a box. The reality was that I had to create this box with proper dimensions, modify each of the notches/outlines, and ensure that each of the lines were as straight/aligned as possible (which was a lot harder than expected). I enjoyed learning on Inkscape so much that I actually downloaded the program on my personal computer! Going forward, I plan to explore the different capabilities in this program along with some of the previous softwares we have learned in this class (e.g. Fusion Autodesk 360 & Cura). I firmly believe that this has been the most valuable course I have taken in college to teach me tangible skills. I love that I am genuinely interested in the area of technological making, and I am confident these skills will come in handy next year when I am starting full-time as a Technology Consultant.


Thank You & Looking Forward

Thank you for taking the time to read my post. Next week, we’ll be learning about conductive thread. Specifically, we will learn how to sew conductive thread into cloth, which will allow us to add another feature to our laser-cut boxes. I can’t wait to share pictures of my creations with you next week!


-Scott Provenzano


References

http://cucfablab.org/