Tag Archives: prototype

Prototypes Galore

During this week’s class, everyone was able to meet in their groups to work on the design of their projects. After meeting with our team, we were to look over each other’s designs and critique them with constructive criticism. We first met with a team that was working on creating a simple 3D printable device that would count the number of people inside and outside of a building for businesses to use. This team was currently struggling to get the device to display on a 3 digit display screen. Although we weren’t able to give much feedback as we do not know much of the mechanics for the wiring of this device, we were able to give some adjustments for the future to consider like the actual storing of this data as opposed to just displaying it that can be implemented in the future to add value to this product.

We then met with a group that is working on a sort of smart plant holder. It was a very interesting design for a plant holder that would make the use of a pump to raise water to the top of the holder so it trickles down to the rest of the plants as this is a vertical plant holder. One concern the group had was on how to split the water evenly among the plants, we advised them to check in with the FAB lab to see if they had anything that could help as well as got them to think about how to not only distribute the water evenly but the nutrients in the water as they plan on putting plant food in the water. As the water trickles down to the next group of plants, there will be less nutrients in the water  since the higher plants would soak it up.

Additionally, both groups gave us substantial feedback on our design in terms of the physical design as well as improvements to think about. Most feedback involved the design of the legs for our coffee contraption as the current prototype does not allow for a cup to be placed under it to catch the coffee. This is something for us to look in further prototype versions. We were thinking of potentially taking another group’s advice and making a tri-pod design for the contraption.  Tune in next time to see what direction we went in!

Prototype Progress & Feedback Session

This week we made significant progress on building the prototype. I went to the FabLab last week to discuss options for the water sensor to detect the level of water in the bucket. Instead of buying a sensor for around $7 and an LCD screen we figured out that it is not very complicated to create our own. The homemade water level sensor would essentially be 2 wires put into the bucket at 3 different points (6 wires in total) and connected to the Arduino.  The way it works is that a current is sent between the two wires and each of the 3 points and when  a change in frequency is noted (the current going through water versus air is noticeably different), a message will be sent to notify user that the water level is high, medium or low and to refill the water or shut off the water pump if it is too low. They also have LCD screens at the Fablab that they do not mind us borrowing for this prototype so we are minimizing our costs of the project as well.

On Tuesday, I went back to the FabLab with the bucket to create the sensor. The process involved a lot of new activities for me as there were several tools I got to use that I had not previously had experience with. We first needed to drill holes in the bucket so I got to use an electric drill and then screw a few screws in with nuts and washers in order to hold the wire on the outside of the bucket (out of the water). The wires will then be able to conduct current through the screws even though they are not in the water. I put caulk on the inside of the bucket around the screws in order to prevent water leaking out through the screw holes. I had never used a caulking gun before so that was also pretty fun to use. We then were able to cut some wires and attach one to each of the screws. I am going back this week to finish attaching the wires to the bucket and soldering them to a couple other parts in order to have a functioning sensor. I will then be finishing writing the code for the Arduino to be able to interpret and send a message to the LED screen of the water level. I am really excited about the progress on our project this week and look forward to finishing the sensor programing this week!

In class we continued working on our hydroponic garden, ensuring that we will have each of the parts ready to construct throughout the week. The second half of the class we split up into small groups and met with another team to pitch our idea/ progress on the project and any current challenge areas in order to receive feedback. The 2 different teams provided a few valuable comments and questions from the perspective of an outside potential user of the product that we had not previously considered. It was definitely an interesting and useful activity. Additionally, we heard updates on all of the other projects and I am excited to see how each of the teams’ work comes together within the next couple of weeks!

Testing & Feedback (Week 12)

What Happened?

Our 7-segment, 3-digit screen came in this week! Our group scrambled to add it to our board in the hour of class we had before prototype testing began. To assemble our counter using the clicker, we were using a combination of instructables, professor/FabLab advice, and our own tinkering. We were able to get a few segments of the display to light up, but the code we had was originally written for a 1-digit display. This caused one segment of each of the three digits to light up, but no one digit had a full set of segments filled in.

We explained our problem to the first group who analyzed our prototype. We also explained what we hoped to make the counter into – a fully functioning, light-sensitive and compact product that can be mounted on the door frames of local businesses. They gave us some good ideas about overall business ideas and how we should present the finalized product, but we still needed to fix the segment display and transition to the PIR sensors before we could apply any of their recommendations.

When the next group audited our prototype, Norman offered a ton of advice on how to connect the sensors, remove the mess of wires we have, and get the board to work with a new setup. He and his team are working on the planter that senses light and soil moisture and are also using an Arduino and 3-digit counter. Norman is someone who tinkers around with this tech a lot and has a knack for finding his own solutions – he helped us learn how to move away from the instructables and start to find our own solutions!

Why does it matter?

At first, I didn’t think having other groups prototype our product would be effective until we got all the code and wires working. However, the session was very helpful in refining our business ideas and what we will do to improve the product after we get it working. Also, we would have never gotten the help from Norman and his group if we hadn’t has this session! So thanks to both groups and especially to Norman for all of your help.

What are our next steps?

We will move forward with the light sensors – no more push button for us! Now, we need to modify the code to count up and down. We will do this by programming sensor 1 to count up if something passes in front of it, and sensor 2 to count down if something passes in front of it. This can be done with simple “if” statements in the Arduino code.

If we have enough time, we will look into placing the external memory on top of our Arduino, allowing the users to remove the SD card at the end of the work day and download all of that historical data.

Then, we will print a simple case for the system to cover the exposed wires and make the counter easier to attach to the door frame of a business.

Here is a video of our prototype. 

Workshops and Busts

This week in class we had a workshop day where we got in our groups and worked on getting a prototype in for our project to begin printing! My group and I got together and we began to finalize some small details on our base design for our pour-over coffee contraption design. We were able to split our design into two parts: the base with funnel part and the water reservoir section. We were able to get two printers running with each of the two parts of the contraption printing. We were able to watch over the prints while in class and as we left the room the last time we saw the prints they were doing well. I was not able to get a look at the prints but cannot wait to see how it came out tomorrow when I visit the lab to get a look at them.

Additionally, I was able to fool around with the scanning technology that I unfortunately missed in the last class and scan a part of me to make a printed bust of myself. I was very impressed with the detail that the scanner was able to get from the scan in order to make a 3D image that resembled me pretty well! I was very impressed and thought it was so cool that I was using the technology that first got me interested in 3D printing in the first place! When I was a freshman here on campus, my best friend (who since then has transferred out) was working on a project for his art class that involved using a Kinect scanner to make a 3D printed bust of himself. So for me to be able to use the technology that got me interested in it in the first place was so satisfying and so much fun!

Week 12 – Prototyping and Planning

This week, I was stuck at home during class time due to a stomach bug. Despite this setback, I am much happier with the current position my team is in given the challenges we have faced. Our original idea of a solar-powered drink warmer was not feasible because the power generated from the solar panel would not be adequate. If we wanted to have adequate power, we would need to wire the circuit with a nine-volt battery. However, adding a battery to the project reduced the novelty of the project. Upon consulting with the experts at the UIUC FabLab, we decided to bring our project into a different direction. My groupmate Ria, from Team Synergy, had a great idea to solve a common problem. Currently, the Apple Air Pods rest on the lower inner ear and are connected via Bluetooth to the iPhone. However, when consumers try to use the Apple Air Pods while working out, running, or any other strenuous activity, the Air Pods are prone to falling out of the ear. To prevent this, our project aims to stabilize the Air Pods by printing an attachment to keep the Air Pods in the ears.

PICTURE

The design will feature an attachment clip to the base of the Air Pod. This will wrap around the Air Pod and secure the stabilizing mechanism. The stabilizing mechanism is a 3D printed tube that wraps around the outside of the ear. Although we were not having great success with 3D scanning someone’s head and isolating the ears, we were able to come up with a makeshift solution. We would like to make three different sizes of Air Pod holders, small, medium, and large. This will allow us to quickly make the Air Pod holders from a set of premade molds, rather than scanning someone’s head every time we want to print the holders. We visited the UIUC FabLab to talk to Clinton about our idea and he gave us a lot of great feedback. Clinton showed us how to make a spline, an arc made of multiple non-colinear points. Once we made a spline, we used the sweep feature to give depth to our arc. When the stabilizing mechanism design was finished, we attached it to our attachment clip to finish the design. We did not get a chance to print out our prototype, so we will be visiting the MakerLab on Monday to print out a beginning prototype. More to come from Team Synergy!

The Iterative Design Process

Hello everyone!

This week we spent time with our project teams really solidifying our prototype and ensuring we have all the correct materials and skillsets to be able to build and complete the project. Our team is working on building a hydroponic vertical garden since we all enjoy indoor plants and thought it would be a great way to gain a new set of skills not only building a plant watering system/ vertical garden but also incorporating sensors into the product to make it more user friendly and set it apart from the current vertical gardens that many people already have in their homes.

One main takeaway I have from this project so far is that design and prototyping is an iterative process. Many factors play into how the final product actually turns out, some of the factors that have changed our prototype so far have included:

  • Available Materials
  • Skillset Required
  • Timing needed to print certain parts
  • Resources available to learn from
  • Feedback from potential users
  • Personal design preferences

There are many moving parts with our product since we have the structure that will act as the backbone for the watering system and the plants (including the piping and drip water system as well as the base and water reservoir), the cages to hold the plants, and finally the electronics used in making our plant system a “smart” hydroponic system. Our ideas for the structure changed when we visited the FabLab last week and picked up a large PVC pipe that would be ideal as the main support. We then adjusted our prototype to include this since it was free and available material, decreasing our material costs. We also decided to incorporate a water level sensor into the product to track how much water is left in the reservoir over the air quality sensor (dusduino) due to the availablility of materials and user feedback. The water level sensor provides valuable information to the user as to when they need to fill the water whereas the dust sensor would have purely been to see how effective the product was. Our design and idea for the sensor changed again when we visited the FabLab on Thursday and learned that instead of buying a water sensor online, it is easy enough to build one out of wires within our water reservoir bucket for much cheaper than the initial sensor cost. This week we will be focusing on putting all of the moving parts together and testing out our product. After we have the backbones for the system in place, we will be getting the plants and other necessary items for them to present during the final presentation.

I’ve already learned so much from this project and all of the others in the class, I look forward to seeing how the other products progress this week and in the coming weeks! Thanks for reading!

Scanning and Prototyping (Week 11)

This week, we learned how to scan with the Kinect hardware attached to the iPad. Kinect is a motion-sensing input device that Microsoft developed for Xbox. I was surprised that it could so easily be used for 3D scanning. However, the hardware and app we used to scan each other worked really well! Below is a picture of the Kinect and stand used for Xbox.

When the Kinect was attached to the iPad, it looked like this:

We had to move slowly around the subject we were scanning. It was important to have good lighting and no objects that could distract the sensor in the background.

Above is a picture of someone being 3D scanned. Since we were having trouble uploading new images, I’ve just attached photos from Google. So the above isn’t someone in our class!

We learned how to use Meshmixer to refine the scan and get it ready for printing. I wasn’t able to print mine this week, but hope to be able to do it some time in the next.

This week, my group also made our Project Testing Plan and began assembly of our people counter. For project testing, we will use other students and a contact at BrewLab as well as CU At Home.

Our first prototype will not use the laser sensors. Instead, it will use a push button. It will count up every time the button is pushed. Once we figure out how to connect all the wires and upload the code, we will move on to the more complex laser sensors.

One other thing I learned this week is that an OBJ file carries color with it. The hope is that this will be the standard file in the future, but some softwares can’t handle the color and will convert it to monochrome.


Shapeways & Prototyping!

Guest Speaker

This week we had an amazing speaker share insights about Shapeways, an innovative company that created their business as a 3D printing manufacturer run online, and advices with prototyping. Shapeways allows users to upload files to their site, choose the material to print and they will print, finish and ship the item to you! There are also many items designed by people around the world on the shapeways site you can order and they will ship you such as jewelry, pottery, home décor items and even tech devices. At the beginning of the talk,  Lauren gave us a virtual tour of the Shapeways space showing us each of the machines they use to print in and for different mediums. When deciding what material and machine to use to print she discussed knowing your needs. This includes:

  • Scale of the item
  • Strength & rigidity
  • Budget
  • Accuracy of design

After deciding on these 4 aspects, you can move to prototyping. At Shapeways they often say “All products are prototypes, but not all prototypes are products”. This put the idea of prototyping into perspective. With products, there is always something that can be improved upon therefore why it is okay to call it a prototype, however conversely, some prototypes need further iterations and improvements to become a working product.

Prototyping our Project

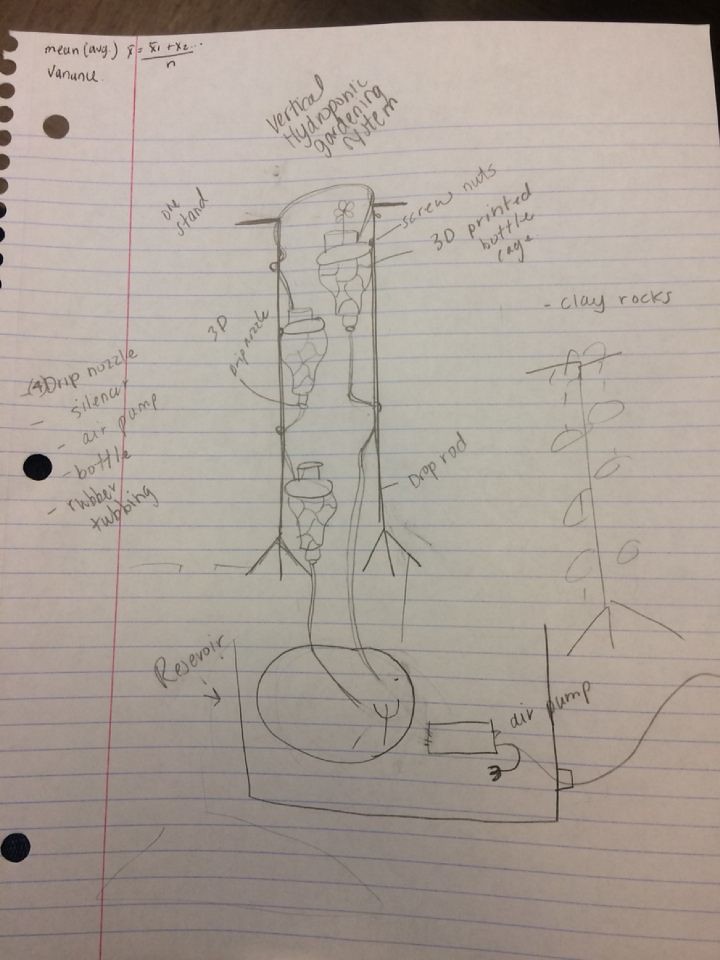
The second half of the class we spent within our groups working on the prototype of our project idea. Our group, 3Dream has met a few times in the last week to make sure we are all on the same page with our design since we have gone through several ideas for a final project. The last 2 weeks we spent further researching hydroponics, the systems and the feasibility of creating a smart vertical hydroponics garden. During class, our team looked into the details of the structure, where we would place the plants and how they would be held up. We drew inspiration from both a coat rack in the classroom and a Christmas tree stand. For a hydroponic system, there needs to be a large basin of water to pump through the system so we spent time thinking of the best solution to incorporate a tub of water into the system. At the same time, we needed to come up with a base for the structure that would be stable enough not to easily tip over and kill the plants. A combined solution to instability and where to put the water led to incorporating the tub of water into the stand as a way to weight the system down while also concealing the tub making it aesthetically more appealing.


Putting pen to paper: Prototyping

This week really put things into perspective on how much detail will be required for our final project. That being said, our team 3Dream put pen to paper and started prototyping! By completing all of the readings and watching the videos, it was clear that prototyping is a must even if you are not sure on all of the details.

Why prototype?

Creating a prototype is crucial to the design process. It allows for the users to put their ideas into a model and make revisions if needed, omit aspects, keep others, and include additional components. Futhermore, by prototyping before production begins, it is possible to see what specifics parts, materials, and additional resources will be needed and be ordered in advance.

3Dream’s prototype

We created a lo-fi prototype which was a quick and simple hand-drawn sketch to demonstrate the core functionality of our project. We actually developed two sketches. The first prototype really helped us get a sense of what we wanted out project to look like.  It was a rough sketch but really helped in the process of fine tuning and simplifying our project to a cleaner model. We got an idea of what materials will need to be purchased as well as which can be found at the FabLab or even printed ourselves! Below, you can get a sense of what our project will look like and see the differences in our first model to the second one.

Prototype 1

Prototype 1 Continue reading Putting pen to paper: Prototyping