Tag Archives: Sewing

Sewing Constellations

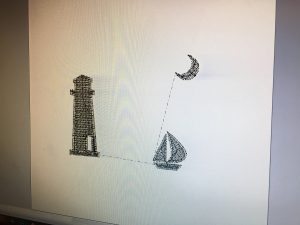
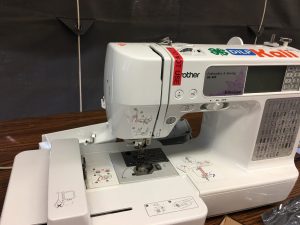
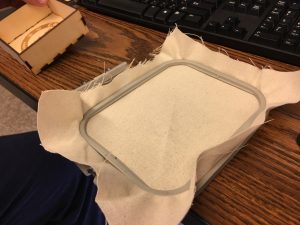
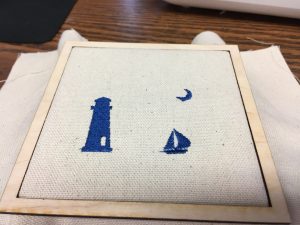
This week we had another visit to the FAB Lab in order to continue with the workshop where we are creating a box with a canvas that has an embroidered design all designed by us. This class was focused on the final step of the workshop where we are to sew on a design to place lights onto our embroidered canvas where the lights will add to the creativity of our design.

In order for us to successfully create a piece with lights in it, we first learned a bit about circuits and how the battery and lights we are sewing on to our piece are working together. One of the students from the FAB Lab that was assisting with the workshop named Duncan began to teach us about circuits a bit before we began sewing. We learned about the difference between parallel circuits and series circuits, where parallel circuits have lights that are independently connected to a power source and do not need each other to light up and series circuits have lights connected to each other and the power source, so they all need to work in order for them to light up. We also learned about the dangers of crossing negative and positive ends of the battery as they can cause the entire circuit to not work. Once we understood that, we were able to design our lighting plans for our canvas on paper, which we then used as the foundation for the actual sewing design for our piece.

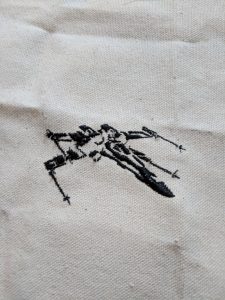
Once we had our design and understood how the battery and circuits worked, we were handed some LED lights (2 or 3 depending on our design/preference) and some conductive string that can pass an electric current through itself in order to reach the lights and light them up. We thread the needle and proceeded to sew in our design. Many people in the classroom had amazing and creative designs. One of my favorites was a student who had the embroidered design of a lion’s face from the lion king and had placed the two lights perfectly on the spaces for the eyes of the design. After a lot of trial and error and many mistakenly crossed negative and positive wires, I too, was able to finish my design and place two lights at the top of my embroidered design. Since my design for my canvas was a couple dancing together on a sort of stage, I decided to place the two lights on the top right and left corners of the “stage” to seem like stage lights and complete the theme of my design. I was overall very happy with my design and grateful to have learned as much as I did from the workshop.

Week 9 Reflection: Lessons from Failure

Week 9 Creations
This week was our final week at the UIUC FabLab. In the first week, Clinton helped me design a Star Wars themed box using a laser cutter. Last week, Duncan helped me design an X-Wing embroidery using an automated sewing machine. This week, we got to improve our embroidery design by adding lights to the fabric. First, Clinton and Duncan taught us how to create a parallel circuit using a small battery, conductive thread, and a few LEDs. Clinton inspired us by informing the class that the LED was invented at the University of Illinois. I drew my original plan as a parallel circuit with three LEDs. I spoke to Clinton about my circuit, he helped me plan out my stitches, so I wouldn’t cross wires. I had not sewn anything since my Home Economics class in 7th grade, so I was a bit pensive about sewing the LEDs properly. After struggling to thread the needle with the conductive thread, I was able to sew a magenta LED and a red LED to my embroidery before realizing I mistook my positive and negative ends.
After speaking with Professor Sachdev about our group project, I decided to restart my sewing. I sewed my LEDs onto the rocket engines of the X-Wing, with a little help from Duncan. Unfortunately, when I started getting confident in my sewing ability, I made another crucial mistake. I crossed my positive and negative wires, meaning the battery would short circuit. I spoke with Clinton and he told me I could restart again, but we only had ten minutes left in class, thus, I decided to use the last few minutes to draw prototype sketches of our final project. Tomorrow, I will present my box to my youngest cousin, a huge Star Wars fan, in hopes that he will get more use out of it than I will.

Looking Forward

When we return from Spring Break, BADM 395 will reconvene in the Maker Lab to work on the final project. My group will be returning to the UIUC FabLab in the coming weeks to utilize their conductive thread, solar panels, and possibly Arduino boards. Clinton showed me a few sensors they had to detect sunlight. Our group’s idea is to create a solar panel heating unit for warm beverages. I look forward to using the lessons learned from the UIUC FabLab to improve the aesthetic appeal of our final project.

Week 8 Reflection

Week two at the UIUC FabLab was constructive and entertaining. When I arrived, I retrieved my laser cut box. The box says “The Force will be with you, always” a quote from Obi-Wan Kenobi in Star Wars Episode 4: A New Hope. On the bottom of the box, there’s a large Rebel logo. I was able to fasten my box together without any glue, meaning the cuts were precise enough to allow for a friction-fit. I was impressed with my craftsmanship, despite the skinny balsa-like wood.

After retrieving our boxes, we worked with Duncan to create an embroidery pattern. We used a program called PE Design that resembled Adobe Illustrator. Duncan taught us how to use the basic functions of PE Design before we got a chance to delve into our own project. Duncan helped me find a proper silhouette of an X-Wing fighter, also from the Star Wars universe. Duncan counseled me with adding an area to insert my LEDs next week. I ended up removing the front of the X-Wing’s rocket boosters, which I will replace with white or red lights on Wednesday. Duncan encouraged me to add more to my design, but I was quite content with just a simplistic X-Wing design. I explored adding an Imperial logo, but I decided it did not fit with my vision of the finished project. As much as I like my embroidery, I do not think I will end up using a box with a cloth on it for anything. I prefer ergonomics over aesthetics and I do not need the art project for anything. I’d rather use the box for storage of coins, keys, and other knick-knacks. When I return home for Spring Break, I plan on giving my box and embroidery to my little cousin, the biggest Star Wars fan I know.

Not only has laser cutting been used in industrial manufacturing, it has found a second wind in art projects. Laser cutting allows the artist to make very precise impressions that a human could not perform. I checked etsy.com to see what designs are being sold on the internet. Many of the exquisite designs can cost over a hundred dollars, but many small projects can be purchased for well under a hundred. Many artists made laser cut skylines, maps, and geometric designs. If given another opportunity to make a laser cut art project, I would likely have the skylines and maps of Chicago and Washington, D.C., my two favorite cities.

Bringing our Creations Together

Overview

Hi again! This week we switched stations at the Fab Lab and got to create an additional piece to our boxes. Since I created the wooden structure of my box last week, I was able to create the cloth top this week. This is not just any regular cloth top, but one in which we were able to design the embroidery/sewing on our own (and we are even going to add LED’s to it next class!). Let’s jump into it.


Recap From Last Week

As promised, below is picture of the box that I created last week. I wanted to etch some things that I feel like describe me on the sides of the box: My name, my school, my hometown city, and my employers. I also etched the date that I made the box on the inside for nostalgic purposes.


PE Design

We began our embroidery/sewing work by working with the program called PE Design. Our instructor walked us through some of the basics on the program, and ultimately allowed us to take free reign with our designs. There were not enough working computers for each of the students, so Michael Rindler was kind enough to let me join him on his computer. We worked to create a design that we both found meaningful: a sailboat scene with a lighthouse. We figured that the lighthouse would be a really cool feature on our embroidery since we needed to incorporate out LED’s into the design. Having the lighthouse emit light would simply tie the entire scene together. We also decided that we wanted to add one additional element to our design that would fill some of the extra awkward space: a moon.

After we positioned each of our design elements, we learned how to command the program to convert the silhouette images into stitch designs. As seen in the image below, each of the items are created up of lines. These lines represented how the sewing machines were going to stitch the design on the cloth.

I also found this video for anyone who may have missed class and wants to learn some basics of PE Design: https://www.youtube.com/watch?v=ZLaa1TZWdY0. I hope you find it helpful!


Sewing Machines

With our design files completed and saved, we then moved to the sewing machines and learned how to thread the machine. This process took a few tries to get it right, but once the needle was properly threaded, we were good to go! Below is a picture of the sewing machine we utilized, and the cloth that we loaded onto the machine.

All we had to do was send the file from our computer to the machine and then prompt it to begin the stitching!


Final Result and Looking Forward

I was very satisfied with how my design turned out. Check out the picture below!

I decided to use the navy blue threading in order to compliment the nautical theme of my design. I was blown away by how accurate and precise these machines were in creating such a clean stitch print. As evident, there is a lot of excess cloth around the outside of the wooden box area. We were told that we would be removing the excess cloth next week while we also add our LED lights into our design. We are getting closer and closer to the final product, and I can’t wait to share it with you next week! Thank you for taking the time to read my post.


-Scott Provenzano


Resources

https://www.youtube.com/watch?v=ZLaa1TZWdY0