Tag Archives: Design for America

Design Thinking

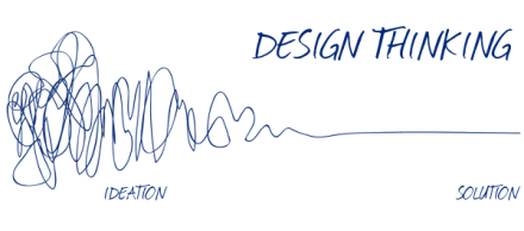
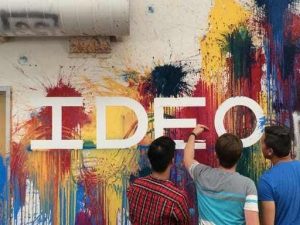
This week, the required reading titled “Design Thinking”  by Tim Brown addressed how businesses are requiring innovative thought processes in order to stay at the forefront of its competitors. A firm that specializes and is often used by companies to acquire innovations is IDEO. IDEO is a global design and innovation company that hopes to create a positive impact through design.

IDEO is so innovative because they do not have a standard way of creating solutions…

Design for America 

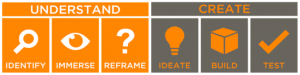
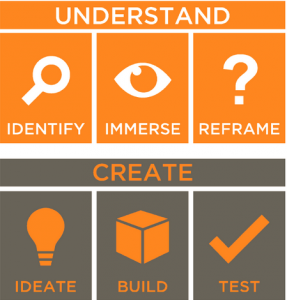
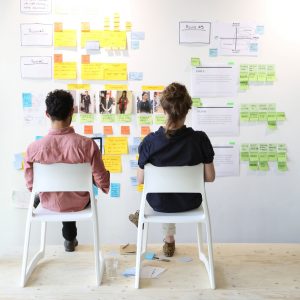
To get a better understanding of design thinking, we had workshop from the University’s Design for America team. The team consisted of a diverse group with different majors and different ages. We were tasked to create a product for a visually impaired university student who wanted to feel more connected to her peers and attend social events held by the university. In order to to create a product, we had to go through a design process.  The first stage was to understand our consumer, then create the product.

This design thinking was foreign to me, and I found it challenging not to create a product after hearing the problem from our “client”. But, DFA’s process allowed for a much better understanding of our client and to dive deep into their world and struggles.
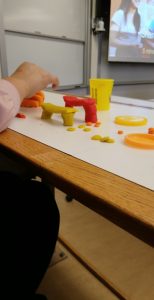
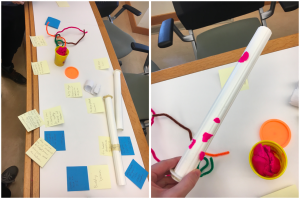
Create /Prototyping 

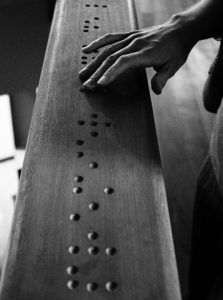
Our team brainstormed and wrote out potential solutions on sticky notes until we were ready to create.  We focused on making football stadiums more of a friendly environment for the the visually impaired and decided to add brail all around the sports arena. It doesn’t sound that innovative, yet it has not been done. One thing that the DFA’s team kept reminding us was that if helped at least a few people, then that was good enough. So, we stuck with our brailed railing at the sport arena since we figured it could be easily implemented around the facility and braille could be added to the existing railing for a tactile experience.


Readings 

Fascinated by IDEO, I looked more into the firm and its current projects centered on design thinking. Recently, the challenge they faced was to expand Zalando’s human-centered design capability. The outcome was “The Studio”, a jointly run innovation lab that prototypes and builds digital products.

https://www.ideo.com/case-study/cultivating-creative-competitiveness-for-europes-biggest-fashion-platform

Thank you for reading my blog and I hoped you learned something! See you next week!


Week 5 Reflection

This week in class we had a group of guest speakers from an RSO on campus called Design For America (DFA) come in and lead a workshop that focused a lot on the idea that we have been emphasizing all semester of having a making mindset. In this workshop, we were given multiple situations and issues and then taken through some steps to come with viable solutions based off of a lot of questions we were coming up with that describes the main problem we want to solve. For instance, my team took on a problem that a visually impaired mother had about not being able to see or locate her children at times. We then came up with the question “How can we help visually impaired parents locate their children in groups of many children or unknown locations?” to represent the problem we are trying to solve more specifically to hone in on potential solutions. After coming up with a focus question to base our ideas off, we began to bounce off each teammates ideas until we finally came up with an idea to which we then had to create a mock prototype out of supplies at hand such as play-doh, pipe cleaners, magnets and some others. From this workshop, my team came up with the idea of a sort of locator jewelry that can be worn by the parent that is visually impaired as well as his/her children that can use some sort of magnetic technology or location system that will sort of pull or put pressure in the direction of the child. We also thought of some potential ear buds that can also be synced to the device to offer audio directions to the child as well. We then used pipe cleaners to form a bracelet to be worn by the parent and a necklace for the child to wear and used magnets as a design for the necklace and bracelet as well as for its attractive properties.  Lastly, we coated the magnets in blue play-doh to make them appear like actual jewelry pieces.


This was a very interesting workshop that helped give us an idea of things we can do to help us come up with an idea for our semester project. Focusing more on a problem to solve then branching out to potential solutions we found is very efficient for our team and got us thinking of possible project ideas. It also helped me learn a lot about DFA, which is a very interesting RSO that I wish I would have known about earlier in my college career and cannot wait to hear what great projects they work on in the future.

Design Thinking to Solve Problems


This week in class we had guest speakers from Design For America give a presentation on a way of thinking about design that helps create solutions to problems. I had never heard of this organization before but after listening to their presentation and seeing some of the projects that they have done I think they are a great organization. They have helped create a stuffed animal called Jerry that helps kids who have diabetes understand the lifestyle that they have to live and also worked with Fiat Chrysler Automobiles to create a steering wheel that helps drivers focus and transition to autonomous cars. This group really takes design to the next level and I wish I had heard of them a few years ago because I would have loved to be in.

For the workshop that we did in class, we were given a scenario in which we chose to help out Jess, a blind University of Texas student who feels disconnected from her peers and avoids football games, tailgates, and other large gatherings because of the disorder and unreliability of these types of events. My group then went through a series of steps in which we eventually created a How Can We statement that helped us focus to just helping Jess feel safer at a football game yet still involved with the student section. After brainstorming a variety of different ideas, we came up with a system of pads that could be installed on the floor of the stadium that had patterns that described each section of the stadium. For example, the end of each row of seats would have a specific pattern that would let Jess know she was about to enter or leave a row. There would also be patterns on stairs, doorways, bathrooms, and others that would help guide Jess around the stadium without having to have a guide. We were then given a bunch of different materials and we actually created a mockup of our concept. It was cool to see how this process helped us go from wanting to help someone to a physical representation of a product in about an hour or so.


https://www.youtube.com/watch?v=M66ZU2PCIcM

https://www.ideo.com/post/reimagining-the-shopping-cart

The process we went through in class reminded me of what IDEO does. They are a design firm that is very famous for using the same type of design thinking and have created countless innovations. Above is a video of IDEO redesigning the shopping cart and a link to their website that describes the shopping cart in detail.

Inspiration, Ideation & Design

This week’s class was made me feel as inspired and creative as I did when I was little and the world was my playground. Design for America came in to give a presentation on the Design Process and walked us through the process for a certain group and issue from understanding the client to crafting a solution.

I have learned and utilized the design process once before in an industrial design class, taught by David Weightman who also introduced the idea of design thinking in our pre-class video. I really enjoyed this Design storm session because it completely encompassed and quickly introduced us to each step of the design process in a condensed form. Below you will see the 6 steps in the design process that Design For America (DFA) follows when working on any of their projects.

They walked us through each of these steps with an example situation by introducing different personal stories who each struggled with a certain aspect of life due to their blindness disability. They had already completed the first step by identifying our target group and users for the design. Our group chose to focus on solving the issue of anxiety when in unknown social situations for Jess, a blind college student. The second step in this process was immersing ourselves in our user’s world by making assumptions about how she sees the world, what she feels, thinks, hears, says, does, wants, and needs. Part of the design process is coming up with a bunch of ideas each on separate post-it notes to visualize and determine the most important ideas. After making assumptions, we were able to build “How Can We… statements” to better narrow our focus for the project. Our group came up with  a few statements focusing on bettering the social environment of Football games for students who are visually impaired.

Ideation

After framing and understanding the issue and potential client, we delved into the ideate portion with an individual and then longer group brainstorm sessions. In this part of class, we came up with as many solutions to the issue as we could find. One of the ideas I came up with was a railing with various textures that would differ depending on the place where you are in the stadium. We ended up adjusting this idea in our group brainstorm session to become our product and mockup in the Build portion of the process.

Prototyping

We ended up designing a railing that would surround the entire stadium and have brail labels for each different area (such as student section, hot dog stand, ect.) to help with navigation throughout the stadium hopefully decreasing uneasiness of the unknown. We presented this to the class and they had mainly positive feedback however during the ideation stage we wished we could ask questions to the user group to determine whether our solution would be useful.

Overall, this class opened our eyes to the design process and I look forward to transferring these skills towards our own ideation process towards our semester project.

Further Learnings from Printing Fusion Design: Nozzle Size

As a side note: Last week I printed the desk cord organizer that I had designed using Fusion 360 and have included pictures of the final product as well. With each print, I learn something new. This, like the phone stand had a balance issue however I could solve that by using a command strip to attach the organizer to my desk so that the cords would not immediately pull it towards the floor and it works quite well.

Additionally, the first few prints I didn’t understand how the nozzle size impacted the print, however I now know that using a 0.4 nozzle is typically the standard however will be much slower to print than the .8 nozzle. This makes sense, thinking about it as the .8 extrudes twice as fast due to the larger size, it is able to cut the print time in half. The down side of this is that it may not be able to capture as many small details if there are thin lines. Additionally, I learned that if using supports, it is quite difficult to remove .8 supports however .4 supports are easy to remove due to thinner lines and less strength in the material. If interested in learning more about how the nozzle size impacts the print you can refer to the 2 links below that I used.

https://craftunique.com/forums/view-thread/1254 

https://rigid.ink/blogs/news/what-3d-printer-nozzle-size-should-i-use-the-pros-and-cons 

Week 5 Reflection

In our fifth week, BADM 395 hosted Design for America. Design for America (DFA) is a registered student organization on the University campus, as well as a nationwide group of creators dedicated to using 3D printing technology to better the world around them. The four guest speakers from DFA introduced us to their six-step plan to solve the issues that arise in any project. The first three steps are based on understanding while the final three steps deal with the creation process. Identify, immerse, reframe, ideate, build, and test makes up the six-step method. One concept the DFA team explained in detail was the interwoven nature of the six steps. While the team often starts with identifying, immersing, and reframing, they often ideate, build, and test prototypes. To truly have an effective finished product, the DFA team must use the six steps multiple times and often out of order. After teaching us their strategy, the DFA team challenged us to make a build for someone with a disability.

This was a great opportunity for us to learn about the challenges and potential solutions for the physically disabled. After some discussion with my team, we settled on Jess because she is a college student just like us. Jess, a blind woman, attends UT Austin and is having a hard time adapting to social situations. The case explained that Jess enjoyed the excitement of football games but couldn’t traverse the stadium without help from her friends. During the understanding phases of our creation, we identified the problem, tried to immerse ourselves in her situation, and reframed the issue. After writing down assumptions, people she interacts with, and her activities, we began designing a walking stick for Jess. Fitted with Bluetooth, GPS, and a motion sensor we aimed to help Jess navigate through Austin. Our prototype was made of pipe cleaners and our final product was made of Play-Doh. We outfitted Jess with Bluetooth headphones that relay important information to her such as incoming objects. We would pair these headphones with Jess’ phone to allow her to quickly communicate with her friends. Overall, the building process was an insightful and humbling project. I look forward to seeing more innovation from DFA.

https://www.youtube.com/watch?v=F0Z3lUyVthE

Working with DFA taught me the importance of having a maker mindset. In the above video, you can see Infosys Foundation sponsoring a creative session for children to let their imagination run wild. At Infosys, they are more interested in teaching students the steps of idea creation rather than restricting their creativity by having an arbitrary goal. Even with the right mindset, you can still fail multiple times. However, having a maker mindset can turn those failures into lessons for future builds. Infosys shows how having the right mindset can ensure success.

Learning the Design Process

Design for America Overview

Hello! This past week our class was able to learn the Design Process from our University of Illinois peers at Design for America (DFA). “Design for America is an idea incubator, a motivated community, and a way of approaching complicated challenges. DFA shapes the next generation of social innovators” (http://designforamerica.com/). The individuals representing DFA were very knowledgeable in guiding us through the process and offering great insight. I have a good friend who has worked closely with DFA; this relationship has actually resulted in a successful startup company: Therapalz. Check out the company’s website here: http://www.therapalz.com/. Essentially, Therapalz creates smart therapeutic companion animals for patients with Alzheimer’s. These customizable animals have realistic heartbeats, lifelike sounds, and calming vibrations to provide additional comfort for patients working through this challenging disease. Please keep this success story in mind as I guide you through the Design Process we learned from DFA because it gives a strong indication about how perseverance through this process can produce great results.


The Design Process

The stages of this process are: Identify, Immerse, Reframe, Ideate, Build, and Test. Identifying involves simply observing or researching a challenge. Once it is identified, we must immerse ourselves into learning every piece of information about the challenge. Then we move into the reframe stage which is where the problem is further narrowed down through the insights we have gained through the previous two steps. Once we understand the specific challenge, we then begin creating in the ideate stage. This means writing down each and every possible solution to the problem. We then begin building prototypes based off of these potential solutions. None of these prototypes should be considered final because they should be built up, torn apart, and iterated to better model a viable solution to the challenge. Finally, we test the model with the end-users. We will go back and forth between building and testing until a final solution is pinpointed.

We were able to go through this process by analyzing a case involving an individual named Brian. Brian is an aspiring entrepreneur in the Austin area who faces challenges when navigating the city due to being blind. My team was able to simulate the Design Process by going through each of the steps with a goal of figuring out the best plan for Brian. We came up with the idea of helping Brian navigate by teaching him with two of his senses other than sight: touching and hearing. This would be accomplished by giving Brian a 3D-printed map of his route with depth features indicating roads, buildings, turns, etc. along the path. The 3D-printed object would allow him to become comfortable with his route before having to take it; his sense of touch will give him further confidence in memorizing the path. Second, we would leverage his sense of hearing to guide him step-by-step in real-time while he is walking his route. This will be aided by his phone-based GPS and headphones. Ultimately, we believe Brian will gain much more comfort and confidence through leveraging two of his stronger senses and the technology we designed.


Wrap up & Thank you

Overall, learning the Design Process helped bridge the gap between the real-world challenges that our class has been identifying and the skills we have learned in regard to 3D printing. Prior to this session, we did not have a specific path to follow when connecting our challenges to 3D printing (we simply 3D-printed without much end-user consideration/prototyping in mind). Now, we have the skills necessary to Identify, Immerse, Reframe, Ideate, Build, and Test our ideas. As evident in Therapalz, a challenge was identified, the Design Process was leveraged, and now patients with Alzheimer’s are living more comfortable lives (see video below). I am excited to use this framework to get started on our class’s semester project with my teammates. Thank you for taking the time to read my post this week.


-Scott Provenzano


Sources:

http://designforamerica.com/

http://www.therapalz.com/