All posts by Helen Albright

3Dream’s Final Reflection

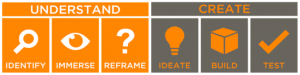
Our team, 3Dream, has had a lot of fun this semester going through the iterative process of ideation, design, prototyping, and testing a new product. During the ideation phase of this project, we thought of several different ideas however when we started discussing interests among our team, we found a common theme of the environment and plants. From there, we took this interest and started thinking about common problems among people our age in order to come up with a good “How Can We Statement”. We were drawn to the idea of a smart vertical hydroponic system as it solves a few common issues: rising air pollution in cities and stuffy apartments as well as providing a source of fresh produce or herbs in a small space (rather than needing a large yard to garden). We came up with three main guiding questions that we based most of the decisions in our project on.

  • How can we improve the quality of life for city dwellers?
    • From this, we came to a gardening system to improve the apartment atmosphere by improving air quality and hopefully reducing air pollution as well as providing psychological benefits such as improved mood, higher creativity and to de-stress the user
  • How can we make it easier for young people to grow fresh produce or herbs within their apartment?
  • How can we make this system affordable for the target market?

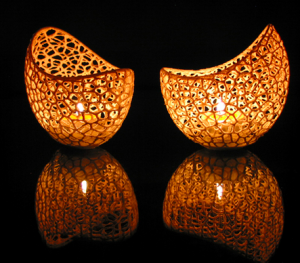
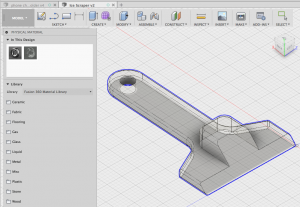
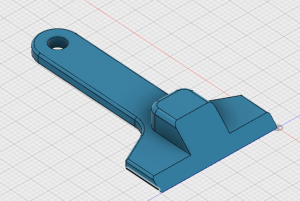
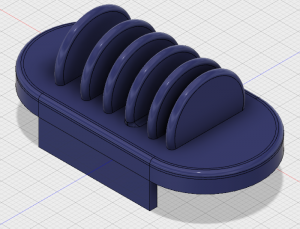
From these How Can We Statements, we developed a “smart” vertical hydroponic drip system. There are three main components that we focused on and divided up amongst the team. The Structure, which ended up being composed primarily of PVC piping and joint units with a 5 gallon bucket as the base and tubing for the water to run through within the PVC piping. The design for the main structure of our product was heavily dependant upon the available resources we had. As mentioned above, one goal was to keep this project very affordable and therefore we mainly borrowed or used scrap parts we were able to find (Specifically for the PVC piping, this was leftover in the basement of the FabLab and therefore we did not have to pay for it). The second main component of the project was how the plants were going to attach to the structure. We decided on a voronoi patterned bottle cage holder in order to be visually appealing. A voronoi pattern transforms a simple structure into a interesting, organic looking model and would provide nice design for the otherwise plain structure. The third and final aspect of the product was incorporating sensors into the system in order to make it a “smart” system. After much debate, we decided to incorporate a water level sensor into the bucket since the pH sensor was too expensive for our budget ($50) and the air quality sensor we had considered did not benefit the user as much as the water level sensor.

Prototyping:

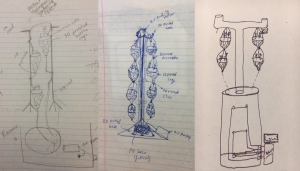
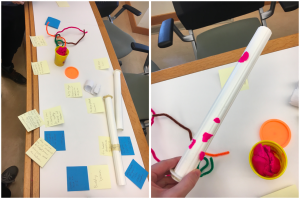
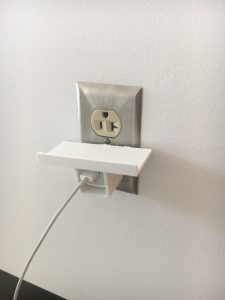
The final prototype changed drastically from the initial sketch of our idea. 3Dream decided to make changes after user testing and group discussions about the practicality of our design. In the first sketch you can see that there were initially two main support poles and an external water basin. 3Dream concluded that having one main support would be more stable than two. For the base of the system, we initially wanted to 3D print a stand in a similar design to a Christmas tree stand with a water basin within however we did not realize at that point in the design phase that PLA printed products do not do well with water over time. We also believed that a connected water basin would be more stable, especially once it was filled with water and therefore this changed to be a 5-gallon bucket. There were several changes for the sensors, as mentioned previously. We initially wanted to be able to test the pH of the water in order to reduce the risk of poisoning plants with too many nutrients however due to the high cost of the sensor, we decided to incorporate a water level sensor instead so that the user would be able to tell how full the water bucket was and when to fill it with more water or turn off the pump (if the water was too low). Lastly, we reduced the amount of plants the system could hold so that the system would be more compact. While most design changes were motivated by pursuing different goals, the design was also highly dependent upon the materials 3Dream was able to gather. We kept costs extremely low by repurposing scrap materials and recycling consumer products. Our prototype would likely differ had we purchased all the materials from a store.

User Testing

Some of the improvements to the prototype design are directly attributable to user testing. 3Dream spent ample time drafting the testing protocol in hopes of constructive feedback. Test subjects were asked various questions regarding their knowledge and opinions of hydroponics. Next, the test subjects assembled the prototype with as little direction as possible. During this time the test subjects responded to more prepared questions about design aspects and consumer demand. 3Dream realized the prototype looked more like a science project than commercial products in stores. The feedback the team received definitely confirmed that idea, as well as the belief that this product would serve a smaller, niche market. The user testing helped to determine a few different aspects of the project (such as the amount of plants or the sensors incorporated) however we mainly used the feedback gained to lead into things we could improve on for future prototypes and the final product if it were to go to market.

Future Improvements

User testing shed light on the path towards future improvements. First and foremost, aesthetics was the most obvious improvement. The tricky part is that ideal aesthetics vary drastically from consumer to consumer. 3Dream has several ideas to address this issue, which include: adding felt coating around the bucket, painting the pvc pipe, and printing a comprehensive Arduino box to showcase the LCD display while hiding the electronics components and arduino. Varying consumer tastes demonstrated that customers desired more customization. To better align the prototype with those values, 3Dream will develop multiple variations of the drip system. Some customers might want taller systems so that they can grow more plants. Other customers may want wheels on the bottom of the bucket for mobility or wall attachments to hang the system. Carrying the prototype from the FabLab to the classroom showed 3Dream how difficult moving the hydroponic system currently was. Adding air quality and pH sensors would drastically increase the cost, but experienced growers could find these features improve the product. Many people, including the test subjects, might be turned off by these features and the complexity they would add. Multiple product variations give 3Dream the versatility needed to satisfy both groups of customers.

Cost and time restraints prevented 3Dream from attempting to grow plants. Plants would automatically improve the prototype’s aesthetics. 3Dream identified 2 types of plants a user of this system may consider: air purifying plants and garden herbs. Depending on the primary objective of the user one may by the system to increase air quality while another may only want the system to grow herbs and vegetables. In terms of air purifying there are three top plants that grow well hydroponically while simultaneously cleaning the air. The first plant is the garden mum, which is the air purifying champion according to NASA. It should be planted at the top because it needs direct sunlight. Next up is the boston fern, which also excels at purifying the air. It doesn’t need as much direct sunlight as the garden mum, so it can be grown in the middle of the system. Last but not least is the peace lily. This plant is shade loving, so grow it in the first pot up from the ground.

Takeaways

Building this comprehensive prototype has taught our team many lessons, the first of which is to utilize resources on campus. These resources were essential when dealing with the challenges that arose each step of the way. We saved hours of time that otherwise would have been spent researching by asking the right people the right questions. One employee at the FabLab, Brandon, gave 3Dream potential solutions for the functional requirements of the prototype. Humans have learned to solve many problems throughout the years. You should utilize this progress instead of reinventing the wheel when problems arise. It’s always a good idea to leverage resources when available.

User feedback is another area that should be leveraged to create a product that users desire. Designing the testing protocol forces you to evaluate prior assumptions in a more objective manner. Using this as a basis, your questions will yield better results. Your mindset should be focused on continuously improving your idea, not validating your beliefs. Finally, this project allowed our team to expand our knowledge of several different systems. We were able to improve our Autocad skills designing the plant cages, acquired electronics skills programming an Arduino and LCD screen, while also learning about hydroponics systems and what it takes to design and create a working prototype.

Link to presentation: https://docs.google.com/presentation/d/1cobksQYS-JXenx-w7A9ZiX_uKf4AMBK-8y2yNzubJXo/edit?usp=sharing

Link to Instructable:

https://www.instructables.com/id/Smart-Hydroponic-Vertical-Garden


Reflecting on a Semester of Creations

Expectations

Coming into this course, I was excited by the prospect of making a previously foreign idea (3D printing) much more tangible. I expected to learn the ins and outs of creating objects with a 3D printer as well as learning more about the capabilities of 3D printing. Inspired by the first guest lecturer, Arielle, a previous class alum, I was very excited to see what product or creation my team would come up with by the end of the semester.

My Experience

My experience in this class has been much more wholesome than I expected. I would venture to say that I gained a more creative mindset that is no longer limited by the unknown possibilities of maker-spaces. If you had asked me at the beginning of the semester to define a “maker mindset” I don’t think I would have been able to. Each of the guest lectures and workshops we experienced this semester contributed to a growing knowledge of the resources and possibilities out there. I expected to be focused on 3D printing skills and printing items each week, however I was pleasantly surprised to pick up embroidery, Arduino, digital scanning, 3D modeling/ designing, and many more skills! In this post I’ll highlight my favorite takeaways from this course.

Designing & 3D Printing

I thoroughly enjoyed the iterative design process that goes into making things. I came into this class with no knowledge on how 3D printers worked so each time I printed something I learned something else to look out for. Taking an idea into Fusion 360 Cad designing software was a new experience for me and taught me that patience is required in order to create the object you are aiming for especially when you are not an expert with the software. One of the first things I printed was a phone stand (shown below) however it was too lightweight to support the weight of a phone. Additionally, I designed and printed a cord organizer for my desk however by reducing the infill percentage (in order to print in less time), it was not as strong and therefore the dividers shortly after ended up breaking off. Read about my experience with Fusion 360 here. With each print there was a new discovery but it was always fun to pick up a freshly printed item and test it out! I am excited to expand upon my 3D printing skills now that I am aware of all of the free resources by which to do so and hopefully utilize some of the things I have learned in my career!

FabLab Laser Cutting & Embroidery

One of my favorite series of courses were the ones at the FabLab. I was constantly inspired by all of the creations on display in this neat makerspace. We had 3 lessons at the FabLab focusing on creating a laser cut wooden box, digital embroidery, and then working with conductive thread. To read more about each creation, check out the three linked blog posts. A big takeaway for me from our time at the FabLab was how much of a resource they can be for any and every idea you may have. They have experts in so many different fields as long as you have an idea, they can help make your idea come to fruition! We spent many hours at the FabLab during our final project and enjoyed bouncing ideas off of the experts and hearing their opinions our project.

Vast Resources for the Maker Community

Each guest speaker we had this semester provided a little more insight into different areas of innovation within the maker community. I had not realized before the vast amount of resources that were available for anyone to use. Some of the online resources that I’ve found most eyeopening and will potentially use in the future are the 3D printing online libraries (primarily https://www.thingiverse.com/ and https://pinshape.com/). Additionally https://www.shapeways.com/ and https://voodoomfg.com/ both provide the machines, materials, and guidance in order to print anything that you design and have it shipped to you. All of these cites help to make 3D printing even more user friendly. A neat resource to learn new skills from that I was made aware of through this course is https://www.instructables.com/ which provides tutorials on almost any DIY project you can imagine.

Final Thoughts

One of my biggest takeaways from this course is that I am so much more capable of building and creating things than I expected. I learned how to program an arduino simply through expert advice at the Fablab and by watching Youtube tutorials. I learned how to design in CAD through a class workshop and then continued online tutorials. We learned how to create a vertical hydroponic garden through hours of online research, Instructible tutorials and advice from fellow makers and gardeners. I learned the iterative process of prototyping and the pride that comes from a final working prototype. The resources are out there and just waiting to be utilized to bring ideas into creation! This class has been one of my all time favorites and I am so happy to have had the chance to learn and grow with such a great group of people!

Thanks for following along on this journey, I hope you’ve been able to learn a little from my experiences or that you’ve gained a new interest as I certainly have!

Prototype Progress & Feedback Session

This week we made significant progress on building the prototype. I went to the FabLab last week to discuss options for the water sensor to detect the level of water in the bucket. Instead of buying a sensor for around $7 and an LCD screen we figured out that it is not very complicated to create our own. The homemade water level sensor would essentially be 2 wires put into the bucket at 3 different points (6 wires in total) and connected to the Arduino.  The way it works is that a current is sent between the two wires and each of the 3 points and when  a change in frequency is noted (the current going through water versus air is noticeably different), a message will be sent to notify user that the water level is high, medium or low and to refill the water or shut off the water pump if it is too low. They also have LCD screens at the Fablab that they do not mind us borrowing for this prototype so we are minimizing our costs of the project as well.

On Tuesday, I went back to the FabLab with the bucket to create the sensor. The process involved a lot of new activities for me as there were several tools I got to use that I had not previously had experience with. We first needed to drill holes in the bucket so I got to use an electric drill and then screw a few screws in with nuts and washers in order to hold the wire on the outside of the bucket (out of the water). The wires will then be able to conduct current through the screws even though they are not in the water. I put caulk on the inside of the bucket around the screws in order to prevent water leaking out through the screw holes. I had never used a caulking gun before so that was also pretty fun to use. We then were able to cut some wires and attach one to each of the screws. I am going back this week to finish attaching the wires to the bucket and soldering them to a couple other parts in order to have a functioning sensor. I will then be finishing writing the code for the Arduino to be able to interpret and send a message to the LED screen of the water level. I am really excited about the progress on our project this week and look forward to finishing the sensor programing this week!

In class we continued working on our hydroponic garden, ensuring that we will have each of the parts ready to construct throughout the week. The second half of the class we split up into small groups and met with another team to pitch our idea/ progress on the project and any current challenge areas in order to receive feedback. The 2 different teams provided a few valuable comments and questions from the perspective of an outside potential user of the product that we had not previously considered. It was definitely an interesting and useful activity. Additionally, we heard updates on all of the other projects and I am excited to see how each of the teams’ work comes together within the next couple of weeks!

3D Printing Edible Objects

Overview

For my Once a Semester activity, I have decided to explore the various 3D food printing machines and applications already in existence. Food printers, over time have progressed to create very intricate designs by combining several different nozzles with lasers and other technology. There are many different companies that have tried to enter into this competitive landscape so in this post I will discuss a few companies and the machines they designed. I will then talk about the various applications for 3D food printing and finally a look into the future and how this can and will impact future markets.

Natural Machines- Foodini

This printer is capable of making both savory and sweet foods with fresh ingredients loaded into the cartridges depending on what the user wishes to create. The main purpose Natural Machines had in mind for this machine was to make food preparation more manageable and promote cooking with fresh ingredients. Like many of the new machines in the 3D printed food industry, these machines are manufactured in small batches and cost $4000 USD. There are two main target audiences for this product, the first of which professional kitchens with emphasis on the art of food and the aesthetic appeal of a gourmet meal. Their other target group is home users. Natural Machines believes that this may become a common kitchen appliance similar to a microwave or toaster oven in the future. This can be used to make fresh foods fast and by hand thus controlling each of the ingredients. Their goal is to help replace packaged foods and candies thus controlling the unidentifiable ingredients in food and reducing packaging waste.

BeeHex- Chef 3D

This company was based off of the 3D food system that was developed for deep space missions for Nasa. The current CEO of BeeHex headed the Nasa food printing initiative and therefore expanded and improved upon the initial design to create the Chef 3D. The idea for this food system is to make home creations more commonplace. Like the Foodini, this printer is designed to create desserts as well as savory foods. It has a specific attachment for toppings in order to distribute evenly for items like pizzas and pies. This is targeted mainly at commercial users in order to provide a unique food creation experience within a restaurant. It can also be utilized to optimize diatary needs based on personal body and lifestyle if purchased for in home, personal use. Currently, this printer is not on the market, however the company has received funding to expand their “personalized” pizza business so that soon customers will be able to order a custom made/ shaped pizza through an app and have the machine manufacture and send it to them. This company has a lot of potential and I look forward to keeping up with what they do!

 ByFlow- Focus

This printer is optimized for desserts and to experiment with various textures and shapes of food. This printer allows users to create new food designs that would be near impossible to create by hand. This is appealing mainly for specialty shops rather than everyday customers. It utilizes syringes for the ingredients and thus they must be available in liquid form. Out of the box, the Focus printer comes with 10 refillable cartrages, 4 nozzles in 2 different sizes (to create various different designs) and 5 prepared food designs. This machine costs 3,300 € and is much less versatile than the Foodini.

3D System- ChefJet Pro

This printer is primarily focused on dessert creations similar to the ByFlow Focus printer in that it appeals to a niche market. This machine is different in the fact that it works by crystallizing thin layers of fine-grain sugar layer by layer to create different shaped candies. Interestingly, there are 2 versions, the ChefJet monochrome printer that can be purchased by anyone for $1000 and the ChefJet Pro for $5000. This is primarily aimed at pastry chefs and professional kitchens looking to create unique desserts that are easily duplicable

Machine Overviews:

I have mentioned several of the major players in the food printing industry currently. 3D printing with food is a very new idea and therefore there are several startups focused on similar ideas. With the research that I have done, I believe that BeeHex will be one of the most successful companies since they have over a million dollar in seed funding and several potential business routes to pursue.

3D Printing Food Applications

As mentioned above with the various machines, there are several purposes for 3D printing food. Several of the machines currently in use are for gourmet professional kitchens to set them apart from others with their unique and perfectly designed creations. These applications mainly are used for cakes, chocolates and desserts but can also be expanded into main entrees. There is currently a restaurant in Spain that uses the Foodini to print seafood purée into intricate coral shapes and decorate the plates with.

Other than gourmet applications, 3D food printer systems are being utilized by NASA currently to print vital nutrient rich food in space that can keep for up to 30 years (unprinted in the canisters) for longer missions. Additionally, food printing systems are being utilized in the nutrition sector to assist people who have very particular dietary restrictions. Being able to easily print all of their food opens up many opportunities. Finally, there are companies such as Modern Meadow that are exploring printing bio-materials such as meat in order to eventually replace the meat that we eat today. Currently all of these applications are being developed and still incredibly expensive.

Future Implications and Opportunities

Being able to 3D print food may provide an opportunity to solve many of the hunger and food waste issues currently around the world. Some companies are using “ugly” foods to put into cartridges and create new life for fruits and vegetables that otherwise would be undesirable. Other researchers are looking into algae and other nutritional substances that could be used as a base or glue for printed food. Finally, if 3D printing food becomes more prevalent, we may see a shift in grocery stores. I imagine this shift would be similar to bulk food sections in some grocery stores although would have printer cartridge filling stations will all sorts of different ingredients already prepped for the machines. Overall, I see this as a fascinating industry with potential in many areas and look forward to watching it grow!

The Iterative Design Process

Hello everyone!

This week we spent time with our project teams really solidifying our prototype and ensuring we have all the correct materials and skillsets to be able to build and complete the project. Our team is working on building a hydroponic vertical garden since we all enjoy indoor plants and thought it would be a great way to gain a new set of skills not only building a plant watering system/ vertical garden but also incorporating sensors into the product to make it more user friendly and set it apart from the current vertical gardens that many people already have in their homes.

One main takeaway I have from this project so far is that design and prototyping is an iterative process. Many factors play into how the final product actually turns out, some of the factors that have changed our prototype so far have included:

  • Available Materials
  • Skillset Required
  • Timing needed to print certain parts
  • Resources available to learn from
  • Feedback from potential users
  • Personal design preferences

There are many moving parts with our product since we have the structure that will act as the backbone for the watering system and the plants (including the piping and drip water system as well as the base and water reservoir), the cages to hold the plants, and finally the electronics used in making our plant system a “smart” hydroponic system. Our ideas for the structure changed when we visited the FabLab last week and picked up a large PVC pipe that would be ideal as the main support. We then adjusted our prototype to include this since it was free and available material, decreasing our material costs. We also decided to incorporate a water level sensor into the product to track how much water is left in the reservoir over the air quality sensor (dusduino) due to the availablility of materials and user feedback. The water level sensor provides valuable information to the user as to when they need to fill the water whereas the dust sensor would have purely been to see how effective the product was. Our design and idea for the sensor changed again when we visited the FabLab on Thursday and learned that instead of buying a water sensor online, it is easy enough to build one out of wires within our water reservoir bucket for much cheaper than the initial sensor cost. This week we will be focusing on putting all of the moving parts together and testing out our product. After we have the backbones for the system in place, we will be getting the plants and other necessary items for them to present during the final presentation.

I’ve already learned so much from this project and all of the others in the class, I look forward to seeing how the other products progress this week and in the coming weeks! Thanks for reading!

Transforming reality into the digital world

Scanning ourselves

This week focused on learning how to 3D scan objects to create a digital version to  be able to print. We had fun scanning each other’s figures, most people tried to print busts however I was interested in trying to do a full-body scan to look similar to an action figure versus a bust. It didn’t end up working well though unfortunately as the app we were using now requires you to buy the scan. Later in the class I ended up try to do the scan again, I noticed that the new app we were using asked you to hold the sensor still quite a few times as it seemed to be taking individual pictures which it would then later compile. I did not end up having the time to clean up my bust and actually print it although I look forward to using the software next week to finalize the images and then also be able to 3D print the bust of my head.

Projects using Scanning Technology:

The thought of printing our own heads seems a bit strange to me although I am fascinated by the idea that we are able to take scans of real objects and then transform that into a 3D printed object. This opens up the possibilities for so many neat projects. Professor Vishal mentioned the project Scan the World ( https://www.myminifactory.com/scantheworld/ ) which I found very interesting so I did a bit of further research on this. The goal of this project is to be able to archive objects of cultural significance all over the world by using 3D scanning then opening up the possibility for 3D printable replications of these objects. The idea and value behind this archive is to open up treasured art to the public in a much more tangible way. The replication of these artifacts also serves as a way to better preserve them so that the public can interact with them while not deteriorating the ancient art or artifact. This project started in June of 2014 and currently has scanned and created 10,903 printable 3D scanned sculptures and spent 21,000 hours printing these objects.

Project Update:
This week we discussed more about the frame and technical aspects of our hydroponic vertical window farm. We gathered an Arduino and other components needed to start programing the sensors and we plan to head to the Fablab again tomorrow to gather a few more materials to start building a rough prototype and designing the specific parts such as the plant holders/ clips to attach to the structure as well as the drip funnels that will attach to the plant holders/ bottles. We’re looking forward to building a rough structure in the next week as well as designing the plant baskets in Fusion 360 and programming the Arduino and sensors.


Shapeways & Prototyping!

Guest Speaker

This week we had an amazing speaker share insights about Shapeways, an innovative company that created their business as a 3D printing manufacturer run online, and advices with prototyping. Shapeways allows users to upload files to their site, choose the material to print and they will print, finish and ship the item to you! There are also many items designed by people around the world on the shapeways site you can order and they will ship you such as jewelry, pottery, home décor items and even tech devices. At the beginning of the talk,  Lauren gave us a virtual tour of the Shapeways space showing us each of the machines they use to print in and for different mediums. When deciding what material and machine to use to print she discussed knowing your needs. This includes:

  • Scale of the item
  • Strength & rigidity
  • Budget
  • Accuracy of design

After deciding on these 4 aspects, you can move to prototyping. At Shapeways they often say “All products are prototypes, but not all prototypes are products”. This put the idea of prototyping into perspective. With products, there is always something that can be improved upon therefore why it is okay to call it a prototype, however conversely, some prototypes need further iterations and improvements to become a working product.

Prototyping our Project

The second half of the class we spent within our groups working on the prototype of our project idea. Our group, 3Dream has met a few times in the last week to make sure we are all on the same page with our design since we have gone through several ideas for a final project. The last 2 weeks we spent further researching hydroponics, the systems and the feasibility of creating a smart vertical hydroponics garden. During class, our team looked into the details of the structure, where we would place the plants and how they would be held up. We drew inspiration from both a coat rack in the classroom and a Christmas tree stand. For a hydroponic system, there needs to be a large basin of water to pump through the system so we spent time thinking of the best solution to incorporate a tub of water into the system. At the same time, we needed to come up with a base for the structure that would be stable enough not to easily tip over and kill the plants. A combined solution to instability and where to put the water led to incorporating the tub of water into the stand as a way to weight the system down while also concealing the tub making it aesthetically more appealing.


Let there be Light!

This week was our third and final session at the FabLab in which we added conductive thread and LEDs to our embroidery project. I was excited to use conductive thread and review circuits because I have taken an ECE class before and was fascinated by circuits. It’s neat to have my previous knowledge apply in areas I would never expect (ECE knowledge with a creative/ arts project). We started out the class by drawing out designs and figuring out where the conductive negative and positive thread would go into the design. This was important because you could not cross the negative and positive threads and it’s a lot easier to visualize by drawing it out than guessing where the path should go while sewing.

We then sewed the individual sides of the circuit. I did the negative side first and then the positive side. My design halfway through changed as I decided I only wanted to incorporate 1 light in the plane instead of 2 LEDs. One big lesson I learned was that you absolutely cannot have either the positive or negative side touching the other thread. After finishing hand-sewing, I tried to turn on the light and it wasn’t working at all. This was because the negative thread was touching the metal that the negative current goes through at all so the circuit was being shorted. I then hand sewed the negative thread down so that it would not interfere and it worked well!

I had an extra embroidery hoop at my house, so I decided to have this separate from the box we made in previous classes and use it as a small wall hanging. I’m happy with how it turned out and excited about the new skills I gained through this project. Unfortunately, it looks as if the storage on our site is full so I didn’t get to upload a photo but you can imagine it from my previous post!

What’s next?
We are starting to put in more time on our final projects at this point in the class. I went into the FabLab for consulting open hours on Thursday in order to gain more knowledge about the sensors the FabLab has and their experience with hydroponic farming. I talked to Brandon, a sensors expert at the lab who has also made a hydroponics window installation so he helped to clarify many details of the project and I am sure he is going to be a huge resource for us.


Adventures with Digital Embroidery

This week was the second FabLab workshop in which we got to try our hand at embroidery! During the workshop we learned several different functions within the software program in order to take an image from online and transform it into an image we were then able to embroider. I enjoy traveling, therefore I decided to embroider an image of a map for the top of my box. It did not go as smoothly as I expected going in so the rest of this post goes into the 3 main things I will look out for next time.

Lessons Learned

  1. Size Matters: One thing I did not carefully consider during this process was the size of the image. When making the map, I added an airplane and line coming from the US to signify travel while also making the image unique to me. However, when I went to load it into the embroidery machine, it turned out that it was too small to actually look like a plane but rather looks like a grey blob in the ocean. I know what it is though, so that’s what counts!

2. Double check thread before starting: My first attempt at this embroidery did not end up working. The white thread on the underside was not pulled taught when the machine started therefore about halfway through, the canvas ended up getting caught in the machine and I had to cut it out and start over with a new machine. The lesson learned here was to make sure both bobbins of thread are correctly inserted into the machine before starting.

3. Group colors within the image before exporting to machine: If you do not have all of the parts of an image that are the same color grouped within the software they may not sew consecutively, therefore you will need to change the thread color way too many times. I did not realize you can change the sewing order by moving around the items. For example, originally the machine sewed North America in pink, then South America in purple, and then went back up to sew Greenland so I had to change the thread color twice to the original pink color. In order to avoid this on my second run through, I made sure to group all of the colors and reorganize the object sewing order so that I would only have to insert each thread color once.

Overall, this experience was filled with lessons and definitely an exercise in patience but it was worth it! I have previous sewing experience however I have never made such a detailed embroidery before. I can definitely see myself creating various embroidery pieces to hang around my apartment in the future so I am glad I got the opportunity and experience with these machines and software.  I am happy with how it turned out and look forward to using conductive thread this upcoming week to add a couple lights!

Box Update: 

Another exciting part about this week was that I got to pick up my finished box from last week. We ran out of time in class to make all of the boxes so it made this class even more exciting since I got to pick up the pieces and assemble it. I’m really happy with how it turned out and look forward to displaying it in my room!

FabLab Exploration & Laser Cutting Project

Tour & Inspiring Projects

This week our class met in the FabLab for a change of scenery and activities. I was excited to learn more about the FabLab as I’d been there before, however had only made stickers and never ventured into other mediums. To start out, Jeff Ginger (a previous class speaker and the director of the FabLab) gave us a tour explaining the various machines and resources they have and some of the things that have been created in each space. There were many neat creations from a Whack-a-mole game created in the electronics shop to a backpack that had eyebrows that flashed like turn signals if you pressed a small button on the straps that was made through incorporating small electronic components into an embroidered project. Before touring the FabLab, I had never considered the crossover between embroidery and sewing (what I think to be more traditional arts) and electronics or conductive thread.


I was also fascinated by all the different materials and projects that had been engraved. They have a special laser attachment that does curved surfaces therefore they had several engraved glasses on display. It’s amazing how many “do-it-yourself” projects are made possible and much simpler with the resources of the FabLab. If you were to custom order engraved glasses, it would probably be at least 5 times the cost of the fee you pay at the FabLab to use their equipment. I really enjoy places like the FabLab because it can cater to so many makers’ needs and with so many different machines, the possibilities feel endless. I felt instantly inspired walking around and looking at the previous creations displayed on bulletin boards, shelves and all over the lab.


Our Project:
This week, the class was split in half, some to work with embroidery and conductive thread, the other half to use the laser cutters and design program to design and make a wooden box. I was in the latter of the groups and so I got design and customize a template that would be inserted into the laser cutter on a piece of plywood and transformed into a shadow box. We did not have time to create each person’s box but I enjoyed watching the laser cutter work through the wood and create designs on the wood. We also got to learn how to manipulate an image and create a template to be laser cut with a program called Inkscape similar to Adobe Illustrator. The most challenging part of this mini project for me, was figuring out which pieces would fit together and then which sides to adjust so that when it is cut that it would create a box. At first, I thought there would be a simple template that we’d modify slightly and then be able to laser cut however I learned that it took much more time and attention to detail than I was expecting. I ended up starting over about halfway through as that was the easier path to take then trying to undo all of my work. It was quite a fun class though, after perfecting the puzzle-piece box sections we found images that we would want on our box to customize it. I spent a while deciding exactly how I wanted my box to look but found some neat images to display. I look forward to picking up my box this week and seeing how it turned out!

A Swirl of New Ideas

UPS Speaker Takeaways:

This week we heard from 2 inspiring speakers on very different topics. The first was Alan Amling who works for UPS on their Corporate strategy and global on-demand manufacturing team. He gave us an interesting look into how UPS is shifting their business model and opening up new 3D printing labs to reach some of the products on-demand market. The part that I found most interesting about his talk was that unlike most of the other speakers we’ve heard from, he admitted that 3D printing is not going to single-handedly take over the world and revolutionize everything. Throughout each of the talks we’ve heard, I’ve had some skepticism about how fast 3D printing is going to take over manufacturing and the ability it has to completely replace certain processes. Alan compared the relationship between 3D printing and manufacturing to microwave ovens versus traditional ovens. When the microwave was first invented, many believed it would replace traditional ovens. It has not replaced traditional ovens however it has become a regular household device alongside the oven. This, Alan believes is exactly how 3D printing and manufacturing will become. 3D printers will become prevalent in most manufacturing processes however will not completely replace traditional manufacturing but rather complement it.

Additionally, Alan had an interesting comment stating that a device or process does not need to be everywhere or take over a space to revolutionize an industry. He brought up Ecommerce and retail discussing how currently Ecommerce accounts for only 9% of all retail however it has still completely revolutionized the way retail businesses operate. The last takeaway I got from Alan was to “Get on a fast-moving train, you’ll excel faster than your peers”. By this, he meant to learn the skills that are becoming more prevalent now before they are everywhere because that will only help excel our careers in the future, specifically this 3D printing course provides a unique skillset that is very marketable to future employers.

Biohacking Takeaways:

The second speaker was Dot Silverman who introduced us to the idea of Biohacking and several amazing projects and products currently on the market or in the works. One of the projects that she had worked with was a material from Ecovative that is a sustainable replacement for polystyrene. This material is grown from a combination of processed agricultural waste and mycelium which then is set in growth trays to grow and take the shape of the trays in which they are set.

This material is incredibly promising as it provides a compostable alternative to polystyrene which takes from 500 years-forever to break down according to this study on biodegradability https://www.sciencelearn.org.nz/resources/1543-measuring-biodegradability. This idea was the most interesting to me as I care a lot about the waste created daily and finding sustainable substitutes to single-use everyday products.

Team Ideas:

Our team has been exploring various ideas for potential final products. For a while we were looking at 3D printing a map of the campus for DRES however this week, inspired by the speakers we decided to change topics and go in another direction. We are interested in exploring the capabilities of the Ecovative polystyrene substitute that Dot introduced and coming up with a common object replacement such as polystyrene coffee cups, plastic bags, or plates made out of this material.  The second idea we are exploring is the potential of using 3D printing on nails combined with a sustainable and healthier nail glue that would be more natural than current nails on the market today. A third idea we are currently discussing is participating in the “Growing Local Community” project led by Ultimaker (https://ultimaker.com/en/blog/52447-growing-local-community-project ) and incorporating the Mycelium material into our 3D printed garden design. We still have quite a bit of brainstorming and going discussing as a team however our goal for this week is to look further into each of these ideas and determine the most realistic and interesting route to take for our project.

Inspiration, Ideation & Design

This week’s class was made me feel as inspired and creative as I did when I was little and the world was my playground. Design for America came in to give a presentation on the Design Process and walked us through the process for a certain group and issue from understanding the client to crafting a solution.

I have learned and utilized the design process once before in an industrial design class, taught by David Weightman who also introduced the idea of design thinking in our pre-class video. I really enjoyed this Design storm session because it completely encompassed and quickly introduced us to each step of the design process in a condensed form. Below you will see the 6 steps in the design process that Design For America (DFA) follows when working on any of their projects.

They walked us through each of these steps with an example situation by introducing different personal stories who each struggled with a certain aspect of life due to their blindness disability. They had already completed the first step by identifying our target group and users for the design. Our group chose to focus on solving the issue of anxiety when in unknown social situations for Jess, a blind college student. The second step in this process was immersing ourselves in our user’s world by making assumptions about how she sees the world, what she feels, thinks, hears, says, does, wants, and needs. Part of the design process is coming up with a bunch of ideas each on separate post-it notes to visualize and determine the most important ideas. After making assumptions, we were able to build “How Can We… statements” to better narrow our focus for the project. Our group came up with  a few statements focusing on bettering the social environment of Football games for students who are visually impaired.

Ideation

After framing and understanding the issue and potential client, we delved into the ideate portion with an individual and then longer group brainstorm sessions. In this part of class, we came up with as many solutions to the issue as we could find. One of the ideas I came up with was a railing with various textures that would differ depending on the place where you are in the stadium. We ended up adjusting this idea in our group brainstorm session to become our product and mockup in the Build portion of the process.

Prototyping

We ended up designing a railing that would surround the entire stadium and have brail labels for each different area (such as student section, hot dog stand, ect.) to help with navigation throughout the stadium hopefully decreasing uneasiness of the unknown. We presented this to the class and they had mainly positive feedback however during the ideation stage we wished we could ask questions to the user group to determine whether our solution would be useful.

Overall, this class opened our eyes to the design process and I look forward to transferring these skills towards our own ideation process towards our semester project.

Further Learnings from Printing Fusion Design: Nozzle Size

As a side note: Last week I printed the desk cord organizer that I had designed using Fusion 360 and have included pictures of the final product as well. With each print, I learn something new. This, like the phone stand had a balance issue however I could solve that by using a command strip to attach the organizer to my desk so that the cords would not immediately pull it towards the floor and it works quite well.

Additionally, the first few prints I didn’t understand how the nozzle size impacted the print, however I now know that using a 0.4 nozzle is typically the standard however will be much slower to print than the .8 nozzle. This makes sense, thinking about it as the .8 extrudes twice as fast due to the larger size, it is able to cut the print time in half. The down side of this is that it may not be able to capture as many small details if there are thin lines. Additionally, I learned that if using supports, it is quite difficult to remove .8 supports however .4 supports are easy to remove due to thinner lines and less strength in the material. If interested in learning more about how the nozzle size impacts the print you can refer to the 2 links below that I used.

https://craftunique.com/forums/view-thread/1254 

https://rigid.ink/blogs/news/what-3d-printer-nozzle-size-should-i-use-the-pros-and-cons 

Discovering the Beauty of Autodesk Fusion 360

Overview:
This week we had Dan Banach from the Autodesk 360 company run a workshop introducing Fusion 360 software, the uses for it as well as walk us through creating our own models. We went through and made 2 different items, which I will discuss in detail later, while introducing many different functions and tools within Fusion 360. Dan had a slide discussing the various industries and companies that use Autodesk software, one I was surprised by was the movie industry and special effects. Many films use Autodesk software to design and create special effects. I am absolutely amazed by the capabilities this one software has and look forward to honing my skills in the coming months to be able to better design and create objects of value.

Fusion 360 Creations:

Our first item we designed was an ice scraper. In this workshop we walked through over 20 different tools within the software in order to create the exact look we wanted. One neat feature within Fusion 360 is that you can change the material of your creation. This then allows you to determine the specs, for example how much it weighs, which would then tell you how much it would cost in time and money to 3D print. I was also amazed by how many material options there were to model items in including metals, ceramics, paper, canvas, and even water.

In class we designed 2 items: an ice scraper and an iPhone charging stand. The phone charger I kept as the plastic PET material (since that is typical for 3D printing) thus why it is transparent, while the ice scraper I applied a “paint” layer to color it teal.

Ice scraper: http://a360.co/2snHF7x
Iphone charging stand: http://a360.co/2BpSWas

I thought the iPhone charging stand would be a useful item for my everyday life and was interested in seeing how the fusion file transferred into Cura to 3D print. I ended up printing this model and was excited to try it however, it is not very functional. The section that goes around the charger is too large to stay easily and when you put a phone on the shelf it is thrown off balance and falls to the floor. I was happy that I printed it because I got to see the iterative process, not everything comes out exactly as planned however you are easily able to go back to the drawing board and adjust the design for improvements. 3D printing is a series of trial and errors which makes it that much more exciting when you print something that works exactly as planned.

My Own Fusion Creation:

As for my own creation, I decided to make something to keep my electronic cords organized on my desk. I plug quite a few different cords into an outlet below my desk and have been getting annoyed that they fall off my desk and get tangled thus I’m constantly picking them up. This figure is a way to help keep the charging ends of cords on my desk. I incorporated a small shalf to keep it from sliding all over my desk however I still think it will need to be secured with a command strip. Hope this is of use to others! I’m excited to try printing this this week and will share updates on how it goes!

http://a360.co/2Bov1bl

Resources:

The most useful resource I resorted to throughout this small project is actually Autodesk’s Support & Learning page. They provide wonderful tutorials, explanations and examples of many different tools as well as products that you can use when creating your model. I found the tutorials quite helpful.

http://help.autodesk.com/view/fusion360/ENU/

First 3D Creation

FabLab Guest Lecture

This week our class focused on the extensive possibilities of 3D printing applications and various examples of products created with various machines in the FabLab on campus. We had guest speaker, Jeff Ginger, who is the director of the Champaign Urbana Community FabLab. He shared insights on the various capabilities of the FabLab and example products and projects that have been created within the lab. I was absolutely inspired hearing different stories of several entrepreneurs who launched their businesses with the help of the machinery and expertise of the FabLab. I have visited the FabLab a few times and made laptop stickers using the Silhouette machines and software however I’ve never used any other equipment. Each time I’ve gone in, I’ve always wanted to explore the other machines but was intimidated by them so I look forward to familiarizing myself with more FabLab machines this semester and expanding my “maker” mindset.

3D Printing Process

The next part of the class we got to dive in and play with the Tinkercad and Cura software while finalizing our logo designs and setting up the printers to create our team logos. Our design went through a few different iterations. We decided on the name 3Dream inside a cloud to represent the endless capabilities of 3D printing and the many dreams that can be achieved through this technology. Our first logo was a flat rendition, as shown below, although after loading it into Cura we decided it would be neat to make it into a 3D cloud shape. We found a useful model for a 3D cloud on thingiverse which we then tinkered with in tinkercad adding our logo and stars.

One of the most challenging parts for us was adjusting our logo to fit perfectly onto the 3D model of the cloud. We utilized a few different tools within tinkercad in order to rotate and adjust the logo to lay flat onto the surface since the surface was angled. Below I have included images of our design in the Cura software as well as the final product. I was very happy with the final product. It took about 4 hours to print.

3D Printing Resources

Looking further into different resources available for people new to 3D printing, I am amazed by what the internet has to offer. I have included a variety of different resources I will be using this semester.

Models Library: Cults3D: https://cults3d.com/

This platform is similar to that Thingiverse and Pinshape however more selective. There are professionals who ensure the uploaded models are of the best quality whereas Thingiverse allows anyone to upload their designs even if they have not been printed. Additionally, many of the curated models on Cults3D are created by professional designers.

3D Scanning: Trnio: http://www.trnio.com/team/
This is a free IOS App that allows you to convert photos from your phone into 3D models. I am hoping to try out this app to see how well it works.

3D News: http://3dprintingindustry.com/

This website shares news about the 3D Printing Industry such as hardware and software but also discusses related industries that are impacted by 3D Printing.

Week 2: 3D Printing will Rock the World

Class Reflection & Takeaways

This week’s class has been a wonderful introduction to the world of 3D printing and the third industrial revolution. I have been wanting to get involved with the MakerLab each year of school but never took the time on my own to visit and get more involved with it. The first week I was incredibly inspired by Arielle, the guest speaker and class alum who spoke about her final project. She turned her project, printing wheelchair racing gloves, into a successful business after completing the class. This got me thinking about various innovative uses for 3D printing that may not have been done before.

Our second class, which I will focus on in this post, provided a great overview of the various resources available to provide inspiration and templates for printing various items. During class, we explored the resources in depth and I looked further into https://www.shapeways.com/. This is a website that provides a marketplace for people to sell their designs and have them printed in various different materials. If interested in buying a product, you have the freedom to choose what it is printed in, materials from 14 karat gold to silver to various grades of plastic. They will then print it for you, and ship it to you, giving a loyalty to the designer as well as making a profit. As I was exploring this website, there was everything from games, to household objects to jewelry. This was interesting for me as it raised the question of whether the art of handmade jewelry will continue, or if 3D printed jewelry will slowly replace the traditional methods.

The readings for this class provided interesting insight into how 3D printing is not only affecting the consumer and manufacturing market but also the mindsets of a large group of people. Dale Dougherty in his article, The Maker Mindset discussed how important this idea is, the innovative way of creating that helps our world flourish. He critiques the current academic curriculum for failing to emphasize creativity and innovation. Makerspaces are wonderful places for a variety of skills and ideas to come together to create something altogether new. I found this an interesting concept, as I have always loved the arts and exercising the more creative side of my brain. I can only imagine what it would be like to go to school in an environment that encouraged creativity over math and sciences or in combination with the more technical courses.


Below I have listed a few items I am interested in printing:

This coaster is unique and I know I would enjoy using it in my own apartment. I drink coffee and tea quite a lot and like nice looking coasters therefore this one is perfect for me! I cannot exactly tell what size this design is, but I would want to make sure it fits a large coffee cup but is not overly large, taking up too much space on my small desk.

https://pinshape.com/items/33773-3d-printed-spider-coasters-design

As a larger project, I am interested in attempting to print a violin this semester. It se
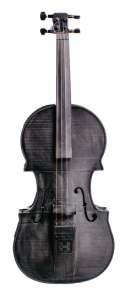
ems as if there are quite a few different designs out there both for acoustic and electric violins so I have included a few of the designs I found for them below. For the acoustic violins, I would most likely print them in white, for a sleek looking design, I would also make sure they had supporting posts inside to hold the back up from the top of the violin while being played.

https://www.thingiverse.com/thing:1533229

http://www.hovalabs.com/hova-instruments/hovalin

https://www.thingiverse.com/thing:2113171/#files

http://vlnlab.com/vla.html

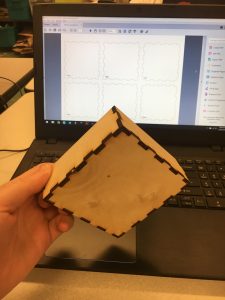
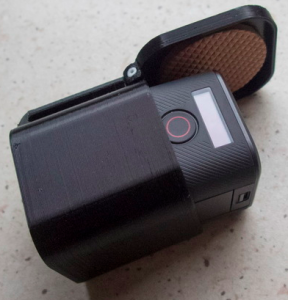
I am interested in printing a small carrying case for my GoPro camera as I do not currently have a case or any good way to transport it. This box seems to be the perfect size and with a hinge it would be much more protective than the current way I transport my GoPro (which is typically unprotected in a backpack). I have never even seen cases like this sold in stores or online so I was very excited to discover it on the internet available to print. https://www.thingiverse.com/thing:2210863

A final object I would like to print is a candle holder. I found this design beautiful and enjoy burning candles while I study. I would love to have one that I personally made. A way that I might modify it would be the changing the shape slightly to fit different sized candles as well as printing various colors.

https://www.thingiverse.com/thing:1751738