Tech Tip of the Week: Managing Course Navigation Links in Canvas

Did you know you can tailor your course navigation so students can only see and access certain navigation links?

Canvas has great documentation on how to hide, enable, and reorder different course navigation links like announcements, modules, pages, people, grades, and more. Instructions for managing course navigation links can be found on Canvas’s community site here.

Please reach out to the Help Desk if you have any questions!

Tech Tip of the Week: Canvas Gradebook Icons

This week’s Tech Tip is for students. Ever see an icon in your grades, and you’re not sure what it means? Our Canvas Gradebook Icons MediaSpace video will discuss icons that indicate when an assignment is graded or ungraded or when there are extra details about your grade.

You can also click through the slides used for this video.

If you want more information about Canvas grading icons, please visit Canvas’ complete grading icon guide.

Tech Tip of the Week: Group Work in Canvas

Making groups within your course in Canvas is a great way to facilitate group projects, collaboration, and participation. Please watch our video tutorial to learn how to make and edit groups in Canvas, what the student view of groups looks like, and more!

You can view our Group Work in Canvas walk-through video here.

Some important things to note about groups in Canvas:

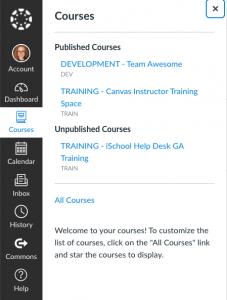
  • As an instructor, make sure to add your course number to each group name for ease of access for students.
  • Students can be still be graded individually for assignments set in groups. (Reach out if you have any questions about your gradebook in Canvas!)
  • Any group member can create an announcement when in their Canvas group, and members can subscribe to announcements, mark as announcements as read, etc.

Please reach out to the Help Desk if you have any questions!

Tech Tip of the Week: Sharing Class Recordings on Canvas

Our Canvas Tech Tip for this week is about how to share class recordings on Canvas! You can view our sharing class recordings video walk-through here

Please reach out with any questions you may have!

Tech Tip of the Week: Navigating Canvas Using the Sidebar

Today’s Tech Tip is all about navigating Canvas using the sidebar. On the sidebar you will find the following: Account, Dashboard, Courses, Calendar, Inbox, History, Commons, and Help. Below are descriptions for what you can find under each section and why you might use it while on Canvas.
  • Account: This is where you can access your profile, notifications, and settings. You can also logout of Canvas by clicking Account and then clicking Logout from the sidebar that appears on the right.
Screenshot of the sidebar on Canvas with Account selected
  • Dashboard: Think of this as the “home screen” of Canvas. If any of your instructors are using Canvas, this is where you will be able to see your course sites. 
  • Courses: This is another place where you can access your courses. If you click Courses, an additional sidebar will appear to the right with a list of all your courses and the links to each of their corresponding course pages.
Screenshot of sidebar on Canvas with Courses selected
  • Calendar: This is where you can view when assignments are due in a calendar view. All of your courses will have due dates listed within your course site, but the calendar option is a great way to view assignment due dates for all your Canvas courses on a calendar. Note that each course corresponds to a color, so it is easy to distinguish which assignments are for each course.
Screenshot of Canvas Calendar
  • Inbox: This is where you can view any messages your instructor or fellow classmates have sent you.
  • History: You can view what you have recently accessed on Canvas by clicking History.
Screenshot of Canvas sidebar with History selected
  • Commons: This may not be something you use frequently, but Commons is a learning repository that lets instructors find, import, and share resources. For more information on Canvas Commons, please see Canvas’s documentation here.
  • Help: You can access Canvas support links when you click here. 
Screenshot of Canvas sidebar with Help selected
Keep an eye out for next week’s Tech Tip which will be a video walk through of what a Canvas course site will look like! As always, if you have any questions or want to learn more about how to use Canvas before the fall semester, please reach out to the Help Desk!

Tech Tip of the Week: Adding a Profile Picture to Canvas

In order to add a profile picture to your Canvas account you would follow these steps.

After logging into Canvas, you will see a sidebar on the left side of the screen. When you click Account it will expand the smaller menu seen below, choose Settings.

The Settings will look like this:

Click on the circle at the top next to your name where your photo will go.

Clicking this circle will extend this menu of options where you can choose to either Upload a Picture from your computer or you can Take a Picture with your webcam.

When you’ve loaded a photo into Canvas you will be able to adjust how your photo looks in the profile picture circle. Once you’ve adjusted it to your liking, remember to hit Save.

Once you’ve saved and refreshed your window, your new profile picture will appear.

Tech Tip of the Week: Adding Your Pronouns to Canvas

When you log into your Canvas account you are able to add your pronouns in your settings.

Begin by clicking Account in the sidebar on the left.

It will extend this menu where you will select Settings.

When your settings are opened, on the right you will have the option to Edit Settings.

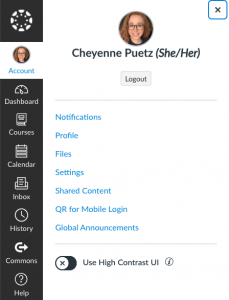
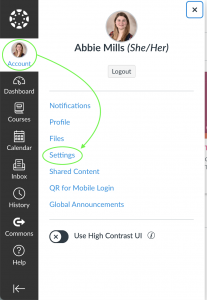
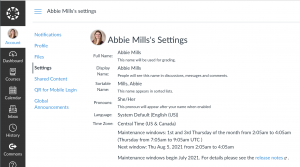
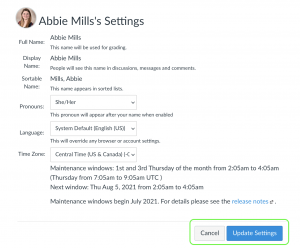
Once you’ve opened your settings to edits, you will have a drop down menu with options for Pronouns.
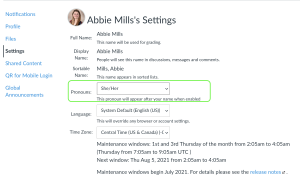
Once you’ve selected your pronouns, remember at the bottom to save any changes you’ve made to your profile by clicking Update Settings.

Once you’ve saved the changes you’ve made to your profile, your selected pronouns will appear by your name.

Tech Tip of the Week: Interactivity in Online Video Lectures

After an instructor expressed their dislike of the lack of interactivity in their online course, the Center for Innovation in Teaching and Learning (CITL) responded with ways to add interactivity to online classes, specifically when using asynchronous videos.

Some of the highlights include breaking the videos up and adding them as parts of a Moodle quiz where they are broken up by questions or using Illinois Media Space to make the video itself interactive.

Learn more in CITL’s article here.