Tech Tip of the Week: Canvas Course Walk-through Video

This video will walk-through some of the aspects of Canvas Courses that you may see if you have courses that are hosted in Canvas this Fall!

(If you are having trouble viewing the video in your browser you can check it out here)

If you have any questions or want to learn more about how to use Canvas before the fall semester, please reach out to the Help Desk, we are always happy to help!

Tech Tip of the Week: Adding a Profile Picture to Canvas

In order to add a profile picture to your Canvas account you would follow these steps.

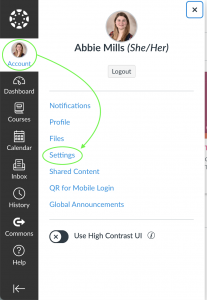
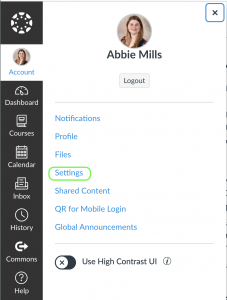
After logging into Canvas, you will see a sidebar on the left side of the screen. When you click Account it will expand the smaller menu seen below, choose Settings.

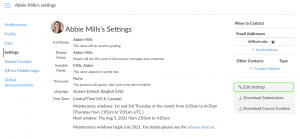
The Settings will look like this:

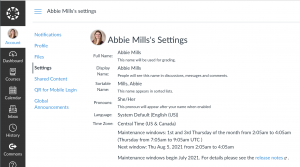
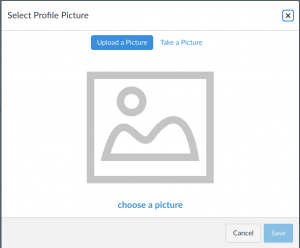
Click on the circle at the top next to your name where your photo will go.

Clicking this circle will extend this menu of options where you can choose to either Upload a Picture from your computer or you can Take a Picture with your webcam.

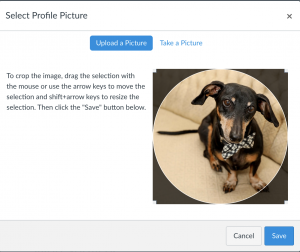
When you’ve loaded a photo into Canvas you will be able to adjust how your photo looks in the profile picture circle. Once you’ve adjusted it to your liking, remember to hit Save.

Once you’ve saved and refreshed your window, your new profile picture will appear.

Tech Tip of the Week: Adding Your Pronouns to Canvas

When you log into your Canvas account you are able to add your pronouns in your settings.

Begin by clicking Account in the sidebar on the left.

It will extend this menu where you will select Settings.

When your settings are opened, on the right you will have the option to Edit Settings.

Once you’ve opened your settings to edits, you will have a drop down menu with options for Pronouns.
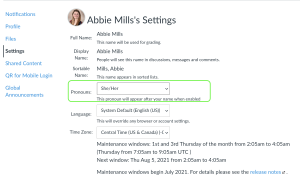
Once you’ve selected your pronouns, remember at the bottom to save any changes you’ve made to your profile by clicking Update Settings.

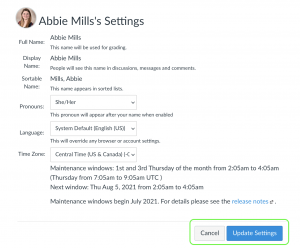
Once you’ve saved the changes you’ve made to your profile, your selected pronouns will appear by your name.

Tech Tip of the Week: Logging into Canvas

If you have a NetID and password you will be able to login to Canvas and take a look around. Begin by going to canvas.illinois.edu. It will look like this: 

Remember, your NetID does not include @illinois.edu like your email address does. It is just what comes before @illinois.edu. When you log in, you can take a look around your dashboard.

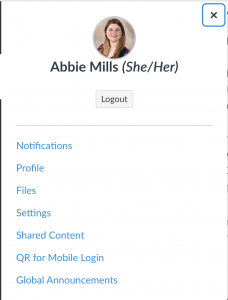
As mentioned last week, only instructors who have opted in to be early adopters of Canvas will have their course(s) on Canvas in the fall.

If you have classes that will be on Canvas for fall, they may not be included yet on your Canvas, but it’s a good idea to take a look around even before they arrive! It should look a bit like this:

 We will have future Tech Tips about the content within Canvas and making changes to your settings, so keep your eyes peeled!


Tech Tip of the Week: What is Canvas?

You may have seen in our July iSchool Help Desk and ITD newsletter that the iSchool will begin making the transition to the Canvas learning management system beginning this fall for our undergraduate courses and any instructors who wish to be early adopters. For our graduate level students, this means that if your instructor has opted to be an early adopter, your class or classes may be on Canvas. Our amazing ITD team is working with instructors on migrating courses, and the Help Desk team will be here to help make this transition as smooth as possible for faculty and students. We are still in the early stages of migrating courses, and instructors are organizing and setting up their courses throughout the summer months. Instructors will let students know whether their course will be conducted on Canvas, and if students or instructors have any questions, please contact the Help Desk and we are happy to provide assistance. 

Tech Tip of the Week: Joining Zoom via Moodle in Safari Browser Error Message

Recently users have been experiencing an error message when trying to join Zoom classes via Moodle while using the Safari browser. This error message is due to third party cookies and pop ups not being allowed in your Safari browser settings. If you have been getting the error message ‘Sorry, your session was expired. Please refresh the page or login again.,’ please check out this Wiki documentation from the Help Desk that explains the steps you would follow in order to ensure you can join Zoom sessions via Moodle on Safari in the future! As always, if you have any further questions don’t hesitate to reach out the Help Desk.

Tech Tip of the Week: Clearing Cache and Cookies

Clearing your cache and cookies can seem intimidating, but it can often help solve various issues like getting those pesky “Bad Request” errors. Your cache helps increase browsing speeds, and cookies are information you selected to have remembered on your computer, like your email user name and password. The Web Browser Security page on the iSchool Wiki has helpful links to guide you on how to clear cache and cookies depending on your preferred web browser. It is important to note that clearing cache and cookies will also clear your saved passwords for that particular browser. Make sure to take note of your passwords before clearing cache and cookies. For detailed descriptions on how to clear cache and cookies in Firefox, Google Chrome, Safari, and Microsoft Edge, please go to the Web Browser Security page on the iSchool Wiki. 
For more information on what cache and cookies mean, please check out Yale University Library’s helpful description here!
If you have any questions regarding your cache and cookies, please reach out to the Help Desk at 217-244-4903 or 800-377-1892, ischool-support@illinois.edu, or via our TechChat.

Tech Tip of the Week: Zoom Tips and Best Practices

We wanted to share some handy documentation we compiled this past school year. One of the pages that is newer to our Wiki and may come in handy for instructors and anyone hosting Zoom meetings is our Zoom Tips and Best Practices page! This documentation gives some best practices for setting up Zoom meeting settings, tips for within the Zoom meeting, and also some tips for breakout sessions. 

Tech Tip of the Week: Windows Keyboard Shortcuts

For this week’s Tech Tip, we have some of the most common and helpful keyboard shortcuts for Windows!
Ctrl+C will copy a selected item to your clipboard
Ctrl+X will cut the selected item
Ctrl+V will paste the item in the clipboard
Ctrl+Z will undo the previous action
Ctrl+P will print the current page/document
Ctrl+S will save the current page/document
Ctrl+F will open the search to find a term in the current page
Alt+Tab will switch between open apps
Windows logo key+H will start dictation
F3 will search for a file or folder in File Explorer
F5 will refresh an active window
Windows logo key+Shift+S will take a screenshot of part of your screen
Windows logo key+period (.) or semicolon(;) will open the emoji panel


Mac Keyboard Shortcuts

Here are some shortcuts to make your life using a Mac a little easier. (Windows Shortcuts coming next week.)
Some of the most common and helpful Mac keyboard shortcuts are:
Command+C will copy a selected item to your clipboard
Command+V will paste the item in the clipboard
Command+Z will undo the previous action
Command+P will print the current page/document
Command+S will save the current page/document
Command+F will open the search to find a term in the current page
Command+Spacebar will open the spotlight search
Shift+Command+N will create a new folder.
Control+Command+Space bar will show the Character Viewer, from which you can choose emoji and other symbols.
Command+B will boldface the selected text, or turn boldfacing on or off. 
Command+I will italicize the selected text, or turn italics on or off.
Command+K will add a web link.
Command+U will underline the selected text, or turn underlining on or off.
Option+Shift+Command+V will Paste and Match Style: Apply the style of the surrounding content to the item pasted within that content.