This is Oliver (cat) and Pickles (turtle). Oliver has two different eyes and we rescued him back in 2018. They told us he was feral and wouldn’t be cuddly towards humans. Now he is the biggest baby and loves all the attention despite my family having two other cats. He knows how to sit, and he loves when you do x marks the spot on his back. Pickles loves his worms and is a red ear turtle that loves you when in the water but when its bath time he pretends like he was never that interested in getting to know you.
PoTW submission courtesy of Evelyn. Thank you for submitting your pets!
If you, or other viewers would like to submit more pets, just send an email with some photos and a brief description to ischool-support@illinois.edu
Here’s a few of our biggest tips on using Zoom, as a student, instructor, guest speaker, presenter, et cetera. Links direct to the iSchool wiki, the UIUC Technology Services Knowledge Base, and previous Tech Tips from the Help Desk Blog.
Screen Sharing Privileges from the iSchool Wiki – If students (or other non-hosts) are presenting, you’ll want to give them screen-sharing privileges first.
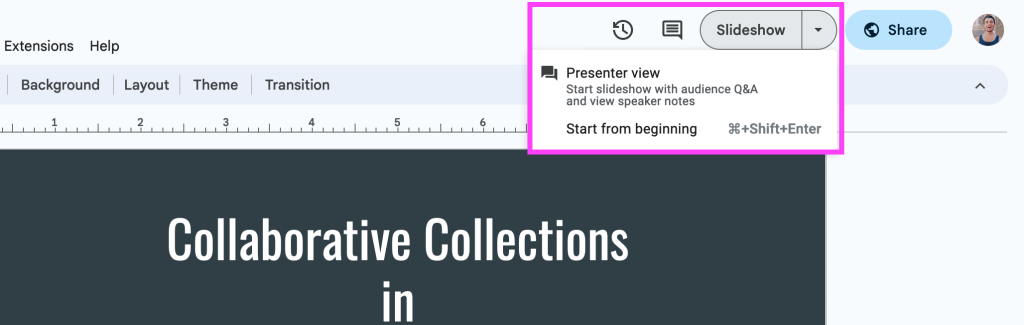
Presentation Mode – If you’re going to present, you can select Presenter View in most slideshow applications to generate linked slideshows on you screen. Google Slides will allow you to look back at your notes, but Power Point will change the whole screen over to slides and notes when you select Presenter View. However, since we don’t want our audience seeing our notes or upcoming slides, we can go into Zoom, screensharing, then advanced settings for screensharing and select “Portion” so you can lay the display window over just the parts of your presentation you want to show, all while you read the notes. You can test this yourself on a single computer.
Zoom-themed posterWhere to find the Slideshow options on PowerPoint. Check out Presenter View so you can see your notes.Where to find the Slideshow options in Google Slides
The Illinois Wiki will be partially shut down as of June 2023. Old pages will still be viewable, but users will no longer be able to create new content on the Wiki.
Check out the notice from the Wiki front page,
Welcome to the Wiki! For full access to the Illinois Wiki, campus users should authenticate by clicking the Log In link in the upper right. From there, feel free to jump in and start browsing pages, or visit our help space for detailed instructions.
As previously announced, the Illinois Wiki service will be retired by June 30, 2024. The retirement is happening in 3 phases and the first deadline is approaching next month:
No new sites can be created on the Illinois Wiki after June 30, 2023.
The following dates provide a high-level timeline of retirement plans: June 30, 2023 – No new sites can be created January 1, 2024 – Illinois Wiki set to read-only June 30, 2024 – Full Illinois Wiki retirement
Hey there, are you graduating this May? Did you do all the little account things you need to do to keep your email contacts, download copies of submitted assignments for your portfolio, and harvest syllabi for later reference? Well if you’re not sure what you need to do as you get ready to graduate, check out this week’s Tech Tip, which collects a few relevant tips from the Help Desk, Tech Services, and the iSchool wiki to graduates who are about to graduate.
Are you interested in social media outreach? Then you might want to make sure your content is accessible to as many people as possible. We’re going to discuss a few ways you can do this.
WCAG: The Web Content Accessibility Guidelines can be found here, WCAG 2 Overview. This is the current standard we at the Help Desk use when writing up our own social media content and it’s one we recommend.
Social Media Accessibility: How do I make my social media content more accessible
Hyperlinks
If you want to link to something on Facebook, you have to past the full link, at which point a clickable image link will appear. Make sure there are no other forms of media on the post (i.e., graphics, polls, etc.), delete the actual link you pasted in, and make sure that the clickable image link at the bottom is still there (it should be). Now you’re ready to post. Unfortunately, Facebook does not support simplified hyperlinks (trust us, we’ve tried).
Twitter behaves similarly, but instead of deleting the initial link, you just leave the link there in its entirety and Twitter will automatically remove it upon posting while maintaining the blip. And just like Facebook, be sure to clear out any other non-text media attached to the post to ensure the clickable image link remains. Also, if your link is not accessible to viewers, a clickable image link will not appear. Is this the least obvious way to do it? Yes.
Alt Text and Captions
If you can, you’ll want to add alt text or captions to graphics. This can be difficult depending on the format of your social media platform.
For example, Facebook/Meta only allows for alt text and captions when using the Meta Business Planner. Instagram only allows for alt text and captions if you own a professional account.
Twitter posts are easy enough to add alt text to to a graphic just by selecting the “edit” option on a post’s image and then selecting “alt” above said image and entering the text you think best summarizes the image.
TL;DR
Check out the WCAG guidelines linked above for some handy tips and tricks to making your content more accessible. It can be difficult navigating the UI of some social media accounts, so be sure to poke around and do some research.
Inspired by a real call to the Help Desk! This week’s Tech Tip will show you how to change the settings on your Windows computer to open certain file types in set apps by default. For example, if you want to open a PDF in Adobe, but your computer is set you default open PDFs in Adobe, it may instead have been defaulted to open in web browser
Navigate to “Settings” which can always be found in the Windows Logo Start menu on the bottom left corner.
From the list of Settings pages, select “Apps” and on the Apps settings page, select “Default apps.” From here, you can change the default of the more frequently used apps, such as email application, web browsers, and media players.
On the bottom of the page, there is the “Choose default apps by file type.” On the following page, there should be a much longer version of the previous page, but organized by file type rather than web browser, email, media player, etc. Scroll to the file type you would like to open in a particular app, and change the default by selecting one of the apps on your device that appear among the options.
If you do not see the app you want to use, you may need to download that app first. (I.e., if you don’t have Adobe Acrobat, you can’t select Adobe Acrobat until the app is installed.)
You may also go back a page, and below “Choose default apps by file type” you can choose similar menus to sort through, such as “Set default by app”.
This one’s for the professors and anyone else running a Canvas course site, especially if you’re having a hard time transferring content from one semester to the other. If you follow our guide, you’ll have one less hurdle to worry about.
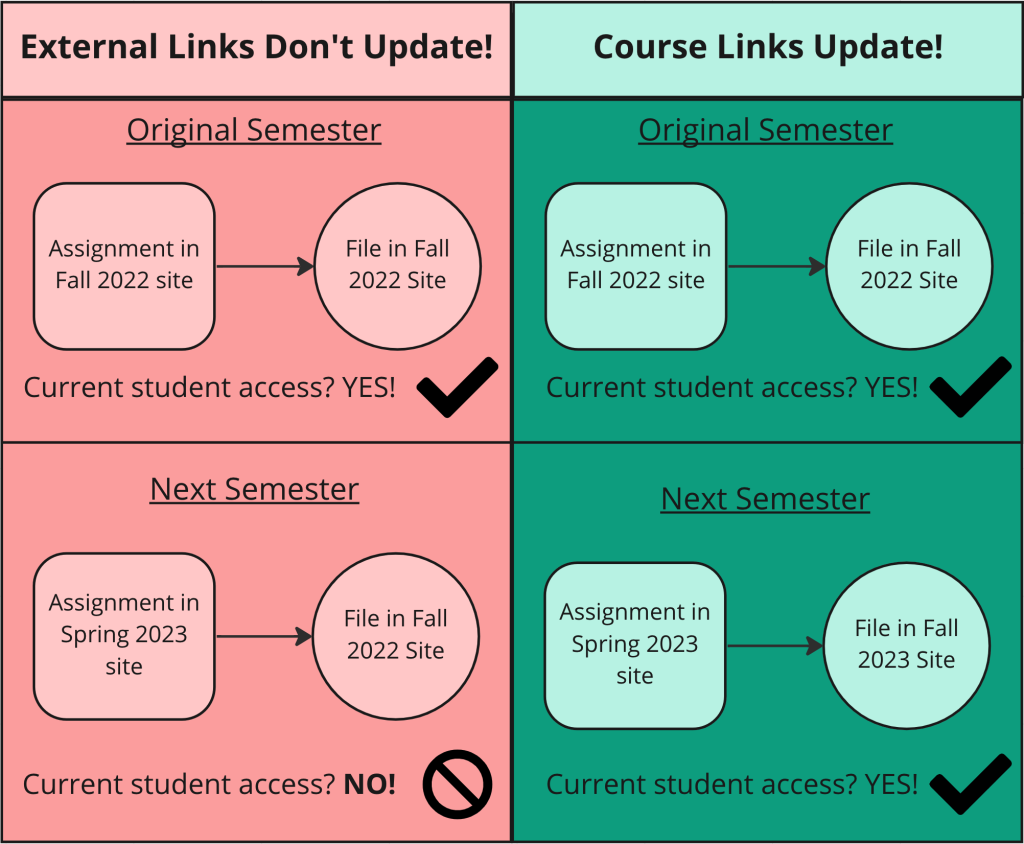
Rubric of original semester to next semester, and from external link to internal/course link
Links created by copy+pasting from the address bar are external links, and usually work just fine on Canvas. However, these external links will default to the course page where they were originally taken from. i.e., the course page associated with the initial link. This can complicate updates to or transferring content from those links to new Canvas Course pages for future semesters.
Links that access your Canvas Course page, and are made using the Text Editor’s “Course Links” option are internal/Course links and work better for keeping your Canvas up to date with new semesters and any alterations you might make. These internal links will not be stumped as course pages update from semester to semester.
TL;DR It’s important to use internal/Course links using the Canvas Text Editor Tool when making your Canvas Course Site. If you don’t do this, and instead take the more familiar method of copy+pasting external links from the address bar, those links will lead back to the semester they were originally made in, leaving students scratching their heads as to why the link leads to an unpublished course site that they can’t access.
Check out the Help Desk Wiki for more information, here. See the full link at the bottom of the page.
LibGuides is an easy-to-use Content Management System used by thousands of libraries worldwide. Librarians and instructors use it to curate knowledge and share information by creating online Guides on any topic, subject, course, on any process, on anything.
You can use LibGuides to create subject, course, or topic guides, use as your library website, store your A-Z lists for easy reuse, create internal guides documenting workflows & procedures, create and maintain staff profile pages, LibGuides is multilingual too, and mobile and tablet-friendly.
I personally like the How-To guides for library resources. If you’re library has a program or tool you’re interested in, you might search their website for a LibGuide on how to access and use said resource. You can learn more in springshare’s tutorial here.
Here’s the UIUC Library listing of Libguides: https://guides.library.illinois.edu/?b=t