Making a presentation or recording some work on your desktop? Take a peak at Screencast-o-matic, a free online software you can use to record your work and audio, edit, and share with others. The free version of Screencase-o-matic gets users started with some simpler, limited tools, which would work for shorter (15 minutes) presentations. The interface is easy to use once you have made an account and completed your download.
^^^ Screen capped from screencast-o-matic.com using said software
When you’re using Canvas to access Zoom meetings for online classes and other class materials, you may encounter some issues wherein pop-ups are blocked by your browser security settings. From browser to browser, there are different ways of fixing this issue so that you may access your Zoom meeting for an online class. The blocked Zoom meeting link pop-up is a common issue, especially when a browser is updated.
Firefox: There is a small shield icon on the left of the address bar. Clicking on this shield icon will open up a menu which you can then turn off/on “enhanced tracking protections” which, when turned off, will place a slash mark across the shield icon. In this state, you should be able to open up Zoom links from Canvas.
Alternatively, you may access more advanced security settings in Firefox from the “burger” icon to the far right of the address bar, which consists of three horizontal lines stacked atop each other. From this icon, select “settings” and “privacy & security” to clear cookies (which can often interfere with Canvas and Zoom). You may also change the level of security, lowering as necessary to allow for pop-ups. We recommend raising security again after allowing the pop-up to open and getting into Zoom. It’s a short process to drop and raise the settings and can be done easily with some practice
The shield icon on the left side of the address bar. The settings “burger” on the rightThe shield icon on Firefox once Enhanced Tracking Protection has been turned off, allowing for Zoom meeting pop-ups from Canvas. The drop down menu when the shield icon is clicked. Note the option to turn the Enhanced Tracking Protection on/off with the blue switch.
Chrome: While there is no shield icon to navigate to in Chrome, the “burger” to “settings” to “privacy & security” path is the same. The Chrome “burger” is three vertically placed dots rather than stacked horizontal lines, but otherwise, it’s a nearly identical process to lower and raise the security settings in order to open a pop-up link for a Zoom meeting in Canvas.
The Chrome browser does not have the shield icon, so the setting must be accessed through the dotted “burger” icon on the right side.
As always, if you have questions or concerns, please contact us at the iSchool Help Desk. You can reach us at (217) 244-4903 or (800) 377-1892, ischool-support@illinois.edu, or via chat at https://go.ischool.illinois.edu/TechChat. Our contact info is also on your course Canvas pages.
The desk is usually open 8:00 AM – 5:00 PM Monday – Friday. Hours may vary during finals, breaks, etc.
When using some of the rooms in the iSchool buildings, you may have the opportunity to use the Mersive Solstice app to wirelessly stream your laptop footage to the room displays. This is very similar to using an HDMI cord to stream from one screen to another, just without the wires! See this iSchool Wiki page below for more details. https://wiki.illinois.edu/wiki/display/ischool/Solstice+Wireless+Display
Solstice is enabled in 501 E Daniel in rooms 46, 109, 131, and 242, and at 614 E Daniel in rooms 4018, 4035, 4043a and 4043b (aka, the Multi-Purpose Room) 4165, and 5116.
You’ll need to download and install the Mersive Solstice App, which you can do here, https://www.mersive.com/download/
Students of the iSchool are privy to lots of tools. So many tools in fact, that it can be difficult to remember what’s where and what it’s good for. If your bookmarks tab is full of iSchool pages, you might condense a few of them by saving the iSchool Student Tools page on the iSchool Wiki. The linked page takes you through a lot of the basics, like Canvas, Zoom, and 2FA, as well as a few useful links you may not have looked into before. This week, we encourage you to check out this repository of student-facing resources.
There’s lots of free content for students, staff, and faculty on the UIUC WebStore, from the Microsoft Office Suite, to Adobe, to security software. Check it out the WebStore’s “Personal Purchases” page to see a break down of software categories for easy browsing.
Below is a series of screenshots of webpages you’ll likely encounter when purchasing software in the WebStore. Be sure to log in to the WebStore first. There have been some issues w/ logins to the WebStore, so if you encounter login trouble, please contact the iSchool Help Desk. You can reach us at (217) 244-4903 or (800) 377-1892, ischool-support@illinois.edu, or via chat at https://go.ischool.illinois.edu/TechChat.
The WebStore Front Page. Note the Personal Purchases and Free Software buttons.Once you log into the WebStore, you can view Account information in the My Account tab. For this example, we’ll look at downloading from the MicroSoft Products category.Here we can see the MicroSoft 365 (Office) Suite, specifically for people at the Urbana Campus. Much of the WebStore software will be free, but watch out for prices on right column. Selecting the MS 365 Office Suite brings us to this product description page. It comes with links, specifications, and instructions on downloading/installing the software.
From this point, depending on which software you’re looking into, directions may vary. Likely though, you’ll download and install the software and be good to go. There may also be limits on how many devices you can install a single instance of software on, so be sure to prioritize installing software on your primary devices.
You may have noticed that your profile picture on Canvas is blank, or is the same image as your iCard photo. If you would like to change your Canvas profile photo, follow along this week’s Tech Tip below.
First, have a picture you’d like to use on the device you are using, or be ready to take a picture with a camera.
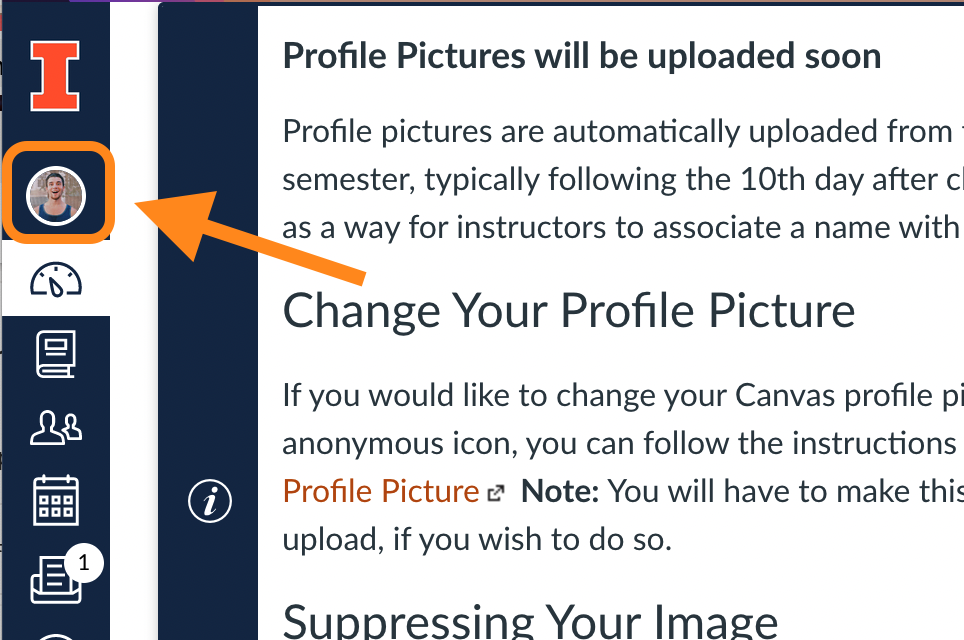
Log in to your Canvas account, either on a computer, or on a smart device via the Canvas App. Select the profile icon in the left hand bar of Canvas.
It should be at the top of the pillar of icons.
Screenshot with highlight and arrow, directing users to the Profile icon.
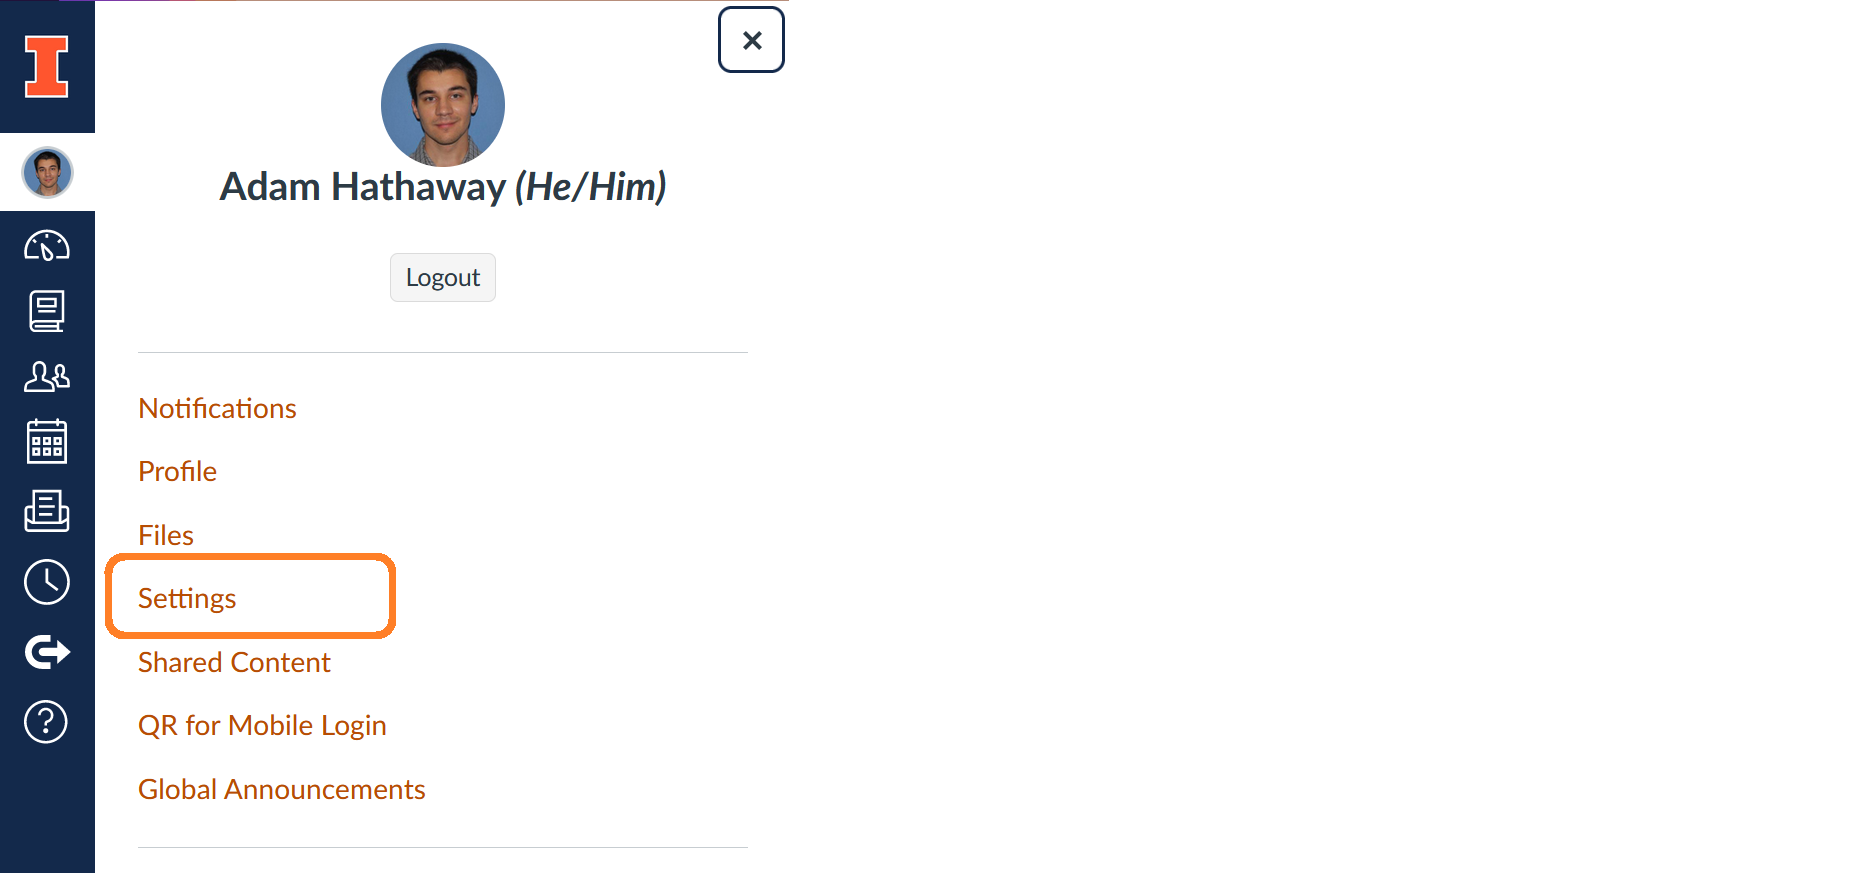
Select “Profile” in the menu that appears.
Screenshot with highlight and arrow, directing users to “Profile” button
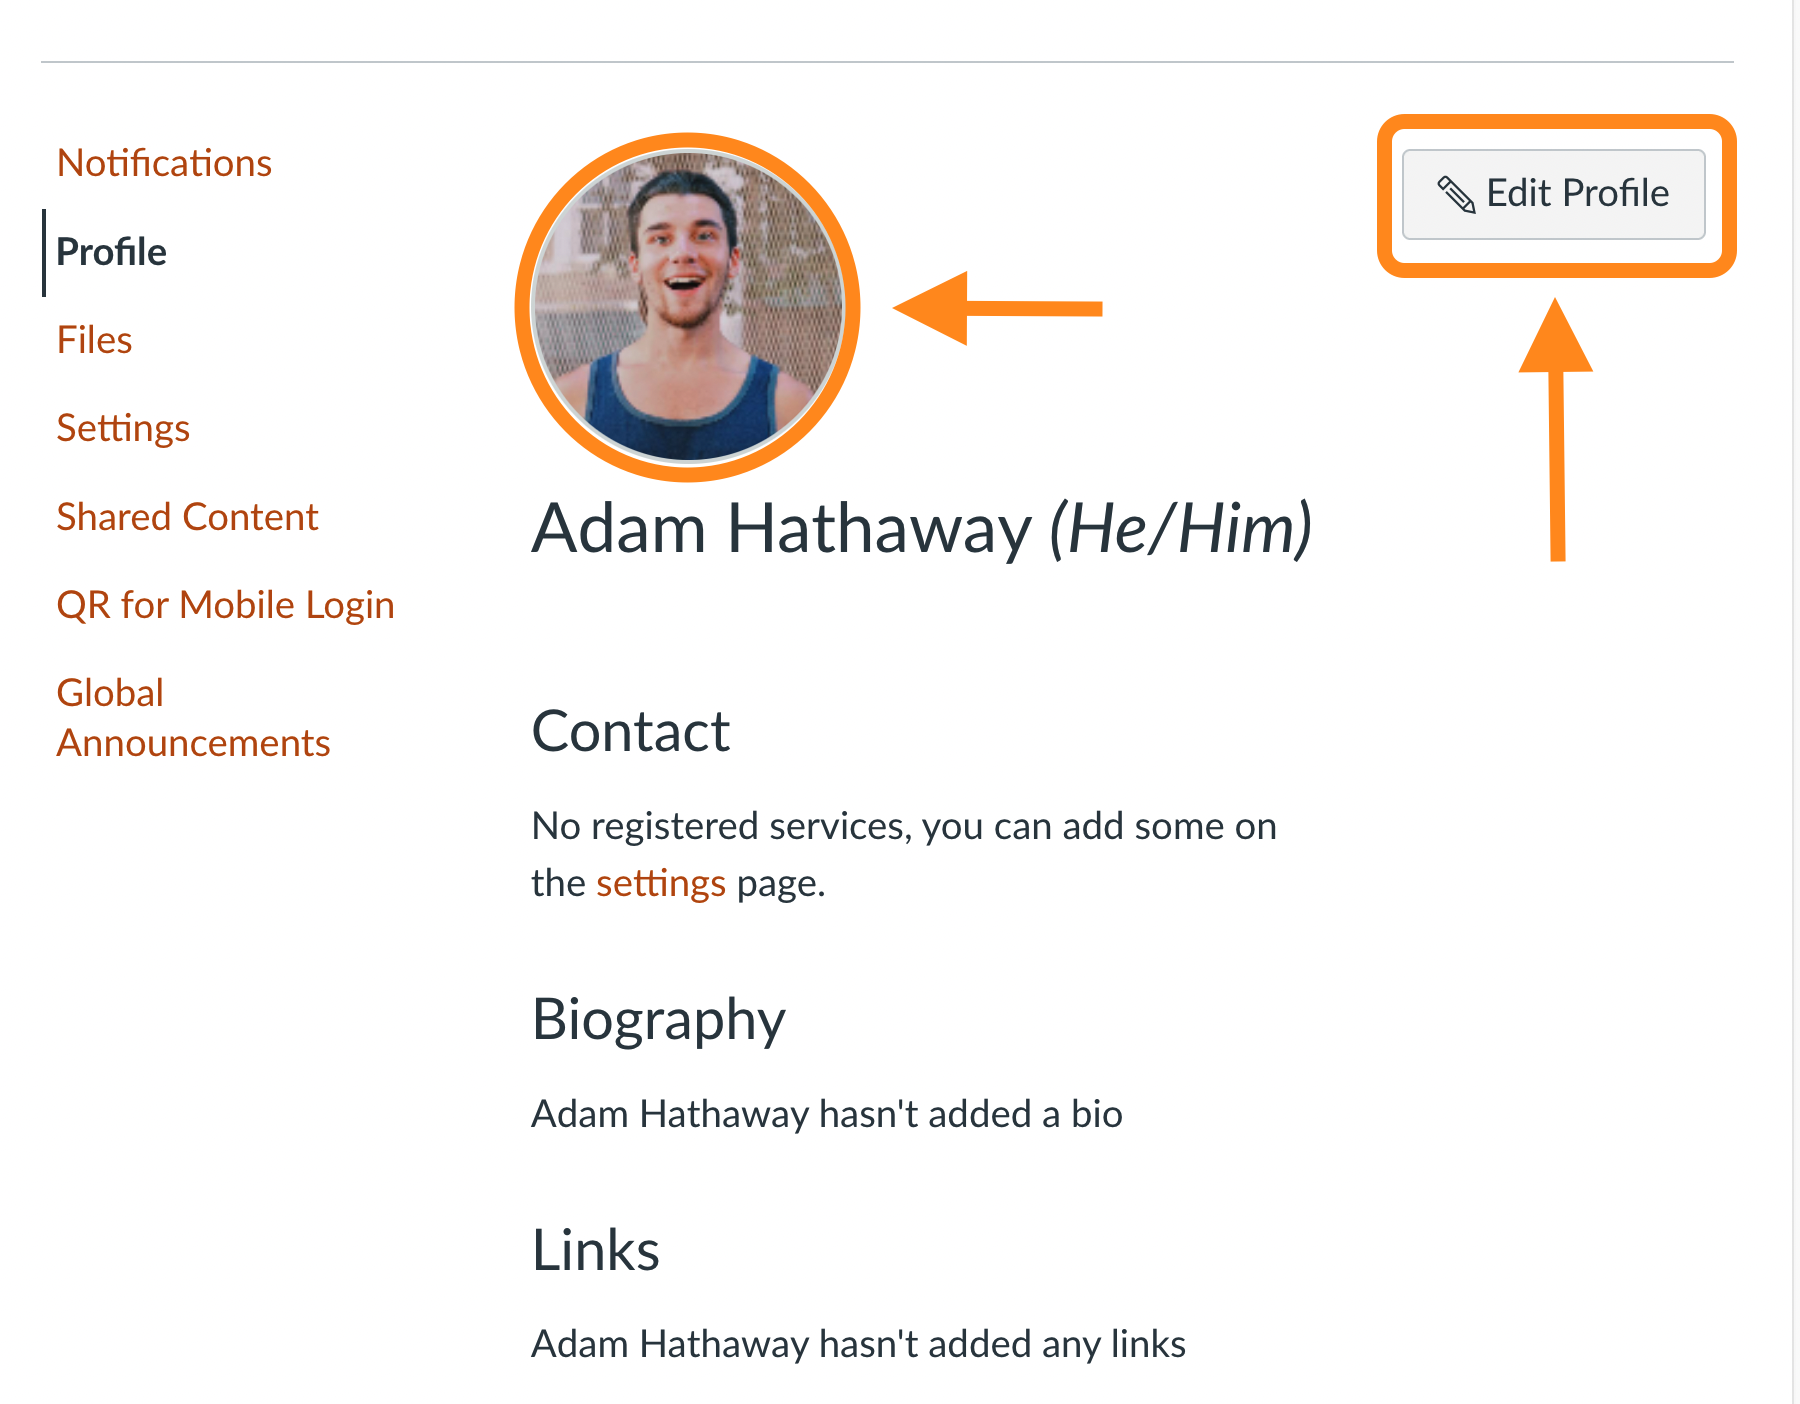
You should now see a page with your name, a place for your profile picture, and places for other personal information which you may manage separately. You can edit your profile picture by clicking on it. If you have not already placed an image there, Canvas will default to your iCard portrait photo, if you took one.
Screenshot with arrows and highlights on profile picture icon and “Edit Profile” button
Once you have clicked on the circle icon to edit it, you will have the option to “Upload a Picture” from your computers files, or “Take a Picture” using any attached web camera. Select “choose a picture” at the bottom.
Note: You may use any image file type, such as .png or .jpg, or even .gif animated images (although the animation will not carry through to your icon).
Screenshot of menu upon clicking profile picture circle
Upon choosing an image to use, you may then crop the picture using the circular overlay to focus on the picture as you please. Click and drag the cropping circle to focus your profile picture to your taste.
A square image fits the cropping window better.
Hit “Save” at the bottom and you’re good to go.
Note: Immediately after saving the new image as your profile pic, the icon in the profile settings page you’ve been working from may turn white. Try refreshing the page or clicking back to it, allowing the new image to load properly. You may want to double check your new profile picture before moving on, to ensure the cropping and resolution are to your taste.
Additional Resources: For more in-depth directions, see the official Instructure Guide for changing your profile picture on Canvas. The above link from the UIUC Systems Knowledge Base in turn links to the official Canvas Instructure Guide.
Here are some notes taken directly from Instructure’s Canvas guides. The source is listed below if you would like to view the content directly and more in-depth.
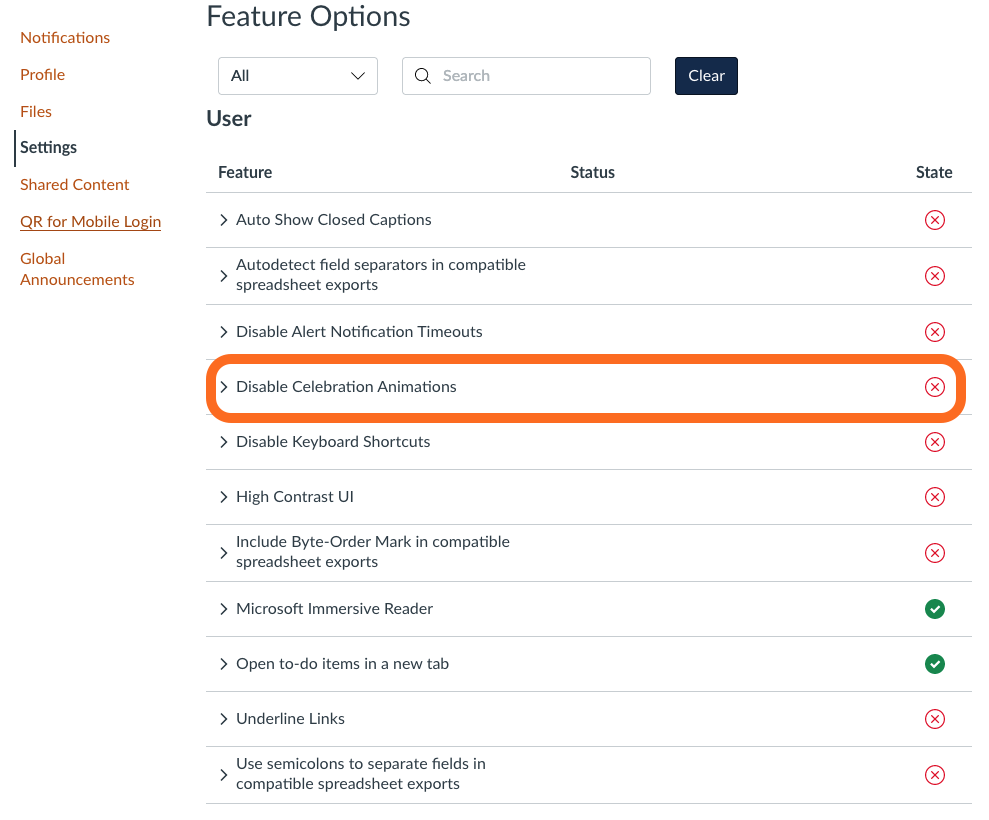
Celebration Animation: One of the easiest ways to tell if your submission has gone through properly, is to enable the Canvas celebration animation in your profile settings. You can find these settings by logging into Canvas, selecting your profile photo, then the settings item. Scrolling down on the subsequent settings page will reveal the “User settings” under the heading, “Feature Options.” Within the “User settings” there is the option to enable and disable celebration animation. Enabling the celebration animation will allow a burst of digital confetti to display upon submission of an assignment.
The Profile Settings page of Canvas in which you can enable and disable the Celebration Animation in addition to other User Features.Hovering the cursor over the “State” icon will allow you to select either “enable” or “disable”There will also be a record of your submission, which should appear in the upper right corner upon submission or refresh.
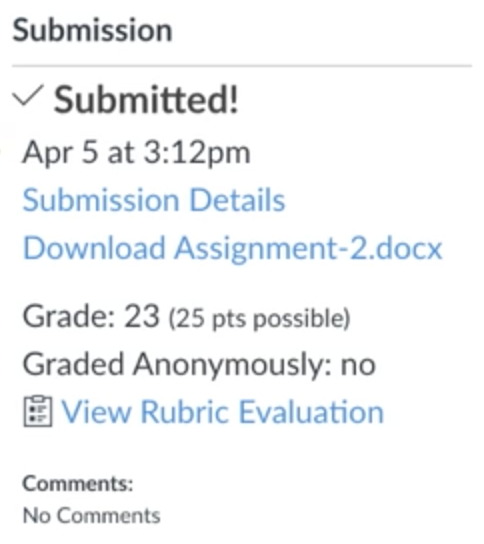
View Submission: After you have submitted your work, you will see information in the Sidebar about your submission. For file uploads, the sidebar provides a link to your submission to download if necessary. This should populate immediately, or upon refreshing the page and remain there indefinitely.
Re-Submission: If you choose, you may resubmit another version of your assignment using the New Attempt button. You will only be able to view the details of your most recent submission in the Sidebar, but your instructor will be able to see all of your submissions.
*When you resubmit an assignment, you can only access and view your most recent submission. However, instructors can view all of your submissions.
Graded Submissions: Once the instructor has graded your submission, the Grades link in Course Navigation displays a grading indicator. You can also see details about your assignment and links to additional feedback in your Grades page.
Before the semester begins, it might useful to know more about your options for using Canvas. While the desktop version of Canvas is ideal for getting work done, the App “Canvas Student” allows you to log-in on the move and check in on announcements and notifications more conveniently.
If you need to, you may also enter your Zoom room from your Canvas Student app, presuming you also already have your Zoom app set up on your phone. (The Zoom app is simple enough to set up; download the app, login w/ SSO using “illinois”and DUO 2FA, and get going with your meetings. The settings for Zoom mobile are definitely worth setting up before trying to attend a meeting.)
You can also mess around with the settings in the Canvas Student app, though they are not as in-depth the desktop settings for Canvas. The app’s settings are more directed towards notifications and display, missing much of the organizational and workflow oriented settings.
For further information regarding Canvas’ Student App, check out these links to the official FAQ,
In Canvas, there are opportunities to customize features to your own taste. Today’s Tech Tip will focus on notifications in Canvas. There are two options; the first being your general account Canvas Settings which you can find beneath your profile photo, and the second being Course-specific Notification Settings which you can access on individual course pages.
In the general settings, as shown in the first two images, you can disable/enable notification timeouts, such that when notifications do appear in Canvas, they will remain until they are dismissed. Enabling Notification Timeouts will allow notifications to dismiss themselves a short moment.
Fig. 1 On the side of the Canvas Home Page, you can find your account settings beneath your profile photoFig. 2 The Profile Notification Setting, “Disable Alert Notification Timeouts”
In these next two images, on an individual course page, you can customize notifications frequency and device destination (phone, email, canvas homepage, etc.)
Fig. 3 Within this sample course, selecting the bell icon with “View Course Notifications” will allow you to select course-specific settings.Fig. 4 Some of the Course Notifications Settings. There are more to explore on the Course Notification Settings page. Note the options available for email.
And that’s all for Canvas notification Settings. There are of course other Canvas settings which we hope to explore further in future Tech Tips.
As always, if you have technical questions about Canvas, contact us at the Help Desk at (217) 244-4903 or (800) 377-1892, ischool-support@illinois.edu, or via chat at https://go.ischool.illinois.edu/TechChat. You can also find us on the 4th Floor of 614 E Daniel just to your left as you exit the elevators. Our desk hours are typically 9-5 on Weekdays.
We are happy to announce that QR codes will be available near the Help Desks in both 501 and 614 East Daniel. These codes will, when scanned by your smartphones’ QR code reader app, link directly to previous Tech Tips you may find useful. These QR codes will be labeled. Please feel free to drop by and learn a new Tech Tip!
In the future we hope to add more of these QR codes, revisiting Tech Tips that have otherwise been forgotten.
This QR code links to a recent Tech Tip post, “Services Available After Graduation”. Scan it with your phone and QR reader app to link directly to the tip on our blog.