Category Archives: Uncategorized

Hacking The System

This week we had not one, but two speakers! Both of them were very different but equally interesting. Alan, who was from UPS, spoke to us about how UPS is leveraging 3D printing. Our second speaker was Dot. She is currently getting her masters in education here at the university. Dot came in and told us about biohacking.

Alan talked to us about a 3D printer in their Louisville center than can print a product and have it out to anywhere in the United States the next day! Having this competitive advantage puts them far and above their competitors.  It is common to have to wait 3-5 days for your package, but with UPS’s new 3D printing service, they are hoping eventually they will be able to get the customer’s their packages by that day or the next!

Dot was extremely interesting to me. She talked to us about 3D printing organs and bones (biohacking). When first coming into college, I thought I wanted to major in biology. So, my love for biology along with business was combined nicely during this discussion! 3D printing is obviously cool, but when it could save someone’s life, that brings it to a whole different level. Dot expressed how she believes that 3D printing of organs could save hundreds of thousands of lives because there are just not enough organ donors to fulfill those needs. Dot also talked a lot about the Foldscope. This is a paper magnifying glass that costs under a dollar to make and can be 3D printing to be distributed throughout under privileged schools across the world. Foldscopes could allow students who normally wouldn’t have a chance to work with microscopes!

Overall, this class opened my eyes to different ways 3D printing could not only make people’s lives better, but to change and save their lives as well.

Design Thinking

This week, the required reading titled “Design Thinking”  by Tim Brown addressed how businesses are requiring innovative thought processes in order to stay at the forefront of its competitors. A firm that specializes and is often used by companies to acquire innovations is IDEO. IDEO is a global design and innovation company that hopes to create a positive impact through design.

IDEO is so innovative because they do not have a standard way of creating solutions…

Design for America 

To get a better understanding of design thinking, we had workshop from the University’s Design for America team. The team consisted of a diverse group with different majors and different ages. We were tasked to create a product for a visually impaired university student who wanted to feel more connected to her peers and attend social events held by the university. In order to to create a product, we had to go through a design process.  The first stage was to understand our consumer, then create the product.

This design thinking was foreign to me, and I found it challenging not to create a product after hearing the problem from our “client”. But, DFA’s process allowed for a much better understanding of our client and to dive deep into their world and struggles.

Create /Prototyping 

Our team brainstormed and wrote out potential solutions on sticky notes until we were ready to create.  We focused on making football stadiums more of a friendly environment for the the visually impaired and decided to add brail all around the sports arena. It doesn’t sound that innovative, yet it has not been done. One thing that the DFA’s team kept reminding us was that if helped at least a few people, then that was good enough. So, we stuck with our brailed railing at the sport arena since we figured it could be easily implemented around the facility and braille could be added to the existing railing for a tactile experience.


Readings 

Fascinated by IDEO, I looked more into the firm and its current projects centered on design thinking. Recently, the challenge they faced was to expand Zalando’s human-centered design capability. The outcome was “The Studio”, a jointly run innovation lab that prototypes and builds digital products.

https://www.ideo.com/case-study/cultivating-creative-competitiveness-for-europes-biggest-fashion-platform

Thank you for reading my blog and I hoped you learned something! See you next week!


Design for America: A Deeper Look into the Design Process

This week we were joined by students in an organization on our campus called Design for America. DFA is nationwide and their focus is to design things that solve real world problems. I could tell the four students from Design for America were passionate about the work they do. Their presentation was well organized and very informational. They shared with us their design process that consists of six different steps separated into two categories. The first category is Understand which includes the steps Identify, Immerse, and Reframe. The second category includes the last three steps of Ideate, Build, and Test.

Picture

This was really interesting to me because something I have been struggling with is just trying to think of a product, and not start with the basics of identifying where a problem might exist.

After we learned about this process they gave us the opportunity to go through each step. We were given four different profiles of blind people in the Austin, Texas community. Each of them had unique problems and we had to choose one of them and come up with a product for them. My group chose Rose who was a mother who had a daughter about to join preschool. Rose was faced with the challenges of having to learn the new route to her daughter’s school as well as be able to identify her daughter in a large group of students. We decided to focus on the identification problem Rose was struggling with.

The first thing we did when trying to come up with a product that could help rose we had to identify things about her. This means writing down everything we knew about Rose. Then, we had to immerse and come up with how Rose felt about her new challenges and what she might be thinking. A few things we decided Rose might be feeling is nervous and anxious about having to find her daughter after her school day is over. After that we reframed and came up with how can we statements. For example, “How can we help blind people identify specific people in a crowd?”

After we went through the steps in the Understand phase, we moved on to Create. We thought of some different ideas about how we could help Rose and ultimately came up with a bracelet or necklace that both Rose and her daughter would wear. This accessory would ideally have a GPS system in it that would tell Rose how close her daughter was to her (similar to TILE which you can attach to your phone or keys to help you locate them). It would also have a button Rose or her daughter could press that would alert the other that they are looking for them. We then built what the device would look like using pipe cleaners and magnets. When we presented to the class it seemed like everyone thought it would be a good idea and they gave us useful feedback. One thing someone mentioned was to have a way Rose could call her daughter through the device.

Overall, I really enjoyed the class and liked learning about how to come up with ideas for designing a product. I plan to use this approach when deciding what object my team and I want to create for our final project.

The Importance of the Design Process

This week we had the pleasure of having students from Design for America come into our classroom and teach us the art of design. Being a Business major, designing and creativity is rarely in our curriculum, so this was an interesting and beneficial change. This group is extremely important to have. DFA allows young minds to think of issues going on and how they can fix them. What I found most important the presentation is how collaborative the whole process was. Everything they spoke about involved working with their fellow members to fix a problem; there was little to no solo work.

This organization and the people in it seemed very professional, philanthropic and genuinely interested in helping out. I think a lot of times society points out specific problems but it is rare that they do any further thinking about ways to fix that problem. Design for America is different in the fact that they take these issues one step further and try to fix the initial problem.

During their presentation, we had to choose a person who was blind that is having a specific problem in their life. We chose a young woman, Jess, that goes to UT Austin and is having trouble fitting in in social situations. We know that football games are popular at UT, so we narrowed our focus on that. We created a prototype of a walking stick with a sensor, attached to wireless headphones. These wireless headphones would let the person know where exactly where you are and if there is anything ahead of them that they should worry about (cars, potholes, etc.)

Having this sensor that lets her know where she is and if there is anything she should watch out for will allow Jess to feel more comfortable at football games. I believe students with disabilities can feel isolated when they aren’t able to do the same things students without disabilities can do. Therefore, I believe it is worth it to create these innovative products in order to make them feel more comfortable, even if it only changes one to two lives.

Overall, creating and designing is a much more complicated and collaborative process than I realized.  I think it is beneficial for everyone to understand the design process.

Design for America- Improving Lives, One Design at a Time

This week in class, we had students from the Design for America club on campus come speak to us about the design process. The entire time they were speaking, I was kicking myself for not finding out about this club sooner. The projects they were talking about sound like something I would have really enjoyed taking part in. I wish that I found out about this club my freshman or sophomore year, so I could have fully immersed myself in the work they are doing. Sadly, as a second semester senior, I am unlikely to join this specific club, but I intend to be on the lookout for similar organizations out in the real world to join after graduation.

The presentation was well organized and interesting, and the speakers- just students themselves- were knowledgeable, professional, and very helpful. My favorite part of the class was hearing about the different designs and solutions the club had come up with, such as the bear for patients with Alzheimer’s. I do wish they went into more detail about the solutions they came up with and the reasons behind them, such as explaining why a teddy bear vibrating in a certain way would calm down an Alzheimer’s patient.

The other part of the class I thoroughly enjoyed was when they walked us through the design process. I found it interesting that they said not to think of solutions at all in the beginning, but rather just problems that a person might face in a particular situation or in everyday life. I also liked that they gave us options of people to design for, and didn’t assign any group to any particular person; this allowed for the most creative ideas to happen naturally, as each group got to choose the persona that they most related to or found most intriguing.

My group chose to design for Brian, the entrepreneur in Austin who was worried about how his blindness would affect his commute to and from meetings with potential investors, as well as about how investors would view him when they found out he is blind. We designed a physical touch map, that Brian could feel his routes to and from meetings, using distance equivalents (for example, one inch is about fifty feet, and it usually takes Brian about twenty steps to walk fifty feet). We also decided to integrate an app into the idea, in order to keep Brian on track, as well as to alert him of possible changes in his environment, such as construction blocking part of the sidewalk.

What I liked best about this exercise was the feedback from the class after we presented our idea. There were a few things we hadn’t considered that the class brought to our attention, such as the fact that Brian may not need to be going to and from the same place for every meeting, so the map would have to include a wider section of the city than we were initially planning. It shows how important feedback is in order to design and produce a quality product that people will actually want to use.

3D Printing Wheelchairs & Assistive Devices

Background

3D printing has an infinite amount of potential to improve our world and the lives of humans. An area of improvement that I am passionate about is in the realm of improving the lives of individuals with disabilities.

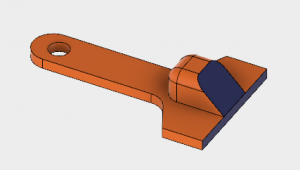
On January 17th, 2018, our Digital Making Seminar class had the distinct pleasure of hearing Arielle Rausin speak on her experience in 3D printing. Arielle has since pursued a career in 3D printing by manufacturing racing gloves for wheelchair racing athletes (see picture below). Her company is called Ingenium, and you can check out the website here: http://www.ingeniummanufacturing.com/.

Arielle was kind enough to chat with me on the phone and allow me to ask her questions. During this time we talked about 3D printing and the opportunities/challenges that Arielle has come across throughout her time in this field. Below I have the questions that I asked Arielle along with her (paraphrased) responses.


Interview with Arielle Rausin

Q1: How are you doing? As a person? As a student? As a CEO?

A1: Pretty good. Busy busy life–I like keeping busy. It takes a lot of balance between being a full-time athlete and running a company. I graduated in December, so I am no longer a student. Right now I work part time on campus and train full-time as an athlete.

Q2: Can you talk a bit about the challenges that you faced when first starting to 3D print the gloves?

A2: First was becoming familiar with the software and learning how to do things like manipulate the infill, correct sizing (what you need to scale) and what you need to go in an adjust by hand. Once I bought a 3D printer, it was tough learning the printer maintenance (which needs to be every few months or so), printer clogs, etc. Another challenge is learning to design the file to make sure you are reducing the risk of clogging. Such designs need to be implemented in every file; a lot of the software does that automatically and it keeps improving every year. Additionally, I had to learn how to train my employees in the software.

Q3: Has your company made any progress or performed research in the realm of 3D printing wheelchairs? Are you aware if anyone has successfully done this?

A3: Personally, I have done a decent amount of research. I have not been able to find anyone who has been able to successfully accomplish it. There’s a company in South America that has done pieces of chair, but it wasn’t able to support any weight. I thinks it hasn’t been accomplished because of a lack of people trying rather than it being impossible. I have talked with wheelchair manufacturers that currently weld wheelchairs (traditional form of manufacturing), and I asked if they were interested in 3D printing–most are not interested. An additional note: there is a group in India that is starting to 3D print posture alignments that would attach onto wheelchairs (essentially a wheelchair accessory).

Q4: Follow up question: why do you think the manufacturers that you have reached out to weren’t interested?

A4: I believe it is due to the high upfront cost of learning the new technology and buying the printers. Most of the companies that make wheelchairs in the US have been around for 20-30 years, so the cost of learning a new technology is a big barrier. Also, they are from a different generation. I found this extremely evident when I ordered my previous wheelchair. I actually had to fax in a form to the wheelchair company because they didn’t even have online capabilities. Again, it’s a generational difference.

Q5: What are the most prominent challenges you see with 3D printing wheelchairs?

A5: I’ve talked with my coach about this, and he notes that he is worried about durability. Especially in developing countries, there is a lack of paved roads and stable terrain–thus, the chairs need to be very durable. In a welded chair, you can weld it again to fix it. For a 3D printed wheelchair, it would not have much room to be able to break. That being said, it would be much better to use metal/steel 3D printers for creating wheelchairs because they would be more durable (yet also more expensive).

Q6: Are there any parts of a wheelchair that would not be able to be 3D printed? Do you think it would be too burdensome to use small printers to then piece the prints together (i.e. are larger printers necessary)?

A6: I see a few items that would not be able to be 3D printed. First, the tires would need to be rubber and thus manufactured; I am not sold on the durability of 3D printed wheels. Also, some of the hardware–like the screws–would not be printed. The cushion where the wheelchair user sits would also not be printed.

Q7: Are you familiar with any resources that would be helpful in beginning of production of printing wheelchair parts? For instance, what is the best way to find out each of the necessary components?

A7: To begin, it would be best to directly talk to wheelchair users and see which parts on their wheelchair break the most often. It’d be good to understand which parts need to be replaced most often because those parts could potentially be printed cheaply. A lot of wheelchair manufacturers make “folding frame” chairs, which are completely useless to everyday wheelchair users. The frames that you would want to look at are called “rigid frame” chairs because those are more useful to everyday users.

Q8: I took a course in college called “The Culture of Disability,” and it was one of the most beneficial/educational courses I have ever taken because I learned so much about disabilities in our society. As someone with a disability, what do you wish individuals without disabilities knew in regards to the culture of disability?

A8: I wish people without disabilities knew that people with disabilities are very very capable. As a wheelchair user, I don’t mind if people ask me if i need help. Like I am capable of getting out of my car by myself everyday. People need more faith in the ability of wheelchair users. I think people without disabilities should come to an understanding that we are athletes, travel the world, live independently, etc. It’s depressing when people are shocked that I can drive and live alone. I like the saying “Assume competence.”

Q9: What is your favorite part about your job?

A9: My favorite part is when I hear that it has positively impacted people’s performance. For instance, I like when I get emails and pictures from parents and coaches saying their athlete achieved one of their goals through using our products.

Q10: Do you have a 5, 10, or 20 year plan? If so, what does it look like?

A10: I believe in plans, but I know they can change really really quickly. Currently, I am training for the Tokyo 2020 Paralympics (2.5 year plan) in hopes to attend the games and compete. At the end of the day, I need to keep in mind that my athletic training is a full-time job. I would also love to help people with disabilities (by providing them with wheelchairs). I have been able to do this in the past by going to developing countries with non-profit organizations to distribute wheelchairs. In the next 5 years, I think it would be incredible if Ingenium could have fully working 3D-printed wheelchairs and a business model that would allow us to give them out for free.


Takeaways

I truly appreciated the time that Arielle took to chat with me about her experiences. My two biggest takeaways were in regards to the current wheelchair manufacturers’ generational differences and her advice to talk with current wheelchair users.

As for the generational differences with wheelchair manufacturers, I found Arielle’s insights fascinating. Initially, I thought that wheelchair manufacturers would love the idea of 3D printing due to the increased ability to customize their products at a cheaper cost. However, Arielle informed me that the upfront costs are what deter the manufacturers from fully adopting this practice. Since they have already invested so heavily in fixed costs over the past 20-30 years, they do not currently find much incentive for purchasing even more items that would qualify as fixed costs (i.e. 3D printers, training, and machinery). I find this to leave a tremendous area of opportunity to first-movers in the 3D printing realm for wheelchairs, which I will discuss in the “Moving Forward” section below.

As for talking with current wheelchair users, I find this advice very useful. As a creator, I often find myself wanting to delve right into the details of the product rather than first consulting with the end-users. I am thankful that Arielle gave me this advice because I will be able to save valuable time in the future by first understanding the needs of the end-users before I make assumptions of their needs and begin work on a product. This also ties into Arielle’s quote of “assuming competence.” People with disabilities are able to accomplish just as much as people without disabilities; those with disabilities may just have different ways in accomplishing those tasks. Thus, individuals with disabilities are competent in best understanding their needs, and creators must openly listen to those needs before creating.


Moving Forward

I know I threw a lot of information at you throughout this post, so I wanted to utilize this section to let you know some opportunities that you can explore to make tangible improvements in the realm of 3D printing for accessibility.

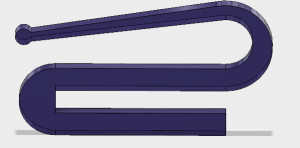
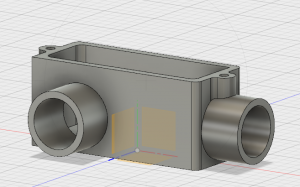
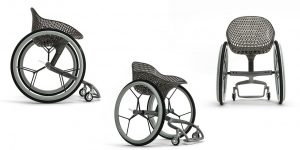
Our instructor, Vishal Sachdev, has shared a link with our class that talks about a company (called Allianz) that is trying to be the first-mover for the 3D printing of wheelchairs (https://www.3dprintingprogress.com/articles/13633/creating-the-future-of-wheelchairs-through-3d-printed-devices). Allianz is requesting innovators to submit ideas and designs for adaptive mobility devices, like wheelchairs. Personally, I believe that the current wheelchair manufacturers will need to convert to 3D printing once fully-functioning wheelchairs and other mobility devices are able to be dependably created by competitors using 3D printing. I believe this largely due to the lower costs that the 3D printing companies will encounter. These lower costs will thus allow the 3D printing companies to charge their customers less for the products and shift the demand away from the more expensive wheelchairs that are currently being manufactured. Contributing to the efforts of Allianz would be a great way to use your ideas and creating skills to innovate in the realm of 3D printing. Your contributions may also lead to lasting benefits for the community of individuals who require wheelchair use by providing more customized and affordable wheelchairs. Below is an image of a 3D-printed wheelchair concept.

Arielle also told me a bit about one of the non-profits she has worked with: Walkabout. With this company, she was able to go to Kenya last summer and give out wheelchairs to developing areas. She found the opportunity with this company through conducting her own online research and finding an organization that aligned with her values. Walkabout gives out over 10,000 wheelchairs a year, which is a noteworthy accomplishment since the company currently only has 5 full-time employees in London. Currently, Walkabout does not 3D print their parts, but that is great news because that leaves the opportunity open for creators like us to continue innovating in this realm. With our innovations, we can hopefully someday assist Walkabout in adopting 3D printing to then be able to provide even more wheelchairs individuals in need. This summer, Arielle will have the opportunity to go to Sudan with Walkabout. Please see the following link if you would like to explore future opportunities with this inspiring organization: https://walkaboutfoundation.org/

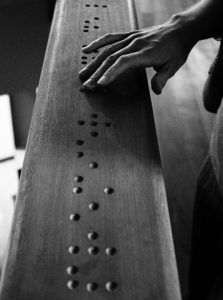
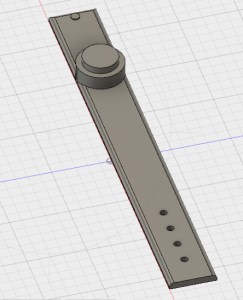
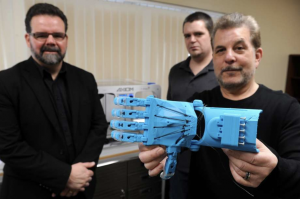
I’d also like to share the following link with you that has great examples on additional 3D printing designs that can be used for assisting those with disabilities: https://3dprint.com/tag/3d-printed-assistive-devices/. One of the designs on this site that I found interesting was of the prosthetic hand (see picture below). Prosthetic hands can sell for upwards of $11,000 (source: singularityhub.com), while there have been creators who have 3D printed prosthetic hands for $10 (source: iflscience.com). These instances go to show that the current expensive costs for medical devices are not necessary. I encourage everyone to explore the diverse needs of individuals with disabilities and see if you can find ways to make their lives easier (both physically and financially) through 3D printing.


Thank You

I would like to thank you all for taking the time to read this post. I hope that you were able to find some of the information useful, and I would be happy to discuss anything further if you have any questions.

Arielle, thank you so much again for offering your insights and wisdom. As you may remember, BADM 395 is structured with 3 pillars: Learning, Making, & Sharing. Thanks to your sharing, our class has valuable takeaways in learning and making. I am excited to carry on this tradition by sharing our information with others and continuing the cycle.


-Scott Provenzano


Sources:

https://www.3dprintingprogress.com/articles/13633/creating-the-future-of-wheelchairs-through-3d-printed-devices

http://www.iflscience.com/technology/man-makes-3d-printed-prosthetic-hand-son-only-10/

http://www.ingeniummanufacturing.com/

https://singularityhub.com/2010/06/30/how-much-is-the-newest-advanced-artificial-hand-11000-usd-video/#sm.00015z0ngm35fdbesv81broawohz2

https://walkaboutfoundation.org/

My Fusion 360 Creation

I was having a hard time creating an object. Dan made it look easy. I tried designing a star shaped cookie cutter, but I could not get the other side to be hollow. I tried using shell, but it continuously prevented me from doing it. Instead, I used the star design to make a little container for jewelry. It is like a little plate that you could put rings, earrings, etc in. I hope with more practice I can get better with Fusion 360.

How powerful software can help you design for an idea

This past week, Dan Banach, a representative from Autodesk led a hands-on workshop on how to design in Autodesk’s Fusion 360 software. Fusion 360 is a powerful tool that allows individuals to model out their ideas. Models can be shared digitally or designed with the intent to be physically produced. Although I was not able to attend this past week’s session in-person I was able to connect with some of my peers to review what I missed from Dan’s workshop.

Completing the fusion 360 tutorial really helped me gain a better understanding of how to use the software. I was able to first-hand experience the various nuances of the software and functionalities. For me, there was a big learning curve to learn the software because I do not have very many technical skills. This was a nice way to learn another technical skills and reinforced how beneficial it is to have software knowledge.

Here’s what I learned:

I learned to take my time and understand what I was doing. From connecting with my peers who sat in on the workshop and completing the Fusion 360 Youtube tutorial, I learned that it was more important to understand why I was doing what I was doing and its role in creating the end product.  Additionally, the step by step instructions made it extremely easy to follow along and it also strengthened my understanding of the Fusion 360 design process. The neat part about learning from others and engaging in self-learning through instructional videos was that it compelled me to learn something new. By collaborating with my peers, and utilizing broad resources available on the internet, I have been able to develop a new technical skill.

Although I was unable to attend the session in-person, I was still able to learn how to create the ice scraper. It was difficult to piece everything together, but below is what my design ended up looking like.

http://a360.co/2BUCb8b

This week, I watched a tutorial and learned how to build a lampshade. It was exciting to see that I have now developed a base-line understanding of Fusion 360. Although the directions and terminology used in the instructional video I watched differed from another one I saw, I was still able to follow along. The design I created can be found in the link below.

http://a360.co/2Bnu3Mp


A Look Into Fusion 360

This week we welcomed Dan Banach into our class to teach us a little bit more about Autodesk Fusion 360. I thought Dan was a phenomenal teacher and was very patient with all of us in class. I could tell he definitely knew his way around Fusion 360. Dan was able to make sure everyone was on par with the products we were making. In class we created an Illini ice scraper as well as a holder for you phone while it is charging. He showed us several different useful things in Fusion 360 such as the fillet, chamfer, and extrude tools. We were able to use these to our advantage while making both of our different products.

While making the first product, the ice scraper, I was a little overwhelmed with all of the different capabilities within Fusion. Luckily, Dan was a great teacher could help us one-on-one if we were having trouble with a step in the process of making. By the time we got to the phone holder I was feeling more comfortable with the way Fusion worked and could maneuver a little easier through the software.  We also learned other things in Fusion like cutting holes in shapes and setting proper measurements for products. The links to the two products I made in Fusion are copied below.

http://a360.co/2G5BFSP (ice scraper)

http://a360.co/2BT5doy (phone holder)

For the object I wanted to create on my own I chose a lamp shade. I followed directions using a youtube tutorial. There were different functions I used in creating this that we did not use in class. For example, the mirror function and duplicate function. I copied the link below to the lamp shade I created.

http://a360.co/2BUyWO7

I found there are several youtube tutorials for objects to create in Fusion. Once again, thingiverse is a great resource, but youtube is good for following directions and watching someone else create the object with you. I simply searched ‘create in fusion 360’ into youtube and a myriad of videos showed up providing instructions on how to create any object you can think of. I copied the link below which showed my search results

https://www.youtube.com/results?search_query=design+in+fusion+360

There are many different resources online to get inspiration for making objects, and I am excited to utilize these in the future.

Learning Fusion 360

This week in class, I enjoyed getting to learn a new modeling system. Mr. Banach was very knowledgeable about Fusion 360, and his step by step instructions and assistance was very beneficial to my learning. It was pretty amazing that he was able to help us design an ice scraper and also a phone charger shelf in the duration of the class, especially since we missed out on a significant chunk of time when the technology assistance took a long time before arriving. I learned not only how to create circles, rectangles, and other basic shapes, but how to extrude an object to make it three dimensional, how to fillet edges (and what the word “fillet” means), and how to insert holes into objects. Making my own object on this system would have been intimidating without having as in depth of a lesson as we got, but I felt more than comfortable designing on Fusion 360 for this assignment. I designed my very own Chief Illiniwek Koozie to keep drinks cold. I would, however, need to be able to print with some sort of squishy, spongey material in order to have a koozie that successfully insulates a can.

Through my research on Fusion 360, I was most surprised to see how many free instruction articles and full online classes that are offered on the Autodesk website. There are classes on the webpage called “Introduction to CAD and CAE using Fusion 360,” “Fusion 360: Foundational Concepts,” and even “Modeling and Prototyping for Mechanical Engineers.” These classes range from thirty minutes to over three hours long. The length of the one that is three hours and fifteen minutes (entitled Fusion 360: Introduction to CAD, CAM, and CAE) especially surprised me- that seems like it would be an especially thorough class for a free online class. It was also interesting to me that essentially anyone could sign up for three full years of access by saying they were a student; this got me wondering whether a person needed a University email address to sign up for free access, so I tried to sign up with my Gmail account, and it worked! It’s crazy to me how much free access to this product a person can get, even if they’re technically not a student. I know this isn’t really on the “digital making” topic so much, but I think it is something Autodesk may want to look into, in order to capture as much revenue as possible and to have money to put into improving the software when necessary.


Attached below is my koozie design.

http://a360.co/2EBmRhJ

Also attached are my ice scraper and phone charger shelf designs.

http://a360.co/2BUMFEJ

http://a360.co/2G7J9F5

Patience and Exploration Are the Keys to Mastering Fusion

Class Summary

In class this week, we began working with Fusion 360 software to design our own 3D models. At first, I was skeptical of the prospect of drawing our own models given the multitude of resources at our disposal on websites like Thingiverse. But as the class moved along, I began to see why having these design skills will be critical to our advancement in 3D printing. The ability to truly customize something on Fusion stuck out to me as a major advantage of using the software. On Fusion, there are endless possibilities of not only what we can make, but how we can make it. The software has a plethora of features that I have grown more and more comfortable with as I use them more frequently.

Speaker Notes

I thought Dan did an excellent job keeping us moving and engaged throughout his lecture. Though I must admit, I struggled to keep up with the pace a bit. That being said, I think that my struggling to keep up with the speed of teaching was actually beneficial as it allowed me to do some tinkering and screw a few things up before getting it right. Through this process, I feel that I learned more from Fusion than I would have if I was blindly following directions at full speed. I think I was most interested in the parallel and perpendicular lines tool that Dan showed us because they are quite forgiving of unequal designs and allow us to create and draw and then go back and edit later. I didn’t quite finish the iPhone stand in class, I got a little bit behind and then class was finishing up and I wasn’t able to catch up in time.

My Designs

Below, I’ve posted a photo and link to my ice scraper design. As the first thing I have truly designed using Fusion, I am quite proud of my ice scraper.

http://a360.co/2H4MMN4

When I went to make my own design, I definitely struggled with coming up with something to make. What could I make with relatively low skill in Fusion that would actually be something I could use practically. I came up with a sunglasses clip for my car that I saw on Thingiverse last week. Using the existing model as a reference was extremely helpful in making my own design. A relatively simple structure still forced me to use many if not all of the tools that Dan showed us in class. Below is a photo and link to my design:

http://a360.co/2Bp95wv

Learning More

http://www.learningfusion360.com/lesson-0-before-getting-started/

I found this website to be a helpful refresher of what we learned in class, as well as providing some useful information about when things go wrong. It was cool to see how the author was messing up a lot of the same things that I messed up, and learn how to correct those mistakes with ease.

I’m excited to continue the making process and begin printing!

Fusion 360- Fusing Your Creativity

Unfortunately, I was unable to come to class this week because I was sick. However, I was able to learn Fusion 360 on my own through the YouTube videos and found it quite fascinating. It has a lot more capabilities and features than Tinkercad, so I was excited to explore this software on my own time and speed. The YouTube videos were quite helpful and the instructor lead me through, step by step. First, he talked through the basic functions of Fusion and some short cuts. I first made a very simple rectangle and extruded it, allowing it to become three dimensional.

Then, I made a hole in the center, making it semi hollow.

The next part was definitely the most challenging. I had to put two circles on the surface of the rectangle and then put a smaller circle inside that circle and push it through the rectangle. This is the part of the video I had to rewind and pause a couple times, but after doing it fully through, I got a hold of it.

After adding all the final touches, (the fillet and making sure the dimensions are all correct and lined up) I finished the box! Now all I had left was the holes for the screws and the lid. Adding the holes to the screws was simple because I only had to do it once and then I was shown the “mirror” feature on Fusion. This feature allowed me to create the screw holder on one side and then mirror it to the other side using a plane. This would be very useful when creating objects with similar features on all sides. Below is the final product (without the lid).

Then, came the lid. This was simple because all you had to do was select the top face and extrude it farther up. Below is right before I extruded it upwards.

Overall, I liked learning about Fusion 360 on my own time and being able to pause and redo things I didn’t understand. After playing around with Fusion on my own, I created this simple watch.

In order to make this, I had to create a rectangle and put small holes at the end and one “clasp” at the end, extruding the hole.  Then, I added a simple circular face with a smaller circular face in order to create the actual clock part of the watch. Of course this is a rough design of a watch, however with some more training and time I believe I could create a more complicated version.

Overall, I believe Fusion 360 is an extremely useful and easy to use and I am excited to learn more about it in the future!!

Fusion 360: Virtual Reality GoPro

Dan Banach from Autodesk came into class this week to lead a workshop on Fusion 360. This software is a cloud-based system that allows you to create models for on and off screen objects. I have never used a software like Fusion 360 so this was really new to me. When I first tried downloading the software it did not work because my computer was not updated. I thought this was a little frustrating; it took me 45 minutes to update my computer. Now I am happy it forced me to do that because my computer was way overdue to be updated. We designed an ice scraper and IPhone holder on Fusion 360. I thought this workshop was helpful and informative because Dan walked through each step slowly. He explained where to click and why you click on that function. This made it easy for us to follow along and learn the system. For me, I learn better when the teacher goes through the project instead of working on my own. I think a lot of students would agree with me.

I did not save my Fusion 360 creation so I cannot attach a picture. What I found really cool is that our project would start with three straights lines then you press one button (expand) and it would become a 3D model. It looked so real on the screen. If you hold the shift button and use your mouse to move around you could view all angles of the object. With this you could change one side of the object or make holes on certain sides. I think this software is beneficial to know how to use for class and in the work force. Fusion 360 develops technical skills that are valuable for business jobs. I am always trying to improve my technical skills so I am glad I learned Fusion 360.

I looked up articles on Fusion to read more about it. Every article had the word “engineer” attached to it. I never thought of myself as someone who could understand what engineers learn, but now knowing the basic level of Fusion I feel more confident.

I thought this article was really interesting. It talks about GoPro incorporating Fusion into their camera. They are using it as a virtual reality lens to record 360- degree video. Fusion was picked from an applicant pool of over 20,000 companies. This shows how great of software it is and that it can be used with different items. Check out this article!

http://appleinsider.com/articles/17/07/11/gopro-trials-fusion-360-degree-vr-camera-with-fox-others-ahead-of-late-2017-launch

The link below is an article that provides further detail about Fusion 360. There is information on different features of Fusion 360, such as sculpt.

https://www.engineering.com/DesignSoftware/DesignSoftwareArticles/ArticleID/12675/Fusion-360-An-Integrated-CADCAM-Solution.aspx

Week 3 Reflection – Fab Lab Presentation

This week in class, we had the pleasure of listening to Jeff Ginger speak about his love for the “making” mindset and everything he has accomplished by working in the Fab Lab with people who listen to him and his instruction and have began to create amazing things in the lab. Something I found very interesting was listening to how he used a child’s game “MineCraft” as a medium to help teach children about the making mindset and get them more attracted to the idea of 3D printing and learning more about it. Some mention of the drag queen Sasha Velour was also mentioned as she has asked one of the many Fab Labs to create a dress for her which I found so amazing since I like to watch Drag and know who that is, it was a really cool moment to think about how this technology is even helping in a fashion setting! Additionally we were able to fool around a bit with tinkercad and begin creating 3D objects. My partners and I put in our first print to be made for our logo or emblem for team GEM and I am excited to see how it comes out!  #Drag #GEM #MakingMindset

Fab Labs Around the Globe

This week Jeff Ginger came in to talk to us about his passion for 3D printing. Jeff is the director of the campus fab lab. This is a place where any student can use the resources to learn, design, print, and collaborate. The area is open for creativity and experimentation. Jeff emphasized that fab labs are accessible to the public because this way everyone has an opportunity to learn and create. Jeff showed a map of fab labs around the world. Some of the locations were China, Australia, and South America. I thought this was fascinating how the advancement of technology is spreading throughout the world. We are all in this journey together trying to discover the future.

Jeff still identifies as a “librarian”, but not the typical one. He considers himself a modern librarian because he is providing an open space for learning 3D printing, instead of books. I went on the campus fab lab’s Instagram to view the pictures and examples of projects created there.

This picture shows kids at camp in the UIUC fab lab. It is great to see young kids learning and using their creativity in the lab. It creates a different way of thinking. Getting kids involved at a young age will expand their knowledge on the products.

Wow! A 10 year old was able to make this. This shows me all the possibilities that the fab lab has to offer.

Tinkercad:

Also, in class we got time to work with our teams on printing our logo. This was exciting because it was my first time experiencing the printing process. We were introduced to tinkercad. This virtual printing platform made me feel so high tech! I was able to pick designs, shapes, letters, and sizes. It reminded me a little of WordArt. I thought it was simple to navigate and use. We worked on including letters in our design, but had issues with spacing. Once we organized the design, we decided to make it smaller. Our first run through the printer did not work because the material spooled in the printer and got caught on something. This showed me that printing is not always going to be perfect. It is important to have patience.

Finally, the printing worked in just 36 minutes. It was so cool watching the nozzle create the shape. The process seemed very tedious, but came together perfectly. I am very happy with how our product turned out and I cannot wait to introduce the “Money Makers” team to the class.

This is a photo of our final product.

Getting hands on with 3D Printing

This week, we had students lead the class and had a very enthusiastic guest speaker, Jeff Ginger. Jeff shared his vision and aspirations for the FabLab that we have here on campus as well for 3D printing in general. Jeff brought 3D printers into public libraries in hopes of having the younger generations develop a maker mindset. He incorporated the popular video game, Minecraft to peak the interest of the youth and it definitely worked!

Last week, our small groups were left to develop a logo and team name. We came up with “3Dream”, because I believe that if you can dream it, you can print it. We created our first sketch to encompass a dream cloud  with our team name at the center.

With this basic sketch, the foundation of our design was laid and brought to life with Tinkercad which turned our idea into a CAD model. Tinkercad offers only four different font options and I wondered if it was possible to import a font just like you can import a design. After some research, I learned that you could do this by using sketchpad, selecting your font and start typing, export it, save it, and then download. Afterwards, go to an online converter, on there you will change the image to an SVG, and select your SVG image to convert. Once it has been converted, the file can be imported onto Tinkercad! And just like that, our design was created.

We were proud of our design but we were not satisfied, so we made some alterations. By exploring Thingiverse we came upon a  model of a low polygon cloud  that made our 2D design 3D! With this change, we were able to see the differences and difficulties by working with different dimensional designs. Once our design was completed and uploaded onto the Cura software, it took 4 hours to print and it came out great! I was surprised that it took so long to print since the inside is hallow but I assume that is was due to the certain material used.

I learned so much this week and I’m very much excited to continue to learn, practice, and create in the future classes.

The Importance of Curiosity and Creativity

This week Jeff Ginger came into our class to speak to us about the FabLab and the importance of 3D printing. He spoke a lot about the importance of exposing children, especially in their early teens, to creativity and curiosity. Jeff made this realization when he was working at a library and discovered some teens playing Minecraft. Minecraft is a video game that allows players to create and build their own world using blocks. Jeff made the connection between Minecraft and 3D printing and decided to introduce 3D printing to their young minds. As Jeff says, I believe this can be extremely beneficial for the community, allowing young teens to imagine and create things from their developing minds. In addition, Jeff speaks about the Fablab and how it is one of the only ones that is still open to the public. This not only allows the public to have a creative outlet, but also allows people from different areas and backgrounds to share their ideas and hopefully come out with something amazing. Overall, Jeff was an excellent speaker and got me even more interested in the creative and art aspect of 3D printing.

Also, in class, my group had the opportunity to create our logo. When thinking of what we wanted our team name to be, we wanted it to be something cohesive and collaborative. We then thought of the phrase, “The whole is greater than the sum of its parts.” This made us think of a puzzle piece. Therefore, we created a puzzle piece and named our team, Team Synergy.

In order to make this 3D print, we had to first learn Tinkercad. Tinkercad is the system that allows you to create your print and scale it. The two students, Billy and Dash were extremely helpful and energetic in teaching us how to use it. Tinkercad was pretty easy to play around with and my group and I quickly figured out the best way to make our puzzle piece. We printed it and it turned out well the first time! We were super interested in watching how layer by layer the printer created the design we created just minutes before. It was pretty incredible.

When searching online for other resources that could help me learn more about 3D printing, I stumbled upon this DIY Weather LED Light Display. This 3D printed LED lamp shows the weather through colors. For example, if it’s snowing, white lights will come down the lamp. If its raining, blue lights will come down the lamp. If its warm, red, if its cold, blue, etc. Prints like these make me realize how much you can do and how limitless 3D printing really is. Overall, this week was great and I am happy we finally got to use the printers!

http://www.3ders.org/articles/20180204-this-diy-3d-printed-lamp-shows-real-time-weather-with-amazing-led-light-display.html