Tag Archives: 3D Printing

3D Modeling with Fusion 360

Another software has been learned!

This week, our class focused on gaining the skillset and an understanding of the Fusion 360 software. We did this by watching beginners tutorials and learning the interface of Fusion before class which made it easier to follow the guest lecturer Dan Banach. Dan is an instructor  from Autodesk and he is very much experienced with this software. He did a great job at explaining the locations of each function, shortcuts to reach them, the purpose of each tool, as well as providing an understanding of the capabilities that Fusion has to offer. Fusion is the first 3D CAD, CAM, and CAE tool of its kind. It connects your entire product development process in a single cloud-based platform that works on both Mac and PC. ( I recommend using a mouse, I assume it’s easier than my touchpad).

Now, onto the fun stuff! Dan displayed two objects that we would be creating in class: An ice scrapper, and a wall outlet shelf. At first, I didn’t think it was going to be possible to create two objects given the time constraint, but I’m glad to say that we were able to design, test, and fabricate them both.
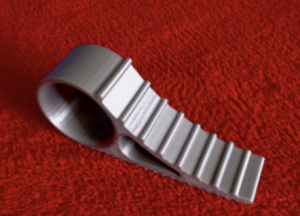
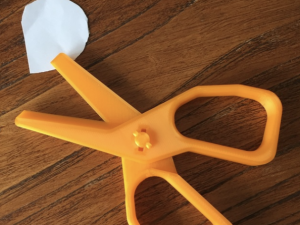
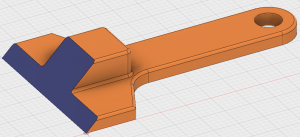
Ice Scrapper 

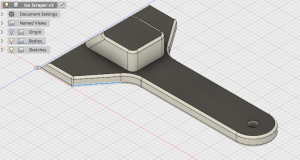
The Ice Scrapper was the first object we created and I was very proud of myself for how it came out! I ran into one complication designing it since I created the object on the wrong plane. With assistance from Dan, and a little arithmetic, the ice scrapper is on par and  ready to get 3D Printed.
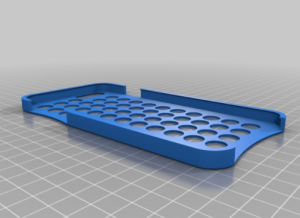
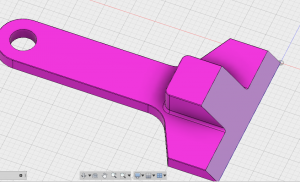
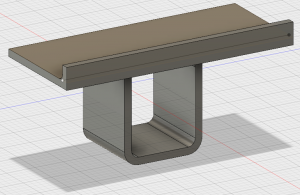
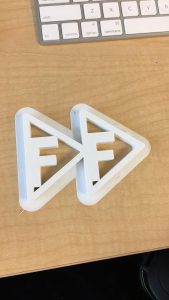
Wall Outlet Shelf

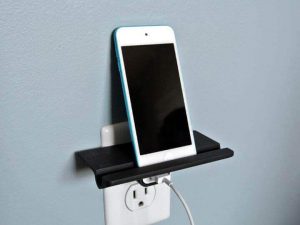
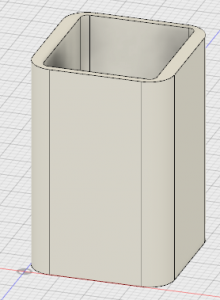
As for the Wall Outlet Shelf, I had much more difficulties creating it and unfortunately did not complete it. But, I do have an image on what it was intended to be. The shelf fits around most standard outlet charger adopters but it can be customized on Fusion. It is a very clever design with a practical benefit.

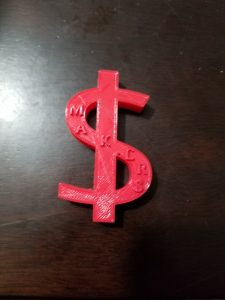
The Making of The Martian

One thing that stood out to me during Dan’s lecture was when he mentioned how the film, The Martian incorporated Fusion.  Apparently, there were work flow challenges in creating the stereo 3D world of The Martian which was  fixed using Fusion Studio!

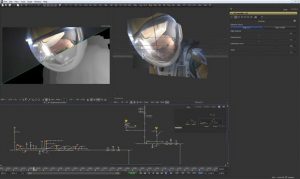
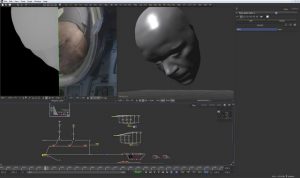
“The shots would come from our artists as EXRs, and we would then run them through our Fusion script which would bake in a new color grade and a heavy sharpen. This meant I could view not only the plate version as provided by the client, but also a heavily graded and heavily sharpened version in the theatre, so I could easily identify any of these small edges. What we produced really hit the nail on the head for the client.”

Prime Focus World, the company tasked with creating post 3D conversions for the film.

Fusion is a very powerful software that I never thought I would learn, but I’m glad that I did. I hope you enjoyed reading,

See you next week!

Learning Autodesk Fusion 360

Overview

Hello! This week we learned how to use Autodesk Fusion 360. I originally thought that Tinkercad online was the coolest software, but now I understand how much more superior Fusion 360 is in comparison. While both of these programs are owned by the same company, I was ecstatic to jump into Fusion 360 because of the extended capabilities within the program.

We were fortunate to have Dan Banach come talk to our class and walk us through creating a few designs (shown in the next section). Dan is an instructor from Autodesk,  and he was extremely knowledgeable and helpful as we learned this (to most of us, completely-new) program. One of the neatest things I learned from Dan is that Fusion 360 is used by many large movie production companies to add in animations and special effects to films. As someone who would love to work in the entertainment industry someday, I found this extremely interesting. I think it is so neat that a company can essentially create a character within this program, animate it, and make it come to life in a film. I plan to dive deeper into the animation aspect of this software as I gain more expertise in designing objects. Check out some of the designs I’ve created over the past week in the next section!


Autodesk Fusion 360 Designs

Valentine’s Day Paperweight – I created this when I was playing around with Fusion 360 because I figured that with Valentine’s Day coming up, some of my peers might find it useful. As a college student, it’s easy to let holidays creep up on us. Thus, I thought it’d be useful to share this idea with the class incase they would like to print a Valentine’s Day 2018 heart paperweight for their significant other: http://a360.co/2FVSKP6


Ice Scraper – This was the first object that we created with Dan. He walked us through each and every step, so we were able to learn a lot of crucial details right off the bat. This design essentially consists of two shapes: a long T-shape on the bottom and a rectangle block on top. We used the fillet tool, used the chamfer tool, and created a hole. It was also neat to learn how to apply paint to the object. This skill will definitely come in handy when using this program to create objects and present to clients/managers! http://a360.co/2GTF1JP


iPhone Charging Holder – This was another one of the designs that we created in class with Dan. It was surprisingly simple to make after extruding the rectangle on the bottom, putting a hole in it, and then extruding a rectangle on the top. With some minor tweaks with the fillet tool and some additional details, we were able to come up with the following design: http://a360.co/2EqneLX


Pen Holder (Everyday Object) – For my everyday object assignment, I chose to create a pen holder. I chose this object because I was looking at my desk and brainstorming what I could use on it. With many pens/pencils laying around, it was a no-brainer. I began by extruding a square (2” x 2”) up by 3”. I used the fillet tool to smooth out the side corners, and then extruded a smaller square from the top of this block down towards the bottom (thus creating the open space within the pen holder). I stopped extruding before I hit the bottom so that this object would not be open the entire way through; I used the fillet tool once more to smooth out the inside walls and was left with the following object: http://a360.co/2G3LQHJ


Further Thoughts

Overall, the skills I have learned over the past week have been very useful in my path to becoming a better creator. My plan is to stay fresh with the content that I have learned and continue creating more in-depth/complex objects.

Since I noted how interested I am in this software being used for animations in movies, I found the following video that shows how animations work (for beginners) in Fusion 360. Definitely check out this short video because it shows how simply we can now animate the designs that we create: https://www.youtube.com/watch?v=iJkI6N8VAiY

Thank you for taking the time to read my post. I hope you are having a great day, and I look forward to checking back in with you in a week!


-Scott Provenzano

Putting Skills Behind The Idea (Week 4)

What happened this week?

This week, Dan Banach from Autodesk led a workshop on Autodesk’s Fusion 360. Fusion 360 is a 3D CAD, CAM, and CAE tool. The software allows modeling for both on and off-screen objects – you can create an onscreen model to share across the cloud or create a model intended to become a physical reality. I’ve used a couple of simple CAD software before, but Fusion 360 has a lot more capabilities than Sketch Up or other beginner CAD programs.


What did I learn?

The workshop was indeed helpful. Sometimes students just need someone to go through the material slowly and work the problem all the way through. This is exactly what Dan did when he taught us how to make an ice scraper and phone charger/holder. Throughout my college experience, I’ve found that there is little I can’t learn myself if I have the material. But as a student in several classes, a member of RSOs, and a student worker, I know I do NOT have the time to teach myself everything I’d like to know! That’s why Dan’s workshop was so effective for me. I technically could have sat down and learned all the beginning commands for Fusion 360 by myself (and I did a bit through looking at the prep videos), but having an instructor take you through step by step kind of forces you to learn it. I have so many programs and things I want to learn about myself, but I never seem to get to it. I guess this commentary lends to the overarching reason I’m taking this class – not only does Vishal and his speakers, students workers, and lab resources provide me with incredible learning tools, it forces me to confront this interest of mine and actually do something about it.


That being said, my ice scraper turned out perfectly, but my phone charger/holder very much did not. I spent the last 15 minutes of class trying to figure out how to change the plane my rectangle (to become the phone rest part) was on. I’ll attach the pictures of both designs below. As you can see, the ice scraper is pretty cool, but my phone charger/holder is not finished. I’ll need to figure out how to move that plane and finish my design, so I know what to do when that problem pops up again in the future. Unfortunately, I do not own a car and when I do get a car this summer when I begin work, I won’t need one (I’ll be in L.A. where it never snows)! So, I won’t waste the material and print out my ice scraper, but I hope to design something I can use out in L.A. in the future.


So what?

Truth be told, I was really inspired by Jeff Ginger’s talk last week and am still thinking about the incredible work he and the FabLab does. The past two weeks, I’ve been more focused on “how can I use 3D printing and the making world to create a job for myself and help others”. But this week was really about adding to my technical skills, so I can make that a reality in the future. I realize I am not an engineer and don’t have the base-level technical skills many people in entrepreneurship and the more technical making world have. So, while I will continue to think about my big, long-term business ideas, I’ll shift more of my focus to adding to my technical skills so I can actually carry out those ideas.


Now what?

My group needs to start narrowing down our product ideas in the next couple weeks. As we learn more about the printers and design programs, it’s becoming clearer which of our ideas can and can’t become realities based off our current capabilities. Next week, our class is centered on design thinking, something I’ve covered in a T&M product design class before. I’m excited to hear about how the 3D printing and making world changes the framework of this lesson.

Learn More about Fusion 360:

Why 360 over other softwares?

The 5 Things That Made Me Take Another Look At Fusion 360

Beginner Projects for Fusion 360:

https://gallery.autodesk.com/fusion360/projects/beginner-project


Fusion 360 Assignment

I used a tutorial to make a lampshade for a cord and light kit I have. Here is the shared link: http://a360.co/2G3q2vS.

I learned how to create a circular pattern, how to insert planes, and how to rotate a parameter to create a 3D image. I hope I can actually print this!


Getting hands on with 3D Printing

This week, we had students lead the class and had a very enthusiastic guest speaker, Jeff Ginger. Jeff shared his vision and aspirations for the FabLab that we have here on campus as well for 3D printing in general. Jeff brought 3D printers into public libraries in hopes of having the younger generations develop a maker mindset. He incorporated the popular video game, Minecraft to peak the interest of the youth and it definitely worked!

Last week, our small groups were left to develop a logo and team name. We came up with “3Dream”, because I believe that if you can dream it, you can print it. We created our first sketch to encompass a dream cloud  with our team name at the center.

With this basic sketch, the foundation of our design was laid and brought to life with Tinkercad which turned our idea into a CAD model. Tinkercad offers only four different font options and I wondered if it was possible to import a font just like you can import a design. After some research, I learned that you could do this by using sketchpad, selecting your font and start typing, export it, save it, and then download. Afterwards, go to an online converter, on there you will change the image to an SVG, and select your SVG image to convert. Once it has been converted, the file can be imported onto Tinkercad! And just like that, our design was created.

We were proud of our design but we were not satisfied, so we made some alterations. By exploring Thingiverse we came upon a  model of a low polygon cloud  that made our 2D design 3D! With this change, we were able to see the differences and difficulties by working with different dimensional designs. Once our design was completed and uploaded onto the Cura software, it took 4 hours to print and it came out great! I was surprised that it took so long to print since the inside is hallow but I assume that is was due to the certain material used.

I learned so much this week and I’m very much excited to continue to learn, practice, and create in the future classes.

First 3D Creation

FabLab Guest Lecture

This week our class focused on the extensive possibilities of 3D printing applications and various examples of products created with various machines in the FabLab on campus. We had guest speaker, Jeff Ginger, who is the director of the Champaign Urbana Community FabLab. He shared insights on the various capabilities of the FabLab and example products and projects that have been created within the lab. I was absolutely inspired hearing different stories of several entrepreneurs who launched their businesses with the help of the machinery and expertise of the FabLab. I have visited the FabLab a few times and made laptop stickers using the Silhouette machines and software however I’ve never used any other equipment. Each time I’ve gone in, I’ve always wanted to explore the other machines but was intimidated by them so I look forward to familiarizing myself with more FabLab machines this semester and expanding my “maker” mindset.

3D Printing Process

The next part of the class we got to dive in and play with the Tinkercad and Cura software while finalizing our logo designs and setting up the printers to create our team logos. Our design went through a few different iterations. We decided on the name 3Dream inside a cloud to represent the endless capabilities of 3D printing and the many dreams that can be achieved through this technology. Our first logo was a flat rendition, as shown below, although after loading it into Cura we decided it would be neat to make it into a 3D cloud shape. We found a useful model for a 3D cloud on thingiverse which we then tinkered with in tinkercad adding our logo and stars.

One of the most challenging parts for us was adjusting our logo to fit perfectly onto the 3D model of the cloud. We utilized a few different tools within tinkercad in order to rotate and adjust the logo to lay flat onto the surface since the surface was angled. Below I have included images of our design in the Cura software as well as the final product. I was very happy with the final product. It took about 4 hours to print.

3D Printing Resources

Looking further into different resources available for people new to 3D printing, I am amazed by what the internet has to offer. I have included a variety of different resources I will be using this semester.

Models Library: Cults3D: https://cults3d.com/

This platform is similar to that Thingiverse and Pinshape however more selective. There are professionals who ensure the uploaded models are of the best quality whereas Thingiverse allows anyone to upload their designs even if they have not been printed. Additionally, many of the curated models on Cults3D are created by professional designers.

3D Scanning: Trnio: http://www.trnio.com/team/
This is a free IOS App that allows you to convert photos from your phone into 3D models. I am hoping to try out this app to see how well it works.

3D News: http://3dprintingindustry.com/

This website shares news about the 3D Printing Industry such as hardware and software but also discusses related industries that are impacted by 3D Printing.

A First Taste at 3D Printing

This week we got the pleasure to hear from Jeff Ginger, the director of the Champaign-Urbana Community Fab Lab as our guest lecturer. It was incredibly interesting to listen and learn about all the different types of equipment that the fab lab and what all that equipment allows them to do in that space. Jeff also talked a lot about the work the fab lab does in the community and how he’s helping people of all types become makers in their own way. I was especially drawn to all of the programs they do, such as the summer camps and after school library programs, to introduce students into being more creative and giving them that ability to make things. Even using the popular video game Minecraft to develop kid’s ability to model objects on a computer was a cool thing to see and is something I would’ve never even thought of. The work that the fab lab does with students in this community is important and has inspired me to try to bring some of the programs Jeff talked about to my local community once I graduate and improve the education system that I went through as a kid.

This week in class we also got our first taste at making something and 3D printed our team logo using tinkercad and Cura. This was my first time 3D printing in 3 years but I was ready to get back at it. Once we got into tinkercad, I realized that our original logo (shown above) was going to be a little too difficult to model in the time we had in class so we decided to modify it to make it easier to print. Making the dollar sign was as simple as adding a line through the letter “s”.  We decided to add the word “maker” on top of the dollar sign instead of our original design.  Modeling this on tinkercad was easy and did not take long.

As shown above, our first attempt to print our logo failed because the material spooled in the back of the printer got caught on something and stopped following to the nozzle. This really hammered home the idea that 3D printing is not a perfect science and there are tons of things that can go wrong at any time.  This failure was quick to fix as all we had to do was reprint it after checking to make sure the material would not get stuck again.


Overall, I liked how it came out for a first print. I think the reason the “E” didn’t come out all the way due to how small of a print it was but it was still cool to see how something we made quickly on a computer could be physically in front of us in only 36 minutes. I can’t wait to develop my skills with 3D printing as the semester continues.


Makers in the Community (Week 3)

This week, Jeff Ginger, director of the CUC Fablab, spoke to our class about the Fablab, its global network, open-source software, and how the Fablab enhances maker education in the community. We also began making! My group designed our logo and successfully printed it. But more on that later – let’s jump back to Jeff and the incredible work he is doing with the Fablab and the CUC community.

Jeff received his PhD from the University of Illinois at Urbana-Champaign in Library and Information Science. His research focus is digital literacy, community informatics, public engagement, makerspaces, learning, and user experience design. In addition to his position at the Fablab, he is an adjunct lecturer at the university as well as the program coordinator of the Illinois Informatics Institute. His background and current jobs allow him to be perfectly poised to tie the maker world and his local community together – something he does very well.

Jess spoke on the public-school system and how many schools “teach to the test”, disallowing children to develop a more creative, “maker” mindset. Public schools receive government funding based on standardized test scores. Meeting the grade threshold, making certain yearly improvements, and ensuring a set number of children pass the tests becomes the primary goals of many teachers and their schools because the school’s future (and inadvertently, the teachers’ salaries) relies on these metrics. So, while Jeff is currently offering 3D printing workshops at the Champaign Public Library after school hours, his long-term goal is to get the 3D printing and other maker lessons into the curriculum of the schools themselves.

Illinois Enactus, a group I am heavily involved with on campus, has a space in the Fablab. We own a wet-saw and use the lab for glass-cutting and laser etching. The lab is a great space to receive advice from the employees, work on our projects, and get inspired by the amazing work that is taking place there. Each Fablab around the world has a standardized set of equipment and software – you should be able to visit a Fablab across the world and be able to create the same things. I hope to utilize the Fablab this semester more for my personal development and experience in the maker space.

Also, in class this week, my group created and printed our logo. We named out group “FF” or Fast Forward, to signify our focus on the future and how 3D printing is becoming more necessity than a novelty. 3D printing is a disruptive technology that will continue to change the world, and my group hopes to learn all we can about how we can use 3D printing and the maker space to make the world a better place. Our logo is a fast forward symbol (two arrows) with a capital F inside each of them. We used a transparent png file of the symbol we found online and converted it into svg (one of the files Tinkercad and Cura can use). We learned how to scale and group our objects and how to orient the text within our design, so it printed out with proper supports on Tinkercad. We also learned how to set up our 3D printer and transfer the files from Cura to an SD card. I didn’t know that the sizes of the nozzle and other little settings were so important! I got a better sense of how finicky the 3D printers can be and how using them does require trial and error.

The first time we printed our logo, the edges curled upwards and the plastic couldn’t quite grip the receiving plate on one part of the print. We were on the mini printer right next to the door and I suspect the strong draft had something to do with it. The second time we printed, we used a larger printer further into the lab and our design was nearly flawless! In the picture you see below, we just have to peel the supportive skirt off and ta-da! My group was really excited to see how well this turned out.

Through the videos we had to prepare for the class this week, I learned more about the materials 3D printers can use – I was surprised to learn that PLA is derived from corn. I hope to be able to print with the wood-based filament sometime. At the Engineering Open House a few years ago (when I was a prospective student), I was able to make a Lego block using stereo lithography. I explored this primitive 3D printing-type process again in the materials science and engineering course I took through The Hoeft T&M Program. I think this was a really good basis for me to understand how 3D printing works with all the layers it breaks the design into.

This was a packed week! I hope to get more acquainted with Tinkercad, Cura, and other 3D printing software next week. Until then, here are some sources I’ve found that can help myself and other students learn a bit more about 3D printing:


Week 2 Reflection: The Power of 3D Printing

The main takeaways for me this week revolves around just how powerful 3D printing can and just how incredible this technology has gotten in the last couple of years in really transforming from something a few hobbyists would play around with to a full-blown industry that welcomes everyone. We have seen countless examples the past 2 weeks about how people have taken 3D printing and built not only full on businesses but entire communities where people can share and learn from each other. This community especially resonates with me because I was introduced to 3D printing by my brother in law back in 2014 when he purchased a Printrbot Plus and started to show me what the technology could do and the communities around 3D printing. We would spend hours browsing on thingiverse.com looking for cool stuff to print and just seeing how creative people got in designing and creating solutions for problems that I didn’t even realized existed. Granted, most of the stuff we printed revolved around designing our own versions of NASA satellites and space ships as well as some other stupid stuff, I saw then the potential that 3D printing is showing now and it makes me want to dive into it even more.

Another thing that struck out to me from the reading was one of the main points in the “The Maker Mindset” by Dale Dougherty about how one of the biggest challenges to the maker movement is education and how giving students the resources to be able to explore the realm of making things is incredibly important. This really resonated with me because as a kid I took apart everything I could get my hands on to learn how stuff worked and how to put it all back together. Although my parents were often pissed off at some of the things I “borrowed”, they realized that they needed to support my curiosity.  They gave me a large workspace in the basement so that I could tinker with things and bought me my first set of tools and even gave me old electronics and appliances and challenged me to get them to work again. When I wanted to learn a new skill, whether it be soldering or carpentry or electrical work, they went out and found people that could teach me these kinds of skills. Students these days need the kind of space and support I had so that we can continue to generate makers and people whose tinkering will lead to the next great invention.

Looking on Thingiverse and Shapeways, I found 4 objects that I would use in my everyday life.

  1. DJ Headphones Holder

https://www.thingiverse.com/thing:1054504

I’ve been running my own Professional DJ and production company for about 8 years now and one of my biggest pet peeves is where to leave my headphones so that they are out of the way but I can get them when I need them easily. This item is just a simple holder that hooks on to a fly case. I’m going to have to print this.

  1. Audio Equipment Mixer Faders and Knobs

https://www.thingiverse.com/thing:547185

Another item I would use while DJing. These are knobs and faders that are used on a variety of music equipment. After a while, they can either break or become worn and buying new ones can be a hassle. I love the idea of being able to print your own instead. While this design is based off of Pac-Man, I would likely make them more suitable for my style in terms of grip type and weight.

  1. Small Tools Holder

https://www.thingiverse.com/thing:754395

This is just a small tools holder that is designed to sit on a desk or work space that would be perfect for me because I have a bunch of small tools like this that I am always misplacing when I work on things.

  1. Vehicle Cable Wrap

https://www.thingiverse.com/thing:2395941

This is a simple cable wrap that would keep my aux cord and phone cable in my car nice and organized instead of always been tangled up. I would most likely mount it in a different place in my car.

Week 2: 3D Printing will Rock the World

Class Reflection & Takeaways

This week’s class has been a wonderful introduction to the world of 3D printing and the third industrial revolution. I have been wanting to get involved with the MakerLab each year of school but never took the time on my own to visit and get more involved with it. The first week I was incredibly inspired by Arielle, the guest speaker and class alum who spoke about her final project. She turned her project, printing wheelchair racing gloves, into a successful business after completing the class. This got me thinking about various innovative uses for 3D printing that may not have been done before.

Our second class, which I will focus on in this post, provided a great overview of the various resources available to provide inspiration and templates for printing various items. During class, we explored the resources in depth and I looked further into https://www.shapeways.com/. This is a website that provides a marketplace for people to sell their designs and have them printed in various different materials. If interested in buying a product, you have the freedom to choose what it is printed in, materials from 14 karat gold to silver to various grades of plastic. They will then print it for you, and ship it to you, giving a loyalty to the designer as well as making a profit. As I was exploring this website, there was everything from games, to household objects to jewelry. This was interesting for me as it raised the question of whether the art of handmade jewelry will continue, or if 3D printed jewelry will slowly replace the traditional methods.

The readings for this class provided interesting insight into how 3D printing is not only affecting the consumer and manufacturing market but also the mindsets of a large group of people. Dale Dougherty in his article, The Maker Mindset discussed how important this idea is, the innovative way of creating that helps our world flourish. He critiques the current academic curriculum for failing to emphasize creativity and innovation. Makerspaces are wonderful places for a variety of skills and ideas to come together to create something altogether new. I found this an interesting concept, as I have always loved the arts and exercising the more creative side of my brain. I can only imagine what it would be like to go to school in an environment that encouraged creativity over math and sciences or in combination with the more technical courses.


Below I have listed a few items I am interested in printing:

This coaster is unique and I know I would enjoy using it in my own apartment. I drink coffee and tea quite a lot and like nice looking coasters therefore this one is perfect for me! I cannot exactly tell what size this design is, but I would want to make sure it fits a large coffee cup but is not overly large, taking up too much space on my small desk.

https://pinshape.com/items/33773-3d-printed-spider-coasters-design

As a larger project, I am interested in attempting to print a violin this semester. It se
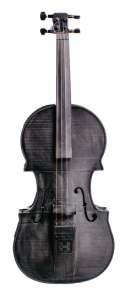
ems as if there are quite a few different designs out there both for acoustic and electric violins so I have included a few of the designs I found for them below. For the acoustic violins, I would most likely print them in white, for a sleek looking design, I would also make sure they had supporting posts inside to hold the back up from the top of the violin while being played.

https://www.thingiverse.com/thing:1533229

http://www.hovalabs.com/hova-instruments/hovalin

https://www.thingiverse.com/thing:2113171/#files

http://vlnlab.com/vla.html

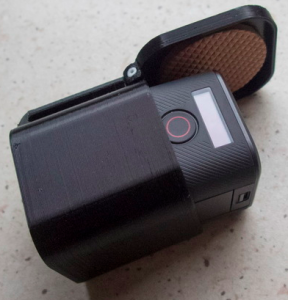
I am interested in printing a small carrying case for my GoPro camera as I do not currently have a case or any good way to transport it. This box seems to be the perfect size and with a hinge it would be much more protective than the current way I transport my GoPro (which is typically unprotected in a backpack). I have never even seen cases like this sold in stores or online so I was very excited to discover it on the internet available to print. https://www.thingiverse.com/thing:2210863

A final object I would like to print is a candle holder. I found this design beautiful and enjoy burning candles while I study. I would love to have one that I personally made. A way that I might modify it would be the changing the shape slightly to fit different sized candles as well as printing various colors.

https://www.thingiverse.com/thing:1751738

Getting Started with 3D Printing

Hi there!

My name is Scott Provenzano, and over the past few Digital Making Seminar sessions I have been absorbing as much information as possible in order to set myself up for success throughout the semester and future career uses of 3D printing. I hope you find the takeaways in my blog posts to be useful and/or insightful, and I’d be happy to discuss them further if you have any questions!

Takeaways

The two most interesting takeaways I had from our past class was John Hornick’s discussion with us about his experience with law in regards 3D printing and learning about the new perspectives offered by my teammates. In regards to Hornick’s discussion, I found it insightful to consider the potential negative use cases of 3D printing. For instance, the creation of weapons or theft of intellectual property are serious and likely outcomes of this third industrial revolution. Prior to this course, I had only thought of 3D printing as a very practical and useful method in giving creators on-demand access to their creation; I had only considered the positive use cases, and had not even thought of the negative use cases such as creating weapons. This is a very important point for us to keep in mind because 3D printing technology will continue to advance which will allow weapon creation and IP theft to become more accessible to everyday consumers. In regards to the new perspectives offered by my teammates, I really enjoyed hearing how they would like to innovate in the 3D printing realm. For instance, one of my teammates is a soccer player and said that she sees potential in creating certain athlete recovery equipment with 3D printing that currently is very expensive due to the necessary customization each athlete needs for the equipment (e.g. knee braces, see picture below). With the scanning and printing capabilities that we will learn about this semester, this equipment has the potential to be 3D printed at a much lower cost and shorter wait-time than the current manufacturing process.

Everyday Use Objects

Thingiverse has many objects that I could use everyday. The first item I would use would be a cooking spoon holder (https://www.thingiverse.com/thing:22000). I cook everyday, so having an extra spoon holder to keep drips off the counter would be very useful. I would change this object by adding a tray dish to the bottom so the accumulated drips would not leak over the edge.

The second item I would use would be an iPhone case (https://www.thingiverse.com/thing:487847). This object would allow me to further protect my phone. For this specific print, I would change the design on the back to be solid/flat so there would not be any circles in the design.

The third item I would use would be a door stopper (https://www.thingiverse.com/thing:200571). This item would allow me to keep my door open without having to put miscellaneous heavy objects in front of it, and I would not change its design because it is very practical and would get the job done just the way it is.

The fourth item that I would use would be scissors (https://www.thingiverse.com/thing:1008990). I find myself requiring the use of scissors multiple times per week. The issue is that I do not currently own any scissors, so this 3D print would truly benefit me in the short-run and the long-run. The change I would make to this design would be to make the blades longer (if that would still make them an effective pair of scissors).

Thank you for taking the time to read my post, and I look forward to reading your insights as well!

-Scott Provenzano