
FabLab Guest Lecture
This week our class focused on the extensive possibilities of 3D printing applications and various examples of products created with various machines in the FabLab on campus. We had guest speaker, Jeff Ginger, who is the director of the Champaign Urbana Community FabLab. He shared insights on the various capabilities of the FabLab and example products and projects that have been created within the lab. I was absolutely inspired hearing different stories of several entrepreneurs who launched their businesses with the help of the machinery and expertise of the FabLab. I have visited the FabLab a few times and made laptop stickers using the Silhouette machines and software however I’ve never used any other equipment. Each time I’ve gone in, I’ve always wanted to explore the other machines but was intimidated by them so I look forward to familiarizing myself with more FabLab machines this semester and expanding my “maker” mindset.
3D Printing Process
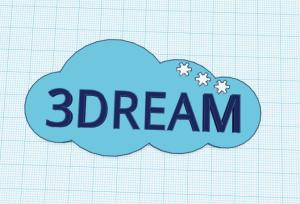
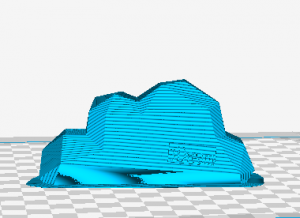
The next part of the class we got to dive in and play with the Tinkercad and Cura software while finalizing our logo designs and setting up the printers to create our team logos. Our design went through a few different iterations. We decided on the name 3Dream inside a cloud to represent the endless capabilities of 3D printing and the many dreams that can be achieved through this technology. Our first logo was a flat rendition, as shown below, although after loading it into Cura we decided it would be neat to make it into a 3D cloud shape. We found a useful model for a 3D cloud on thingiverse which we then tinkered with in tinkercad adding our logo and stars.
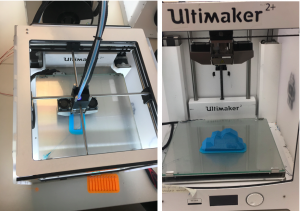
One of the most challenging parts for us was adjusting our logo to fit perfectly onto the 3D model of the cloud. We utilized a few different tools within tinkercad in order to rotate and adjust the logo to lay flat onto the surface since the surface was angled. Below I have included images of our design in the Cura software as well as the final product. I was very happy with the final product. It took about 4 hours to print.
3D Printing Resources
Looking further into different resources available for people new to 3D printing, I am amazed by what the internet has to offer. I have included a variety of different resources I will be using this semester.
Models Library: Cults3D: https://cults3d.com/
This platform is similar to that Thingiverse and Pinshape however more selective. There are professionals who ensure the uploaded models are of the best quality whereas Thingiverse allows anyone to upload their designs even if they have not been printed. Additionally, many of the curated models on Cults3D are created by professional designers.
3D Scanning: Trnio: http://www.trnio.com/team/
This is a free IOS App that allows you to convert photos from your phone into 3D models. I am hoping to try out this app to see how well it works.
3D News: http://3dprintingindustry.com/
This website shares news about the 3D Printing Industry such as hardware and software but also discusses related industries that are impacted by 3D Printing.
Helen,
It was terrific to see the progression of your design from idea to physical form. I think that a fascinating aspect of 3D printing is the ability to truly bring ideas to life – and quite quickly at that. I will definitely be checking out the Trnio app to recreate images of everyday objects or other cool designs.