This week, Jeff Ginger, director of the CUC Fablab, spoke to our class about the Fablab, its global network, open-source software, and how the Fablab enhances maker education in the community. We also began making! My group designed our logo and successfully printed it. But more on that later – let’s jump back to Jeff and the incredible work he is doing with the Fablab and the CUC community.
Jeff received his PhD from the University of Illinois at Urbana-Champaign in Library and Information Science. His research focus is digital literacy, community informatics, public engagement, makerspaces, learning, and user experience design. In addition to his position at the Fablab, he is an adjunct lecturer at the university as well as the program coordinator of the Illinois Informatics Institute. His background and current jobs allow him to be perfectly poised to tie the maker world and his local community together – something he does very well.
Jess spoke on the public-school system and how many schools “teach to the test”, disallowing children to develop a more creative, “maker” mindset. Public schools receive government funding based on standardized test scores. Meeting the grade threshold, making certain yearly improvements, and ensuring a set number of children pass the tests becomes the primary goals of many teachers and their schools because the school’s future (and inadvertently, the teachers’ salaries) relies on these metrics. So, while Jeff is currently offering 3D printing workshops at the Champaign Public Library after school hours, his long-term goal is to get the 3D printing and other maker lessons into the curriculum of the schools themselves.

Illinois Enactus, a group I am heavily involved with on campus, has a space in the Fablab. We own a wet-saw and use the lab for glass-cutting and laser etching. The lab is a great space to receive advice from the employees, work on our projects, and get inspired by the amazing work that is taking place there. Each Fablab around the world has a standardized set of equipment and software – you should be able to visit a Fablab across the world and be able to create the same things. I hope to utilize the Fablab this semester more for my personal development and experience in the maker space.
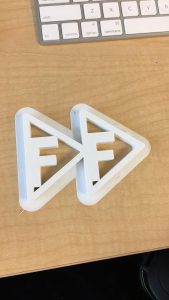
Also, in class this week, my group created and printed our logo. We named out group “FF” or Fast Forward, to signify our focus on the future and how 3D printing is becoming more necessity than a novelty. 3D printing is a disruptive technology that will continue to change the world, and my group hopes to learn all we can about how we can use 3D printing and the maker space to make the world a better place. Our logo is a fast forward symbol (two arrows) with a capital F inside each of them. We used a transparent png file of the symbol we found online and converted it into svg (one of the files Tinkercad and Cura can use). We learned how to scale and group our objects and how to orient the text within our design, so it printed out with proper supports on Tinkercad. We also learned how to set up our 3D printer and transfer the files from Cura to an SD card. I didn’t know that the sizes of the nozzle and other little settings were so important! I got a better sense of how finicky the 3D printers can be and how using them does require trial and error.
The first time we printed our logo, the edges curled upwards and the plastic couldn’t quite grip the receiving plate on one part of the print. We were on the mini printer right next to the door and I suspect the strong draft had something to do with it. The second time we printed, we used a larger printer further into the lab and our design was nearly flawless! In the picture you see below, we just have to peel the supportive skirt off and ta-da! My group was really excited to see how well this turned out.

Through the videos we had to prepare for the class this week, I learned more about the materials 3D printers can use – I was surprised to learn that PLA is derived from corn. I hope to be able to print with the wood-based filament sometime. At the Engineering Open House a few years ago (when I was a prospective student), I was able to make a Lego block using stereo lithography. I explored this primitive 3D printing-type process again in the materials science and engineering course I took through The Hoeft T&M Program. I think this was a really good basis for me to understand how 3D printing works with all the layers it breaks the design into.
This was a packed week! I hope to get more acquainted with Tinkercad, Cura, and other 3D printing software next week. Until then, here are some sources I’ve found that can help myself and other students learn a bit more about 3D printing:
- What software do 3D printers use? https://www.shapeways.com/creator/tools
- Will 3D printing change how/what we eat? https://www.techrepublic.com/article/heres-how-3d-food-printers-are-changing-the-way-we-cook/
- 3D printing and CDC machinging. http://astromachineworks.com/difference-cnc-machining-3d-printing/
