
Overview
Hello! This week we learned how to use Autodesk Fusion 360. I originally thought that Tinkercad online was the coolest software, but now I understand how much more superior Fusion 360 is in comparison. While both of these programs are owned by the same company, I was ecstatic to jump into Fusion 360 because of the extended capabilities within the program.
We were fortunate to have Dan Banach come talk to our class and walk us through creating a few designs (shown in the next section). Dan is an instructor from Autodesk, and he was extremely knowledgeable and helpful as we learned this (to most of us, completely-new) program. One of the neatest things I learned from Dan is that Fusion 360 is used by many large movie production companies to add in animations and special effects to films. As someone who would love to work in the entertainment industry someday, I found this extremely interesting. I think it is so neat that a company can essentially create a character within this program, animate it, and make it come to life in a film. I plan to dive deeper into the animation aspect of this software as I gain more expertise in designing objects. Check out some of the designs I’ve created over the past week in the next section!
Autodesk Fusion 360 Designs
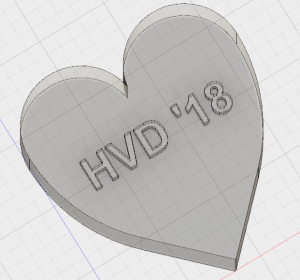
Valentine’s Day Paperweight – I created this when I was playing around with Fusion 360 because I figured that with Valentine’s Day coming up, some of my peers might find it useful. As a college student, it’s easy to let holidays creep up on us. Thus, I thought it’d be useful to share this idea with the class incase they would like to print a Valentine’s Day 2018 heart paperweight for their significant other: http://a360.co/2FVSKP6
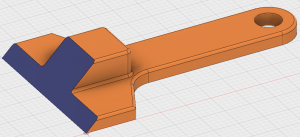
Ice Scraper – This was the first object that we created with Dan. He walked us through each and every step, so we were able to learn a lot of crucial details right off the bat. This design essentially consists of two shapes: a long T-shape on the bottom and a rectangle block on top. We used the fillet tool, used the chamfer tool, and created a hole. It was also neat to learn how to apply paint to the object. This skill will definitely come in handy when using this program to create objects and present to clients/managers! http://a360.co/2GTF1JP
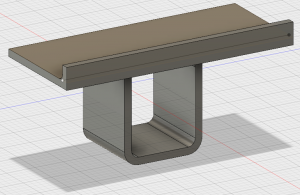
iPhone Charging Holder – This was another one of the designs that we created in class with Dan. It was surprisingly simple to make after extruding the rectangle on the bottom, putting a hole in it, and then extruding a rectangle on the top. With some minor tweaks with the fillet tool and some additional details, we were able to come up with the following design: http://a360.co/2EqneLX
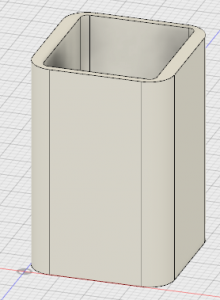
Pen Holder (Everyday Object) – For my everyday object assignment, I chose to create a pen holder. I chose this object because I was looking at my desk and brainstorming what I could use on it. With many pens/pencils laying around, it was a no-brainer. I began by extruding a square (2” x 2”) up by 3”. I used the fillet tool to smooth out the side corners, and then extruded a smaller square from the top of this block down towards the bottom (thus creating the open space within the pen holder). I stopped extruding before I hit the bottom so that this object would not be open the entire way through; I used the fillet tool once more to smooth out the inside walls and was left with the following object: http://a360.co/2G3LQHJ
Further Thoughts
Overall, the skills I have learned over the past week have been very useful in my path to becoming a better creator. My plan is to stay fresh with the content that I have learned and continue creating more in-depth/complex objects.
Since I noted how interested I am in this software being used for animations in movies, I found the following video that shows how animations work (for beginners) in Fusion 360. Definitely check out this short video because it shows how simply we can now animate the designs that we create: https://www.youtube.com/watch?v=iJkI6N8VAiY
Thank you for taking the time to read my post. I hope you are having a great day, and I look forward to checking back in with you in a week!
-Scott Provenzano
Hi Scott,
I love your design for your paperweight! It is very fitting with the season we’re in. That’s something I really love about the digital making world we’re living in right now- you can design something in as little as a few minutes, print it the same day, and perhaps give it as a present the next day. It’s very fitting with the day and age we’re living in- everything is fast and immediate. I also love your design for the pen holder- it is definitely a simple and useful everyday object that almost anyone could use.