
Overview:
This week we had Dan Banach from the Autodesk 360 company run a workshop introducing Fusion 360 software, the uses for it as well as walk us through creating our own models. We went through and made 2 different items, which I will discuss in detail later, while introducing many different functions and tools within Fusion 360. Dan had a slide discussing the various industries and companies that use Autodesk software, one I was surprised by was the movie industry and special effects. Many films use Autodesk software to design and create special effects. I am absolutely amazed by the capabilities this one software has and look forward to honing my skills in the coming months to be able to better design and create objects of value.
Fusion 360 Creations:
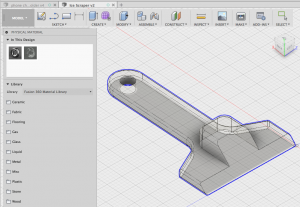
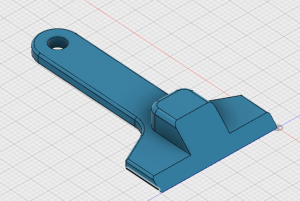
Our first item we designed was an ice scraper. In this workshop we walked through over 20 different tools within the software in order to create the exact look we wanted. One neat feature within Fusion 360 is that you can change the material of your creation. This then allows you to determine the specs, for example how much it weighs, which would then tell you how much it would cost in time and money to 3D print. I was also amazed by how many material options there were to model items in including metals, ceramics, paper, canvas, and even water.
In class we designed 2 items: an ice scraper and an iPhone charging stand. The phone charger I kept as the plastic PET material (since that is typical for 3D printing) thus why it is transparent, while the ice scraper I applied a “paint” layer to color it teal.

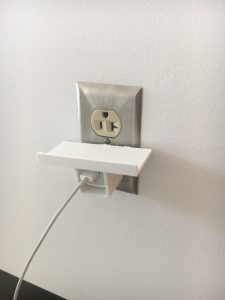
I thought the iPhone charging stand would be a useful item for my everyday life and was interested in seeing how the fusion file transferred into Cura to 3D print. I ended up printing this model and was excited to try it however, it is not very functional. The section that goes around the charger is too large to stay easily and when you put a phone on the shelf it is thrown off balance and falls to the floor. I was happy that I printed it because I got to see the iterative process, not everything comes out exactly as planned however you are easily able to go back to the drawing board and adjust the design for improvements. 3D printing is a series of trial and errors which makes it that much more exciting when you print something that works exactly as planned.

My Own Fusion Creation:
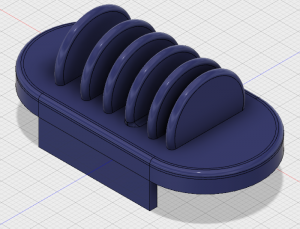
As for my own creation, I decided to make something to keep my electronic cords organized on my desk. I plug quite a few different cords into an outlet below my desk and have been getting annoyed that they fall off my desk and get tangled thus I’m constantly picking them up. This figure is a way to help keep the charging ends of cords on my desk. I incorporated a small shalf to keep it from sliding all over my desk however I still think it will need to be secured with a command strip. Hope this is of use to others! I’m excited to try printing this this week and will share updates on how it goes!
Resources:
The most useful resource I resorted to throughout this small project is actually Autodesk’s Support & Learning page. They provide wonderful tutorials, explanations and examples of many different tools as well as products that you can use when creating your model. I found the tutorials quite helpful.
Hi Helen,
I think it’s so cool that you actually printed the iphone charging tool! I was actually very curious as to whether or not it would be functional, so thank you for sharing your results–it’s a great way to learn how to improve upon the existing design. I also thought your design for keeping cords organized is very handy. I look forward to seeing the finished product once you get a chance to print it!