
Hello, everyone!
This week, my group focused on building our working prototype and uploading our code to the Arduino board. We spent past weeks learning what the laser sensors were, how the Arduino worked, and really getting an idea of how the more complicated pieces in our people counter operate. However, when we started to put the first working model together, we found that we had missed learning about some of the little things! Is there a positive and negative end to the LEDs? Can we connect resistors to each other? Can we put the resistors directly on the Arduino or do we need to put them on the perf-board? Does it matter?!
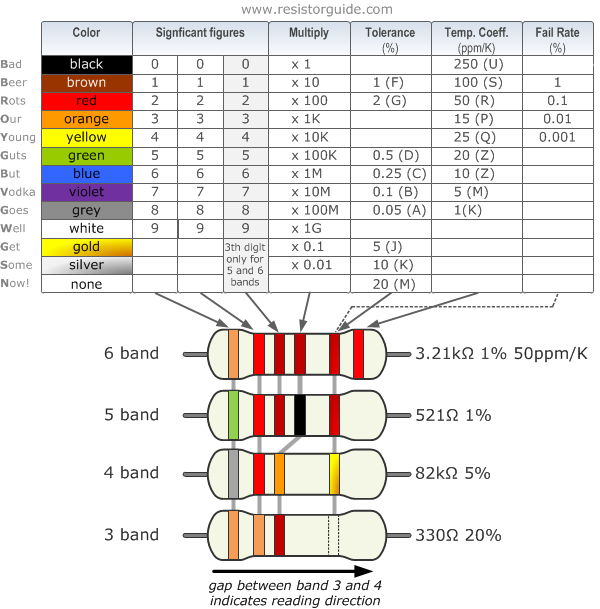
We learned that it’s important not to overlook these little things, but we were able to figure them out as we went. We did not have a 470 ohm resistor (called for in our guide), so we connected 2 resitors of lessor values to get to that 470 ohms. Here is the website we used to learn how to determine how much resistance one resistor has. If you didn’t know, ohm resistors use colored bands to show the user what resistance they carry. You read the bands left to right – each color has a number attached to it. Below is a chart you can look at o determine what resistance your resistor might have.
Since our 7-digit display had not yet arrived, we made our first working prototype with individual LEDs. A 7-digit display is just many LEDs put together in a particular oder. Organization of the lights aside, connecting a few LEDs to our perf board allowed us to get a similar effect.
We were able to upload our code to the Arduino and connect all the wires we needed to. We did not have a battery on hand, but we used the Arduino connector in conjunction with a 5V cell phone converter and plugged the counter into the wall socket. Regular sockets run at about 120V, so it was important to have the converter in order to not overload our creation.
We were able to hook up the counter to power and run the program – we made a few of the LEDs blink! We are currently using the push button, not the laser sensors, so every time I pushed the button, we’d have a light blink. It was gratifying to see all our wire connecting and learnings pay off.
Another thing my group discussed was memory. An Arduino can hold the memory of the program its running, but needs extra memory to hold anything else. If we want our counter to hold historical data, we have to add a chip or another board to our Arduino. This will require us to solder some wires, so we will look more into this next week. I found this forum online discussing Arduino memory that has been helpful to me. It might also be helpful to groups also using Arduinos.
Hey Aubrey!
I love how you explain the process and learnings your group has gone through. My group is also working with an arduino and incorporating it into our final product so your note about the little things you didn’t necessarily think about was useful! It’s easy to overlook a situation and think you completely understand it until you try to make it work and the realize the little things you forgot about. My group is also encountering the same issue with the arduino and re-learning all about the circuits and connecting LED’s to the breadboard & arduino. It’s a great experience overall though!
In my opinion, your project is easily the most technically-advanced one in our classroom! It is amazing to see how you guys were able to successfully wire it such that the lights blink on command. I look forward to seeing your finished product! I was actually at the ARC this week and thought of your group’s project – one of these devices inside of each ‘corridor’ that leads into the ARC would be really helpful for their staff, or could be used in tandem with the existing I-Card swiping system!