
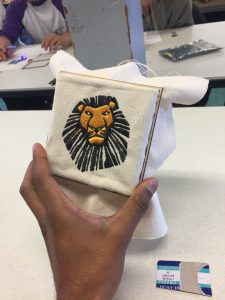
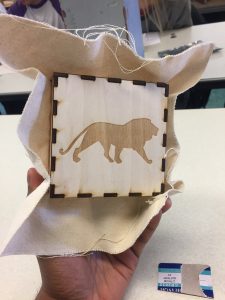
This week at the Champaign-Urbana community fab-lab, we finally got to put all our skills together from the last couple weeks. Firstly, I was able to assemble my laser-cut wooden box from one week ago – it connected together relatively easily! I loved how it turned out, with a simple lion silhouette on one side and my embroidered design on the front. It slid right over the box, using the square wooden holder I had printed.
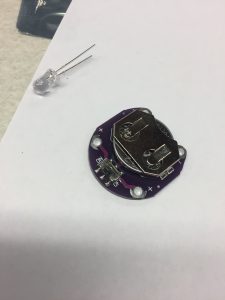
Next though, was the most interesting part of the project so far – the circuitry. The fab lab instructors went around and handed us each LEDs (light emitting diodes were first invented at the University of Illinois), a controller switch, and a small disc battery. He explained some general principles of circuitry and currents to us – and the difference between continuous and parallel circuitry. Those frustrating Christmas lights finally made sense! We were all excited when we were first able to get the LED to shine by connecting the right contacts to the controller.
 Next, using our intermediate knowledge of sowing circuitry into our canvases, we drew out the schematic of what our stitches would look like. It was like playing a puzzle game – you had to complete the circuit without letting any oppositely charged lines touched. I drew the head of my lion on a page and mapped out where I wanted my circuitry to connect. I realized that I did not have to send every thread back to the battery, but could continue them on to a similarly charged node at another LED, and then send it back (see design below). This saved me a lot of headache in stitching and made the design more efficient.
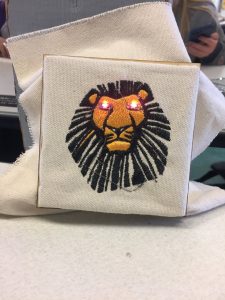
The actual stitching part was much more difficult than I anticipated. We used conductive steel thread to ensure that a charge was carried. I had a lot of trouble threading this coarse thread into the needle – and found out in class that beeswax serves a lot more purposes than I had initially thought. I decided to leave my LEDs on the outside of my lion, to give it a more mechanic/hybrid look. I didn’t spend as much time as I should have stitching – if I could redo it, I would have made much more stitches, and hidden any excess thread from the front of my lion – but you can’t tell from far away. I felt like an engineer when I had finished my threading, the controller, LED, and battery was in place. Finally, the moment of truth – I held my breath and flicked the controller switch to “on”, letting a current run from the battery, through the thread, to the LEDs, and back.
 My lion’s eyes blinked to life! It looked even more aggressive than I thought with it’s contrasting pink/purple light. I completed the entire box and cut off the excess canvas around the corners. I absolutely loved how it turned out. My mom will definitely put it next to all my other ‘art’ projects from school, except this one is actually decent. I learned a lot from these past 3 weeks of hands-on making – my favorite portion of the class so far!
Hey Ajie,
Your design turned out awesome! I agree with you that the LED lights make your lion seem much more fierce and aggressive. The outlining process was something I found extremely helpful. Understanding the circuitry process before I started sewing helped prevent me from making any major mistakes. It was nice to learn how to sew by hand and bringing together all of the different pieces we have been working on these past few weeks.
Hey Ajie,
Your box turned out so great! Everything from the embroidery to the actual box itself looks really clean and well thought-out. You also did a really great job stitching the lights behind the eyes- that takes a lot of precision. I agree, the stitching part turned out to be quite the challenge but it was good learning overall and nothing beats the satisfaction of switching the light on and seeing it glow!
Hi Ajie!
I really enjoyed reading your post! It was well written. I liked how you added a lot of pictures and walked me through every step visually. I thought your lion turned out amazing! I found the actual stitching part to be more difficult than expected too. I think sewing is a great skill we should all master. It helps with hand-eye coordination and uses a new part of our brains. It was fun being able to do a hands-on project. I think as a class we all were very successful and learned a lot together.
Hi Ajie,
I was so amazed today when I saw you finish your box and lion design–it was so smart to incorporate your LED’s as the eyes! I agree with you that the stitching part was more difficult than anticipated, and I am very glad we had this experience. I say this because it allows us to see what many processes would be like if we did not have the technology to do it. It is incredible that we have a lot of machines that can do busy-work for us, but it is equally important to understand the details of that busy work because that is ultimately where it all began.
-Scott Provenzano
Hey Ajie! Thanks again for providing such a great overview of the project, as I could not be in class to finish it today. I am glad I already have some circuit knowledge from a couple of my classes, but I’m jealous of all the cool stuff you got to do! Your lion looks really good – it’s cool how intense the LEDs are even though they’re behind both fabric and a bit of embroidery. I definitely did not think they would be that great. I also commend you on your lion – my embroidery machine got caught and made my mountains design turn out a little off, but it looks like yours stayed nice and straight. That’s really impressive considering the fine mane design it has.