All posts by Ajie

Curtains Down

Course expectations

At the beginning of this course, I expected to work extremely hands-on with 3D modeling software and printing hardware. I’ve only heard really positive things about the course and have taken a class with Vishal in the past. I was expecting to do a lot of self-learning – in a good way! I knew that the online community for MakerLabs was very extensive and that we would rely a lot on teaching ourselves concepts and then applying then. I also expected the course to be a great way to end out my senior year with a class that provided some practical, applicable, hands-on knowledge that could be transferable to industry and beyond. I also expected a great deal of industry knowledge via guest speakers and pizza!

Expectations exceed

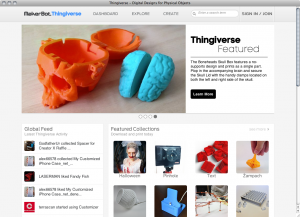
Many of my expectations were met this semester in BADM395! Even from the first day of class, we were exposed to online design databases like Thingiverse and were able to tinker with the 3D printers. I found myself doing a lot of self-learning. Most times I had a question about Fusion 360 or modeling software, Vishal would send me a learning resource rather than simply doing it for me (which is what I was expecting)! Though this was frustrating at first, it helped me learn skills in a very impressionable way. Furthermore, we got to hear from some amazing guest speakers including executives from Thingiverse and Shapeways!

Different than what I expected

My experience was different than I expected in that I thoroughly enjoyed attending this class. Most of my classes in college have been about showing up, mindlessly retaining information to score well on exams, and leaving with course credit. However, the unique structure of this class made actual knowledge the end goal, not a simple grade. I truly appreciated that because it allowed the class to really grow and not simply check off assignments. I was not expecting Vishal’s ideology of “it doesn’t matter if it works, it matters if you learned.” I think that ideology is so beneficial for college students as it encourages creativity and higher learning!

Learned about myself

Through this course, I learned that I am capable of doing a lot more than what I expected I could. In all my years of school, I was used to an instructor teaching me an initial methodology and then having me practice it. However, in this class, there were of a lot of guest-lecturers and big ideas. After some brief tutorials on maker software, we were expected to do the majority of the work with our hands, on our own. I initially did not think I had “what it took” to be such a self-driven, motivated learner. Despite this, I found myself looking up tutorials, wikis, and ‘guru’ assistance to accomplish many of my goals in BADM395. I learned that given the right resources, I can develop myself professionally and academically without as much personal guidance as I expected.

Takeaways from the course

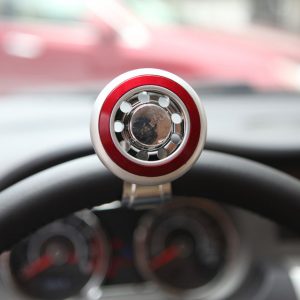
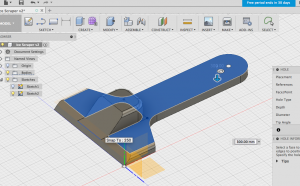
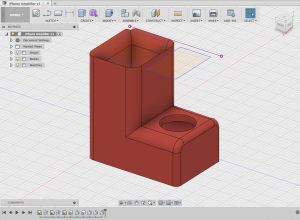
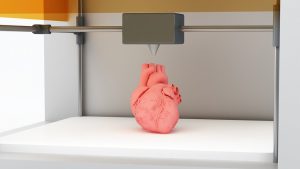
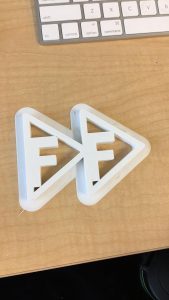
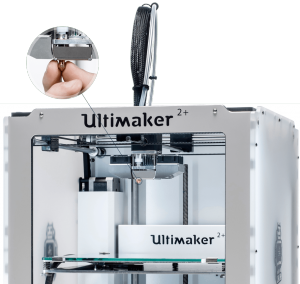
At a practical level, I learned many tangible skills in this course. I learned how to navigate and utilize Autodesk Fusion 360 to create custom designs for print. I learned how to export these designs into an .stl and have them printed on an Ultimaker 3D printer. However, some of the most important lessons I take away from this course have to do with the iterative design process as well as prototyping. I never truly understood what iterative design was until taking this class – I would print out model after model, trying to get the correct dimensions for a particular screw, and thought each was a waste. However, in reality, each failed iteration gave me a key insight for the next model. Having this process was essential, because making a physical 3D printed product is never a simple as it seems on a computer. Secondly, I learned that the prototyping process is an incredibly frustrating yet extremely gratifying process. It was maybe 5 iterations before we had a prototype that actually accomplished its original goal – but it was amazing to see our product actually worked. I learned that having a functioning prototype is absolutely essential to gain the buy-in of potential sponsors and clients.

Thanks for a great class, Vishal! Best wishes to you and our class for the future.

Design Audits

This past week in class, we actually all physically had working prototypes that we got to share with one another! We all had the chance to work ‘design audits’ with each other – working through and explaining the designs we had with our peers, so that they understood it properly.

I had the privilege of being able to ‘audit’ two of my peers’ designs for their final projects. The first group was the vertical smart garden team. They showed me how they had wired their arduinos to both their soil humidity sensor and their LDS sensor (which detects the presence of light). It was amazing to see how much they had progressed over the course of our short semester! One critique I suggested was to incorporate two separate LEDs for each sensor output, because the one they had was flickering – perhaps because it was too large of a power load.

Secondly, I got to audit the team that created the custom overhead headphone attachments. I loved the simplicity and imitability of this design – I suggested to this group that they actually make a bunch of their product – many colors and sizes – and hand them out during the presentations. Their print time is actually only about 30 minutes so it would work out fairly well.

As for my group, we went forward with presenting our prototype to date, which included the steering wheel bracket, bushing, and custom screw used to add the physical attachments. We feel like we are right on the edge of where we want to be with our project. We are looking forward to printing our actual final parts and continue the final testing phase of the project. We can’t wait to share our idea with the world!

Tangible Prototyping

Assigned Reading

This week’s assigned reading was all about the process behind prototype testing. I really learned a lot from this resource that I did not know before about the development/testing stages of a product build. One that that stuck out to me is three important use cases I need to be looking out for when I observe participants: “the user got through the task with no problem at all and no help; the user struggled and moaned a bit but he eventually got through it; he got so frustrated he gave up.”

Each of these categories provide valuable insight into understanding how a given test subject interacts with the product we created. In our case, with our steering wheel assist tool, we will be closely monitoring our test subjects in a closed environment (parking lot) to observe the way they install and use the tool. It was helpful to understand more insights behind testing.

Class Reflection

In class this week, we finally  started printing actual prototypes of our steering assist tool – it was awesome to actually hold our idea in our hands. We have 5 pieces of the total project we need to print out:
1. Bushing (printed)
2. Screw (printed)
3. Handle Attachment 1 (printed, in the lab)
4. Bracket (printed, in the lab)
5. Handle Attachment 2 (need to print)
We are excited with our progress so far. Here is what the screw looks like. We were surprised by just how strong this screw actually was. After printing this prototype, we realized we will likely need to extend the length of this screw a little longer to accommodate our handle attachments.
Furthermore, we were able to print the bushing that will serve to tighten the bracket that attaches to the steering wheel. The interesting thing about the bushing is the way that it bends when it is compressed, rather than staying rigid. This will allow the screw to secure into place without cracking under the pressure.
When we come back into the lab, we plan on assembling all the parts we have on hand. We will likely need to make slight modifications to the steering wheel attachments, and start prototype testing as soon as we are able to! We are looking forward to seeing how our steering assist tool will actually function in a testing environment. Can’t wait to get back into the lab this week to continue prototyping.

Busting out the Busts

This week in class, we had the awesome opportunity of learning to make 3D busts of ourselves. We utilized scanners from a company called Sense 3D which allowed us to capture detailed information from all three dimensions of a solid object. We used the iPad attachment which allowed us to use a standard iPad as the viewfinder for our tool , which made the ease of accessibility high.

We learned how to slowly pan around the object we wanted to scan (in this example, our own faces and shoulders) in order to create a fully rasterized rendering of the details of our profile. It was amazing to see the shape of the scan appear in real time, as we circled around our classmates’ faces. Once we scanned our faces, we then had a rough digital construction of the 3D model. However, we were far from complete. The digital files were often very rough and in need of a lot more refinement. At this point, we imported the models into familiar modeling softwares like Fusion360 and MeshMixer. We would use these tools to refine the rougher edges of our features and create a more natural depiction of what our faces look like.

After this process, we would import our refined busts into Cura to scale it and prepare to print. After completing this process, our busts were ready to go from a simple scan to a finished product of our very own faces – the perfect gift for our moms this coming Mother’s Day!

(This is not an image of Google Photos, not of myself!)

However, this was not a perfect process – there were still many challenges associated with the scanning process. For example, if we had facial hair/hats/other obstructions to our faces, the scan often became rather distorted. Furthermore, we had to manually ensure that all parts of the head and face were scanned, otherwise we’d have to manually recreate pieces of our face in Fusion (replicating natural contours, like in faces, is difficult!). Despite this, this session was an excellent introduction into learning the ubiquity and application of utilizing 3D scanners to bring ideas from theory into existence.

Prototyping

This week in class, we first had got the chance to speak with a Shapeways employee. She started off our session by giving us a virtual tour of the manufacturing facility she was at. It was interesting to hear and see how every employee in the business had a specific role to contribute to the 3D making and distribution process. I spent some time looking into the various companies she referenced, specifically HeroForge. It was amazing to see how 3D modeling is now available to desktop machines without any additional software or upgrades. I was able to create a custom figure and see it in live-dimensions on my screen. I’m curious to see how these capabilities will grow the personal 3D-making movement!

Next, we spent time actually creating crude mock-ups and prototypes in class. My group decided to move forward with our steering assistance tool. We looked into products that are actually on the market now, to understand what form factors work best and are most appealing to the public right now. We initially discussed the idea of using OpenSCAD to create modifiable dimensions within our steering assistance tool. However, we decided we wanted to go in a more modular direction. Similar to the way you can attach different heads onto an electric drill – we wanted to create a custom steering tool that can be utilized in a variety of use cases.

We decided to create a standard clamp that would affix to the user’s steering wheel. Then, we want to create at least 2 different attachments that can be utilized with the clamp. One would be a standard sort of knob (circular) that can provide general steering assistance to those with low motor strength. Another would be designed for with severely low motor strength, where the user would put their hand through a handle, and use their palm/wrist to steer the wheel.

The biggest challenges we are facing is safety – understanding how we can ensure that our modular design does not sacrifice design integrity. Since we are entering a product segment that requires products to work 100% of the time (driving a car) we have to make sure that our designs are solid. In the coming week, we plan to design and print actual prototypes of our models.

Putting It All Together

This week at the Champaign-Urbana community fab-lab, we finally got to put all our skills together from the last couple weeks. Firstly, I was able to assemble my laser-cut wooden box from one week ago – it connected together relatively easily! I loved how it turned out, with a simple lion silhouette on one side and my embroidered design on the front. It slid right over the box, using the square wooden holder I had printed.

Next though, was the most interesting part of the project so far – the circuitry. The fab lab instructors went around and handed us each LEDs (light emitting diodes were first invented at the University of Illinois), a controller switch, and a small disc battery. He explained some general principles of circuitry and currents to us – and the difference between continuous and parallel circuitry. Those frustrating Christmas lights finally made sense! We were all excited when we were first able to get the LED to shine by connecting the right contacts to the controller.

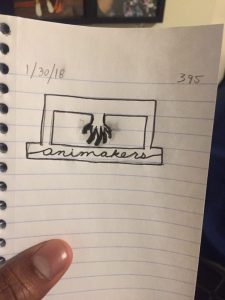
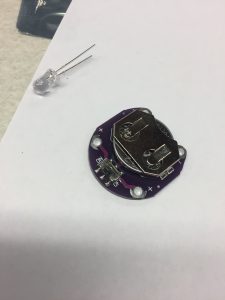
Next, using our intermediate knowledge of sowing circuitry into our canvases, we drew out the schematic of what our stitches would look like. It was like playing a puzzle game – you had to complete the circuit without letting any oppositely charged lines touched. I drew the head of my lion on a page and mapped out where I wanted my circuitry to connect. I realized that I did not have to send every thread back to the battery, but could continue them on to a similarly charged node at another LED, and then send it back (see design below). This saved me a lot of headache in stitching and made the design more efficient.

The actual stitching part was much more difficult than I anticipated. We used conductive steel thread to ensure that a charge was carried. I had a lot of trouble threading this coarse thread into the needle – and found out in class that beeswax serves a lot more purposes than I had initially thought. I decided to leave my LEDs on the outside of my lion, to give it a more mechanic/hybrid look. I didn’t spend as much time as I should have stitching – if I could redo it, I would have made much more stitches, and hidden any excess thread from the front of my lion – but you can’t tell from far away. I felt like an engineer when I had finished my threading, the controller, LED, and battery was in place. Finally, the moment of truth – I held my breath and flicked the controller switch to “on”, letting a current run from the battery, through the thread, to the LEDs, and back.

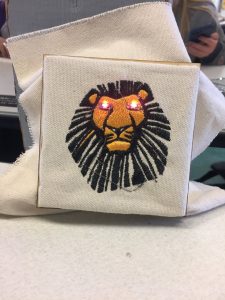
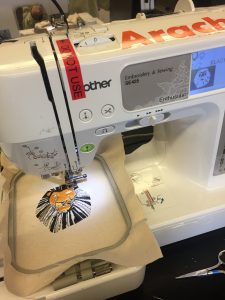
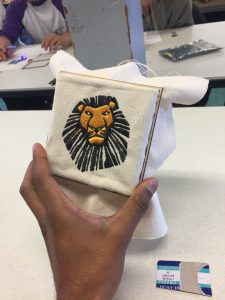
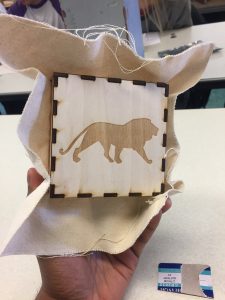
My lion’s eyes blinked to life! It looked even more aggressive than I thought with it’s contrasting pink/purple light. I completed the entire box and cut off the excess canvas around the corners. I absolutely loved how it turned out. My mom will definitely put it next to all my other ‘art’ projects from school,  except this one is actually decent. I learned a lot from these past 3 weeks of hands-on making – my favorite portion of the class so far!

Laser Cutting at the Fab Lab

Week Summary

This week, we continued with our rotations at the Champaign-Urbana community fabrication lab. Last week, I had the awesome opportunity of being able to use the embroidery machine to bring my lion to life. This week, we switched sides over to the laser cutting station, where I got to create a holder for my embroidered patch!

This was my first exposure to any sort of laser-cutting software or hardware. We used a vector graphics software called InkScape. Creating the laser-printed design was significantly easier than creating the stitched design. It was as simple as finding a .png online and making any necessary modifications to the lines in the software. Following my “king of the jungle” theme, I found a simple silhouette of a prowling lion to etch onto my box. We learned about the difference between cutting something out of the wood vs. engraving something in the wood. After finalizing our designs on Inkscape, we went over to the cutting machine itself! I had never seen one before, and it was a lot smaller, and a lot more louder than I expected.

Also, I had no idea that there was a literal laser inside the machine. I could see it flickering bright red, as it roared to life and began cutting into the wood, in the same way a 3D printer rapidly moves around a grid. I actually wished we were able to actually cut out designs in the wood, but found out that is a much more complex process than simply burning a design into the wood.

When the first designs started to come out, I was amazed at how fast the machine worked to burn the designs in – it was like seeing it appear out of thin air onto the wood. This is what one classmates’ design started to look like:

You can see here how it actually used a very fine laser beam that was extremely hot to engrave the designs we created. I was unable to see my finished product, but I look forward to collecting it when we meet at the fab lab for the last time this week!

I was curious to see how laser cutting is used in industry beyond making simple wooden boxes, and found that it is extremely relevant in the automotive industry. Automative manufacturers have started employing laser cutting techniques for extremely specific and nuanced parts because they can be made with high precision. Furthermore, it’s significantly safer than traditional methods to cut metal today, which include large moving blades. Laser cutting allows for a much smoother process. Amazing!

Hands On at the Fab Lab!

Week Summary

This week in class, we finally got to explore the Champaign-Urbana Community Fab Lab! It was an incredible experience. We entered what looked like a fairly nondescript building on the South Quad and found that the whole space was covered in cutting-edge maker equipment. Director Jeff Ginger gave us the tour, showing us the cutting equipment, fabrication tools, 3D printers, even the wood-working station in the back. While our MakerLab back at the BIF simply focused on 3D printing and design – this space truly embodied the ‘maker mindset.’

We split into two groups for a hands-on learning session. A student volunteer, Duncan, brought us to a corner room full of sowing machines and computer – not the most obvious combination. He explained how we would be using a computer software to make a 2D design, and uploading them to the sowing machines, which would then ‘print’ our design onto a canvas patch. Unsure of what to expect, I decided on a simple image of a lion (my favorite animal) to print. Duncan showed us how to import an image into the software, and manually ‘punch’ out the stitches that the machine would then follow.

Admittedly, using a software to create a 2D image was not the most unique experience we’ve had in this class. However, I was not prepared for what would happen next! We learned how to set up the  sowing machine to begin printing our design (I had to be careful to not stitch my finger into my design on accident)! When I had the spool I wanted, uploaded my design, and positioned my canvas patch, I hit the ‘start’ button on my machine. It whirred to life, slowly at first, and then rapidly picking up speed!

I was amazed at how quickly this machine fired its needle, like a piston on an engine, into the cloth as it began sketching my design. I slowly started to see my lion come to life and I was amazed – though this wasn’t a 3D printer like I was used to, I was still creating ‘something’ from ‘nothing!’ The finished product was actually amazing – the lion looked exactly as I imagined it, and I never expected that I would have loved using a sowing machine so much. This session truly showed me that ‘making’ is much more than meets the eye. I cannot wait for this week’s learning session, where I will be working to create a hand-crafted wooden box!

Hack Everything

Guest Speakers

Our first guest speaker this week was Alan Amling from UPS. Alan had a wealth of experience in the 3D printing and making space – at present, he worked in a logistics division of UPS.

Alan shared about how UPS is a redefining how the industry views logistics/supply-chain companies. The company is preparing to launch their own on-demand 3D printing manufacturing network. They plan to link their global logistics network with 3D printers at UPS Stores around the United States. Alan shared about how they’ve established a key partnership with a 3D printing factory in Louisville, KY. They are essentially creating a new, single-stop solution for additive manufacturing and logistics. The new platform will make 3D printing more accessible to a wide variety of potential users, from small businesses to mid-size companies.

Alan shared how the current business model of consumer-facing production is “best fit.” For example, we get to select from size 8.0, 8.5, and 9.0 for shoes – these sizes are already set and mass-produced. We choose whatever size happens to fit us “bes”t, although it may not be “perfect” fit. Alan shared that UPS is essentially breaking into the space of custom production on a user-by-user basis. He referenced Adidas, who has paired up with a rising new Silicon Valley printing company called Carbon. Using their new proprietary Continuous Liquid Interface Production technology, Adidas can custom-make shoes to exact scans of users’ feet.

Following Alan, we had the privilege of hearing from Dot Silverman, who truly embodies the maker mindset. She is a graduate student in Educational Psychology here at the University of Illinois. She studied Physics at Pomona College, and went on to work for Instructables, Autodesk, and the Harvard Wyss Institute. As she spoke to us, I found myself captivate by her engaging and outgoing personality.

She introduced to the amazing frontier of Bio-Hacking. Dot explained to us that traditional mindset of making calls printers, lasers, and fabrication to mind. In contrast, Bio-Hacking by definition  is a fairly new practice that could lead to major changes in our lives. It would be fair to call it “do-it-yourself” biology. It is the freedom to explore biology, growing organic things, and understanding different aspects of our physical world. Dot helped me understand that creating a microcomputer to control the movements of a cockroach is just as much “making” as printing a 3D widget is. I was particularly interested in what she shared about Backyard Brains, which is an educational tool targeting young students. It allows anyone to learn practically about neuro-scientific principals by studying our own brains, electrical impulses, and even those of insects.

Final Project Ideas

At the end of class, we had time to ideate potential final project ideas with our teams. My team, Animakers, thought of 2 potential ideas we could focus on this semester:

  1. Grocery bag holder

We came to a common pain point of trying to carry dozens of grocery bags in our hands to our cars/homes during our weekly trips. We realized we could potentially create a solution that would target college students at the grocery store. We would improve on some ideas for this product that already exist (and at a lower cost!)

2. Steering wheel ball

Secondly, this idea is specifically targeted at elderly drivers, or those with low arm strength. which makes turning a wheel into a tight turn significantly strenuous. This ball/tool would allow an easier contact point to turn the wheel using significantly less force. We also looked into existing designs and considered how we could make it even more accessible.

Creating Solutions with Design Thinking

Readings

This week, we read an article called “Design Thinking” by Tim Brown of the Harvard Business Review. I found this article to be incredibly insightful as it highlighted an industry leader in design thinking, a firm called IDEO. IDEO focuses on closely observing actual problems and creating innovative solutions from there, rather than creating a solution and trying to market it to the masses. The article cites how designers are now being asked to create ideas, not simply dress them up. This article really set the stage for the presentation we had in class from the student group Design for America. I understand that effective product design is about understanding the problem at it’s deepest level.

Furthermore, we watched a video interview between our very own Vishal Sachdev with Professor David Weightman, who has a background in industrial design and a wealth of experience in product design. He talked about the matrix between desirability, viability, and feasibility when determining where the “sweet spot” of good design resides. Furthermore, he focused on the responsibility that designers have to create not only effective products, but products that are mindful of our resources and planet. He summed about critical design thinking in a couple sentences, “Understanding what other people are about is a very important part of what a designer needs to do. Observing and inquiring gives you insights into unmet needs at the moment – and that’s the time you start ideating.”

Guest Speaker

As I mentioned, we had the University’s Design for America team come in and give us a workshop on the actual design thinking process that they go through when creating a new idea. They narrowed down our market to the visually impaired, and gave us four unique ‘clients’ we could cater our ideas to. My group chose a visually-impaired college students, who’s blindness affects her ability to attend social events at school.

The process they shared with us was truly eye-opening for me (and was completely relevant to the readings)! Instead of going straight into products, they had us spend time simply writing down our assumptions, pain points, potential solutions, etc. on sticky notes. By the end of this brainstorming process, our work station was covered in colorful sticky notes!

However, I saw how DFA’s process began to narrow down solutions and opportunities until our idea was right there in front of us. It was amazing looking through the DFA America page and reading their Process Guide which addresses how to apply the skills and values of human-centered design to address social challenges.

Prototype

We ended up creating a unique walking stick attachment for our client. We recognized that we didn’t want to ‘reinvent the wheel’ by creating an entirely new walking stick. Rather, we designed a modular attachment, that clips over the stick’s base, that can give it a wide new range of functionality, including Bluetooth, NFC, emergency calling, GPS, etc.

I realized that creating a unique prototype was only half the battle. As I explored the IDEO U homepage, I noticed how much emphasis they put on sharing the story, or crafting a production narrative to inspire others toward actions. Keeping this mind, we tried to present our product as not just a simple model made out of pipe cleaners and PVC, but rather a tool that could truly ease the life of visually-impaired clients everywhere. We wanted to sell our story, not just our product. This is an important lesson that I hope to carry into my actual semester project!


Becoming a Tinkerer

Guest Speaker

“Are you a professor?” I asked Mr. Banach, our guest speaker for this week’s class session. “No – but I’ve written 24 books and have taught thousands of people all over the world. So, you could call me a teacher.”

It was an excellent experience being walked through using Fusion 360 with Mr. Banach. It was evident that he has taught many students – he was patient and methodical in his teaching style. We gathered in a classroom instead of the MakerLab this week, to get a hands-on tutorial on using this common CAD software. Mr. Banach walked us through drawing lines to create shapes, extruding them to give them mass, and cutting them to give them depth. Together, we designed an ice-scraper that we could actually print and utilize. After our session, I felt like I understood the basic controls of using Fusion 360 to bring ideas into reality.

Class Takeaways & Activities

Overall, this class was an extremely informative one and a key session, I believe, as we begin to start digitally tinkering. Beyond the simple physical controls of using Fusion 360, I learned some key concepts about design aesthetics. For example, using the ‘Filet’ tool to round out edges really made designs much more aesthetic than cold cut lines.

Furthermore, we learned the importance of design practicality, in terms of strength, material, and feasibility. We had to be aware of what material we were using to print a design based on its intended purpose. For example, using a brittle plastic (although cheaper!) would likely shatter our 3D printer ice scraper. We learned how to interpret stress simulations on our objects (very similar to a heat map), to see where the weakest points were. However, upping material design involves a much higher cost and “resolution” of the print. All these factors need to be considered when printing an object – it’s not as simple as design, click, print.

Tinkering

For my personal project, I decided to explore making my very own iPhone Amplifier. I looked at various designs on Thingiverse for inspiration, and then decided to take it my own direction. The iPhone would sit directly into the amplifier, sending the sound waves bouncing around the corner, amplifying in resonance, and coming out of the circular hole in front.

I’m not sure if this is a feasible design – my first thought is that there is a lot of excess waste with this model. Regardless, doing this personal project showed me that I am actually able to independently use Fusion 360 to model. I want to continue refining this design and see how I can potentially improve it.

Going Forward

Going forward, I want to grow my skillset in Fusion 360. Ultimately, I only know a few tools – extrude, filet, taper, etc. However, I believe that as I continue learning skills, my designs will get more complex and more feasible. I look forward to gaining this hands-on experience as I tinker – but I found an excellent additional resource online from AutoCad. It is a quick-start guide on using Fusion 360 and could be very helpful to our class,

Making Things | Week 2 in Review

In a corner room of the Business Instructional Facility at the University of Illinois – a group of about 20 students meet weekly to learn how to change the world with 3D printing. Just two weeks into the course, we’ve already had our ideologies about 3D printing  flipped upside down by a guest lecturer, learned the basic mechanics of the process, and explored free designs we want to innovate during the semester. We are off to a fast start – welcome to BADM395: Making Things (Spring 2018)!

Guest Lecturer

At the start of week 2, the class was privileged to hear from John Hornick, a Finnegan lawyer who isa  litigator and counselor with broad experience across the intellectual property practice. More than that, he authored the book, “3D Printing Will Rock the World.”   John closely follows the 3D industry and advises his clients about the intellectual property issues surrounding this rapidly developing technology and how they may affect their businesses. Though we were only able to video-conference him, we all learned a great deal from this expert.

John taught us how 3D printing is flipping traditional manufacturing’s business model on its head. This model depends on mass production, economies of scale, and low labor costs, which are major barriers for competitors. 3D printing, however, eliminates these barriers because just one machine can produce an entire product and needs only a fraction of the labor. Furthermore, it brings the marginal cost down to nearly zero – John taught us that whether you print 1 jet engine, or 100,000 bolts for jet engines – the fixed cost of production would stay the same. He showed us how modern-day innovators were printing actual engines, full-sized cars and motorcycles, and even human organs. It was truly insightful to John’s wisdom. He taught us that given the highly unregulated and complex nature of securing intellectual property rights for virtual design, it’s nearly impossible to control who prints what.

Learning & Skills Objectives

During this week, our learning objectives included learning from what others have made/shared, as well as forming team names and brainstorming logo ideas.

The class spent time on a variety of online design databases: including Thingiverse, TinkerCAD, and Pinshape, just to name a few. We found that each site had a particular theme to it. For example, TinkerCAD had a lot of complex mechanics/tooling designs. On the other hand, Thingiverse was much more light-hearted, with models much more accessible to kids of all ages. As a class, we pored through these sites, finding interesting designs and sharing what we liked, what we disliked, and how we would further innovate with each other.

Finally, Professor Sachdev sorted us into our semester project teams. Many of us had to take a few days to come up with our team names. We have a lot of creativity in the class – just to name a few: Synergy, Money Makers, Fast Foward, Animakers, etc. Beyond simply naming our team, we were all tasked with creating a logo to 3D print in the following week. This was easy enough on paper, but we will see what happens when we upload onto an actual printer!

(PC: Aubrey Haskett)

Readings Reviewed

We had three readings that we reviewed this week. The first was entitled “How to Make Almost Anything” by Neil Gershenfeld. Neil discusses the newest digital revolution that is coming upon us, in fabrication. He writes about how communities should not fear or ignore digital fabrication – they can be used to educate, innovate, and breathe life into communities. Next, we read “The Maker Mindset” by Dale Dougherty. Dale discusses a crucial mentality that our class needs to develop – the Maker Mentality.

This is a kind of mindset that teaches people – especially students – to few problems not as static, but dynamic. This mindset creates a platform for students to ‘create’ new solutions to problems using innovative thinking strategies – all made possible through the 3D-printing revolution! Finally, we watched a video called “The Birth of Desktop Printing” with Matt Griffin which highlights the slow process that brought desktop printers (ex: Ultimaker) to the forefront of the consumer markets.

Overall, the three resources for Week 2 helped lay a solid foundation us to understand what 3D printing is, where it came from, and where it can go.

Student Reflections

As a class, we found Week 2 of BADM395: Making Things to be incredibly insightful. One student’s sentiments captures our thoughts well, “I don’t understand how these milestones have been happening under my nose. Owning the means of production used to be a privilege reserved for the rich, but now everyone can print from their home with this technology. The consumer’s changing relationship with traditional manufacturing is fueling the maker movement. (Rindler). Traditional consumers are evolving into prosumers all around us – we are now a part of this revolution.

As we progress into this class, the class is collectively excited to gain more hands-on experience as we expand our ‘maker mentalities’. In class to date, we’ve gained a lot of contextual and expert information on the industry and trends. Starting next week, we will have a crash-course in online modeling, the Cura software, and have a chance to actually print the team logos we planned this week.  We will have the opportunity to use our minds (and our machines) to bring something forward from nothing. Who knows, we may all end up with only melted piles of plastic after our first print – either way, we are extremely excited to see what the future holds this semester!

A Print-Sharing Economy

Jeff Ginger

This week in class, we had a guest speaker come in a give us fascinating presentation. Jeff Ginger is the director of the Champaign-Urbana Community Fab Lab. When he was speaking though, I got the impression that he truly embodied the “maker mentality” we’ve discussed in class. He embodied the idea of a print-sharing economy, where community members had free access to the designs, hardware, and assistance needed to make their dreams a reality. I appreciated his vision – he was truly passionate about enabling another generation of future-makers. I enjoyed seeing the real-life examples of community members that utilize the Fab Lab to grow their small businesses. I also learned that there is a global fabrication lab network! I had no idea that you could visit a different country, and find a lab with a standardized set of fabrication tools. I found it fascinating that there are both regional and national conferences, where makers all over the world get together to share ideas, get critiques, and collaborate on projects. I am very excited to visit Jeff Ginger’s Fab Lab (just right across from ACES…I passed this building every day my freshman year and had no idea what it was!) and learn how to best utilize these free resources.

Considering that our MakerLab only had 3D printers, I look forward to learning how to truly ‘fabricate’ products using a variety of tools: laser cutters, sower machines, circuitry, etc.

Class Takeaways

This week in class, we finally got out hands on the the Cura software and the Ultimakers! Admittedly, it was an unfortunate week to not have our actual professor teaching (Vishal had the flu); the students were a little frenetic and not the best teachers. However, a lot of group-learning and collaboration happened – and we were able to make things happen!

We started by learning how to use TinkerCAD – it was a surprisingly usable tool. The user interface reminded of an iPhone game – very fluid, logical, and responsive. In just a few moments, I was able to import an Illinois keychain and render my name on top of it. Though I did not print this, I was pleased with how smooth the process went.

My team’s name is “Animakers” – a combination of ‘animate’ and ‘make’! My team spent the second half of class trying to render our logo. It was more difficult than we expected with our original creation (we needed a lot more experience on TinkerCAD) so we modified our original design. Instead of a 3D Printer with a hand for a nozzle (see original mock-up below), we decided on an outstretched hand holding the world on it’s fingertips – literally representing the world at our fingertips to make.

After a lot of self-learning, we were able to initiate the print! It was scheduled for over six hours, and we have yet to return to the MakerLab to see how it went…either way, it will have been a learning experience! Things will only get better from here.

One topic I want to continue learning about is supports – the process of printing temporary structures to support a complex design that cannot initially stand on its own. I found this 3D Hubs resource to be incredibly insightful…I suspect mastering the art of supports will be key to creating unique and powerful prints!

Genesis

Genesis is the first book of the Bible, covering the Christian creation account. In it, God speaks into the darkness, and brings something from nothing.  I too, this semester, plan to bring forth things from nothing in this course. The advent of 3D printing truly symbolizes the 4th major revolution in human history; I look forward to joining this movement and becoming an avid maker. A little about myself – I consider myself a content creator – music, photography, videography – but I look forward to entering into the physical realm!

Takeaways

In class this past week, we had a guest lecturer discuss the implications of 3D printing changing the world as we know it. I found it incredibly insightful – hearing John Hornick’s ideas about the future of ‘prosumerism’ really shifted my paradigm about being a maker. I learned that 3D printing is far more than printing face models and paper weights – in reality, people are printing human organs, jet engines, and entire cars! What interested me the most about what he said was regarding the unregulated nature of 3D intellectual property. In the assigned reading for class, I read about the theorized dangers of 3D printing for the masses. British scientists theorized about the ‘gray goo’ – a nefarious name for a mass of self-replicating robots capable of consuming all biomass on Earth.

It seems like something out of a sci-fi movie – but with the rate that artificial intelligence is growing, along with the growing ubiquitousness and complexity of personal 3D printing – it makes me wonder how far-fetched this idea really is. Consider Cody Wilson, a law student who released blueprints for a 3D-printed plastic pistol called “The Liberator” in 2013. When he did this, there were over 100,000 downloads of this actual weapon – capable of shooting actual bullets! It makes me wonder what measures we should be taking to protect 3D-printing technologies from not getting into the wrong hands.

Luckily, we won’t be printing any weapons this semester in class. Rather, I look forward to understanding the methodologies and practices behind creative design and bringing my thoughts to life! Something out of nothing!

Everyday Objects

I accessed the popular online design database, Thingiverse, to discover some potential projects to make. They are detailed below:

  1. Canon Lens Hood (https://www.thingiverse.com/thing:36284)

As a photographer, I’m naturally interested in practical photography accessories. I would definitely explore this lens hood design for my Canon T5. To improve on it, I would explore integrating an actual lens cap into the lens hood itself, so I can be confident I can protect my lens if I leave for a quick shoot.

2. Flash Stand (https://www.thingiverse.com/thing:9534)

I would also look into creating this simple flash stand! People always underestimate the value of external flashes during a big photoshoot – but setting up flashes is the most difficult part! Being able to print these en masse would make life much easier. I would see if I could modify this design to attach it other accessories like Speedlites or diffusers.

3. Ring Lamp (https://www.thingiverse.com/thing:480042)

A ring lamp is an essential tool to create epic videography scenes. This would require a lot more work (buying and wiring the LEDs), but offers the ability to customize the ring lamp for any custom lens I own. This would be a great addition – but a lot more labor and fabrication intensive. Learning opportunity!

4. Canon 5D Model (https://www.thingiverse.com/thing:29662)

This last design has no particular utility – but would be a great addition to my desk, or as a gift to a fellow hobbyist. This body is a classic and recognizable design – I would modify it by adding some degree of personalization – perhaps a custom monogram on the lens cap!

Signing Off

I learned an unbelievable amount in only 2 weeks of maker lecture sessions. I look forward to actually getting hands-on with my work. The next time you hear from me, I will have brought forth things from nothing.