
This week, we finally got to put our wooden boxes together. These past three weeks have been a wonderful learning opportunity, and it felt good to come up with a finished product. I thought it would be a simple process- put the wooden pieces together, stick a light somewhere on the canvas, switch some button on, and see the pretty light glow on top of a perfectly constructed box. Little did I know, there’s a lot more to it than that.
We first received an introduction from Duncan on how circuits work—the basics of it made sense to me: connect the positive LED side to the positive battery side, and connect the negative LED side to the negative battery side. However, if the two wires touch at any point, it’ll cause the device to short circuit and the light won’t work. In order to make sure that we were connecting the right wires to the right sides, we sketched out where we wanted to sew the LED light and where we wanted to place the battery on our designs. I decided to place the light by the location of my hometown in California:

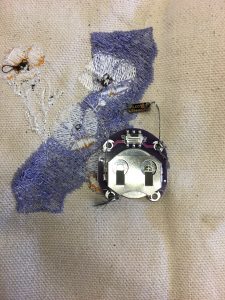
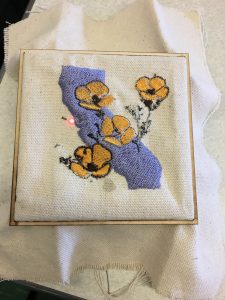
Once we identified the positioning, we used conductive thread to actually sew the various components onto the canvas. I think I speak for everyone when I say that this was a challenge. After 30 minutes of trying to tug the thread through the canvas and trying to tie knots to hold the finished stitches in place, I was finally ready to test out the light by inserting the battery. On my first attempt, I couldn’t get it to work and I was terrified that I had crossed the wires accidentally—it turns out that a part of the thread was touching the metal portion of the battery where it shouldn’t and that was causing it to malfunction. Once I moved the thread over, my LED lit up and the box was complete:
If there’s anything I’ve learned throughout these past few weeks, it’s that I should be patient with technology, and with myself. I came into this workshop with the expectation that the machines would take care of everything, but in reality, there is still a ton of trial and error that goes into making anything worthwhile.
Ria,
I really like how well your finished product turned out. Many of my family members live in San Francisco, so your project really appeals to me. In the coming weeks, I look forward to working with you and Maddi to create an ergonomic and efficient solar-powered drink warmer.
Jason
Your final product looks great! I thought the conductive thread was really neat. Duncan’s refresher on circuits was vital for me getting my battery to work. I like your last point about being patient. As we begin working on our final projects, our patience will be tested.
Hi Ria- your finished product turned out so beautifully! I love the idea of putting the LED right near your hometown- I’m sure this box will be really special to you going forward. On the topic of the sewing of the conductive thread though, I agree- it was so hard to figure out how to stitch the thread in a way that the wires didn’t cross, especially since I had three LEDs to stitch in!