Fusion 360 & Making

Fun in Fusion 360

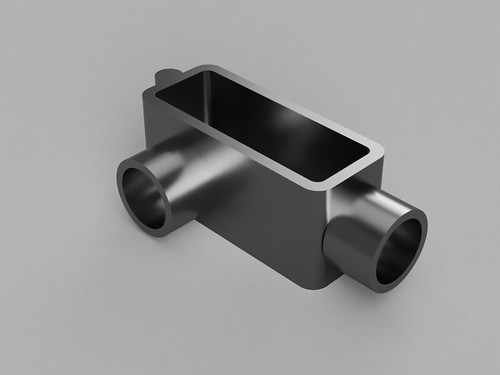
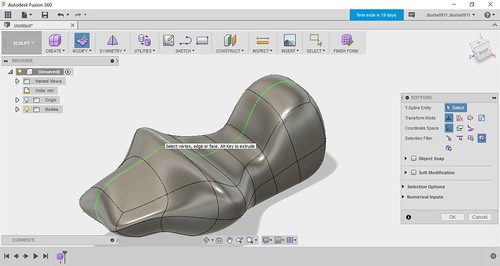
Learning how to use Fusion 360 was an incredible learning experience. From the very first tutorial, I quickly realized the amount of power this software had. Fusion 360 was truly a complete package for anyone who wanted to make. As you can see from the above picture the workshop I was involved in really let us go absolutely wild in terms of creativity. That ability to make whatever strikes mind is truly quite powerful in my opinion. Fusion 360 made it easy to start sketching, extruding, and finally rendering. It was so easy to create whatever the mind wanted.

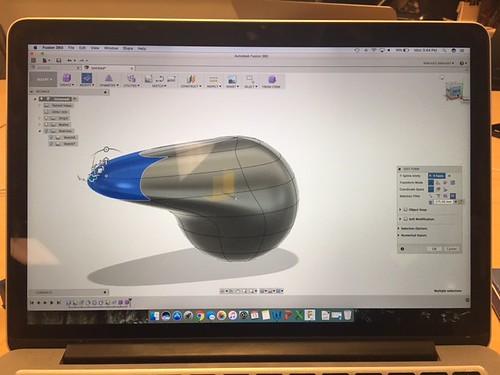
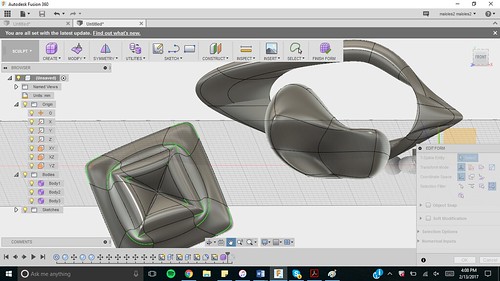
Through the workshop and YouTube tutorials lessons in design and engineering were also passed through to us. Rules regarding shapes, grids, and how space interacts with physical objects. It was all quite a lot to come at us at once but I wouldn’t have it any other way. It was especially cool to see what exactly was possible with this software. Particularly, when there was a demonstration on how easily Fusion 360 could create natural amorphous shapes with the click of a single button.

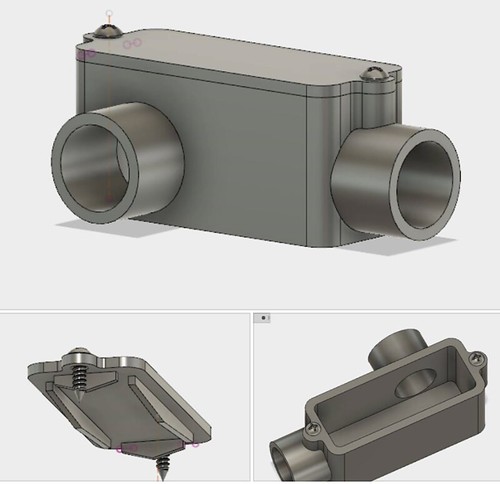
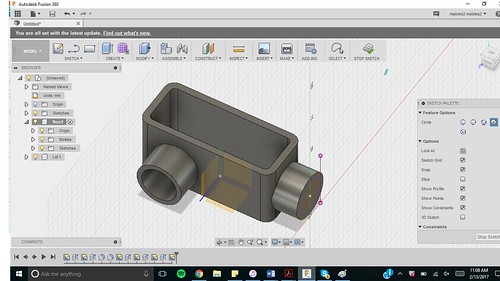
I think throughout the workshop I realized just how much I took for granted simple engineering feats. Taking a simple water bottle the shape itself is complex enough but it actually has several parts working together to provide us with a coherent product experience. Without great designers with software like Fusion 360 we wouldn’t have most of the products in our world today. In fact, I tried my hand at making one such water bottle (cap) and realized just how difficult it is to make an object from real life (not even the whole thing either!).

Water Bottle Cap Modeling

To also make these objects to scale, ready for manufacturing, and testable/buildable in the real world must be quite the task for engineers and designers alike. I was astonished at the amount of focus, energy, and time it took to just create a simple mockup of a water bottle cap. Truly, though CAD software like Fusion 360 allows anyone to make what their minds think of. I think that alone is revolutionary.

To boot I think AutoDesk is doing extraordinary work in the student space. Allowing their core software to be released to the student public at no cost is amazing. Giving any student the ability to make, create, and model. AutoDesk is doing a great job of giving problem solvers the tools they need to make physical solutions to real life problems.

Elevate Design Skills With Fusion 360

This week we started building models with Fusion 360. Fusion 360 is a cloud-based CAD/CAM design software developed by Audtodesk. It is a powerful tool for designers from all levels. During the class, we’ve explored a variety of functions in Fusion 360 with instructor from Autodesk. Fusion 360 provide multiple modeling forms, including freeform modeling, solid modeling, and parametric modeling. It also integrated simulations that allow designers to test the capabilities of the models. Besides, Fusion 360 is a cloud-based software that support a high-level of collaboration between designers. As we’ve discussed last week, collaboration is an essential part of human centric design process, and Fusion 360 is helping designers to work together in the second and third phases of design thinking processes.

box_2017-Feb-13_07-27-51AM-000_HOME

Before the class, I’ve followed the tutorial and built a model for a part of a tool. What I found to be really interesting is how Fusion360 build 3D models based off flat graphs. The only design software that I ever used in the past is TinkerCad, which basically had all 3D figures prepared for users. Another feature that I think it’s really cool but not able to master is the design timeline. Based on the tutorial, designers can save a lot of trouble going back and forward adjusting the models by manipulate the timeline. However, I do believe it requires a certain level of understanding.

After the class, I build a model based off a hand cream. I thought the tube is hard to depict using traditional 2D method, so it may be a good illustration of the function of Fusion360.

https://flic.kr/p/S2AHB4

Hand Cream v1

https://flic.kr/p/SdgFAX

I dissected model into three major parts:

  • The cap: the main body of the cap is a cylinder. I noticed that the bottom of the cylinder has a small sinking area in the middle. Therefore, I constructed another cylinder and have it cut into the bigger cylinder. I also have the fillets for the rims.
  • The closing end: the part that closes up the tube
  • The tube: I built a loft with the two surfaces between. I couldn’t figure out a way to smooth out the lines on the side.

What I really enjoyed during the process is that Fusion360 allowed me to add details to the model so it doesn’t have so many edges. A problem I faced is I’m not sure how to construct the inner structure of the cap and I think there might be semi-finished parts in the part-shop.

Looking into the future, I think Fusion360 is able to help us achieve a lot of amazing things through 3D printing. Because one advantage of using Fusion360 is it allows designers to build components and then assemble them together. It helps the designers to solve one of the most important constraints when using 3D printers, which is sizing. If we are able to break down a design into small pieces, we are able to make much bigger things. Also, since the defection rate of 3D printing is also relatively high (for me 2 out of 3 so far), It is also much easier to reprint a small piece if there’s any defection. I’m looking forward to future application of Fusion360 in my 3D printing project.

Learning one day at a time

#DesignForAmerica #DesignProcess #MakersForLife

Human-centered design is a new up and coming scene in which designers put into the account of the target user and design around that basis. In order to successfully produce a new product, one has to be able to identify the problem and the user to identify the situation at hand and then solve it utilizing creative problem-solving techniques. Limitless. This word accurately depicts the nature of our class session this week, where we participated in a lab led by the UIUC chapter of Design for America. Through a series of exercises, we were exposed to the processes and mindset behind ideation from a designer’s perspective.

In order to give us a look at their design process and put us in a Design For America mindset, they facilitated a class activity in which we were handed 3 cards at random. One card gave the demographic which the product which we were designing for, the next gave what it will be used for, and the last card a constraint for out design. One of the group’s challenge was to design a way to make music for adventurous preschoolers and the constraint was that it should grow. They interpreted the constraint, “it grows”, as that the object expands. Their team came up with an expandable “laptop”, where it had 3 folds, one had a screen, the middle had buttons in different colors and shapes, and the last fold had a piano keyboard and a xylophone. The buttons would make noises when pressed and the screen can show cute characters dancing on the screen. The piano and xylophone allow the child to have a physical thing they can play with to make noise in case they do not like digital sounds.

As written on the website of Chicago Architecture Foundation, “The Design Process is an approach for breaking down a large project into manageable chunks.”

Although our workshop with Design for America had us create unrealistic products, the same concepts hold true. Before you can come up with a design, you need to have a specific population and a specific problem to solve in mind.  As you design the product, it needs to be realistic and be able to be manufactured, and it needs to be profitable.  Fortunately for us, our access to the Maker Lab and CU Fab Lab allows to rapidly design, create, and test prototypes.  Regardless, It is important for us keep desirability, viability, and feasibility in mind throughout the entire process.

Now, it was time to make the logos for the groups. Just seeing the logos printing made all of us so excited for what the future holds for us. What can we all create from nothing? There are still so many questions we need to ask ourselves before coming up with our final ideas and designs. I look forward to figuring out what the final products will be through design thinking.

If you want to know a more in-depth experience of each individual you go to the ‘Week 3’ tab.


3D Modeling with Fusion 360

We have Jeff Smith, the industrial designer at Autodesk, as our guest speaker this week. Although Jeff used his most of time explaining how to use Fusion360 and why it is superior to the other competitive products, Jeff’s self-introduction indeed contained a lot of wisdom. First of all, he called him a “dinosaur”, because Jeff was the in the last generation in his college that purely used “analogy design methodology” (not sure whether this is the terminology he said) and Photoshop was barely in beta version. It is crazy to see that what people learned in college might immediately be replaced by other advanced technologies nowadays. Does that mean we do not need to study hard anymore? Absolutely not, we still do need to master the subjects in our curriculum. On one hand, no one knows exactly when the new technology will replace the old one; on the other hand, the experience we accumulated by studying the old method will broaden our perspective when applying new technology. All in all, we need to keep an open mind to new tool/ technology all the time.


Jeff also emphasized the importance of network. Before working for Autodesk, Jeff worked for Autodesk’s competing company for decades. It would be a nightmare for anyone when he/she is informed to leave the company after he/she had worked for such a long time. Unfortunately, Jeff faced this kind of tough situation.  Though frustrated about his unemployment, Jeff found a new job with the help of his network in the following weeks. Jeff himself also said that he did not expect he would work for his original company’s competitor and his network would help him secure a new job when he needed most. These two episodes have nothing to do with 3D modeling, but I do believe we can learn a lot from these two events.


Fusion360 is a computer-aided design application for creating 3D digital prototypes. Similar to Cura, Fusion360 enables users to design prototypes or edit other’s projects. Under Jeff’s instruction, we have a quick overview of Fusion360’s user interface. Then, we start to sketch the basic 2D patterns such as line, curve, square, and circle. Then, Jeff introduced how to create 3D object like box and cylinder. Meanwhile, Jeff also demonstrated how to use extrude, revolve, and other functions to create new patterns based on these basic 3D objects. Finally, we learned how to use “Create Form” to create symmetric objects. The object I designed is my speaker. I used extrude function to create the control button on my speakers. It looks simple but it will work well. 😉

https://uofi.box.com/s/1wujdb2sq1iyl4c928426teqpej34sbh

Design and Build: Learning to Use Fusion 360

Screen Shot 2017-02-17 at 5.03.53 PM

This week, we take a step further into product design by learning how to use Autodesk Fusion 360.  Luckily as students, we have free access to Fusion 360, a tool we all found to be quite powerful and intuitive.  Prior to our class session we were able to follow a series of tutorials to become familiar with the software, and I was proud to finish this model before class.  I really enjoyed playing around with the software while learning its capabilities.  In our class session, Jeff Smith, an Instructor from Autodesk presented to us and taught us how to use many of the features of Fusion 360.  Following Jeff’s presentation, Dot Silverman came and presented on her work with Biohacking.

As with many software programs, Fusion 360 is a very powerful and complex program.  Initially, it can be difficult to navigate and to achieve your desired outcome in design.  However, once you become more comfortable with the program, designing can come naturally to you.  Playing around with the tools has been really helpful in learning how to properly use the software, and I found the tutorial videos very helpful.  I also found this slide deck which gives an overview of how to use many of the tools in Fusion 360.  I personally am a big fan of tutorial videos and slide decks as I can go through them many times until I fully understand each step. Something else I have already realized is that there are many design implications to keep in mind when designing for 3D Printing.  This article gives a brief overview of mistakes to avoid when designing.  Many of these echo what Jeff mentioned we must be mindful of when designing in Fusion 360.

IMG_1025

Moving forward in the class, our group is approaching the point at which we will need to start designing on our own.  We all need to learn and practice using the design software, 3D printers, and the many other technologies and machines that are available to us.  We want to make sure that our design is desirable, viable, and feasible.  We need to be sure that our design is logical on the screen and in its physical form, so being comfortable with the design software is paramount to our success.

IMG_1026

Unfortunately we did not have much time to cover Biohacking in class,  Dot introduced us to the concept of biohacking which could involve anything from product manufacturing to medical uses.  This article gives many examples of how makers can “biofabricate” clothes, furniture, and other special materials to turn manufacturing into a more sustainable process.  As we continue to evaluate future implications of making and 3D Printing, biohacking will become a major discussion point.

To learn by creating

Time to learn how to build! #Learning #CAD #Modeling #Fusion360workshop

Building things can be tough and building it on CAD software, you can imagine. It was time to get on with the whole 3-D designing, not beginners but fully advanced CAD software. Creating models on CAD is totally different from designs made on paper. There are so many things that you can do with your model. There are no limits, especially with the software that we were taught today by a highly qualified person from AutoDesk.

Before coming for the class we watched a video about how to make a part in Fusion360. This helped us all to get a hang of the software and know the basics of it. Jeffrey Smith from AutoDesk came today to give us a workshop and teach us how to use Fusion360. When he came he introduced himself to us and told us about his journey and how he ended up working at AutoDesk. His story was so inspiring, it made me realize that one should always keep trying and never give up. He then talked about the company and told us that it is located in Pier 9. After this, it was time for us to gets our hands on the software and do some building.

Learning CAD software is a meticulous job and even a tiny mistake can make the entire design go to waste. Jeff started teaching us the basics of the software. He first told us how to create a new file and where can we save files. Then he talked about the sketch tool. He first drew something with the sketch tool and then asked us to try it on our own once he was finished demonstrating it. This way we got time to examine and play with each tool. After the sketch tool, we learned how to extrude things and scale it to the size that we want it to be. This was the time when our model actually looked 3-D. There are so many ways by which you can make a model; there is no particular step. After learning to extrude we were allowed to use the purple button that is the ‘create form’ option. This tool looked so organic with all the rounded edges. My favorite tool was the assembly tool. This tool made your single part interact with other parts and one could see how it would function as a whole. This gave us a sense of step-by-step building process.

To conclude I would like to say that the workshop made me more inclined towards using this software and play with different tools. I am really looking forward to the assignment in which we have to create a product on Fusion360 that has different/separate parts to it and make then interact with each other.


No Boundary for Innovation and Design

There are a million and one ways to make something. So far in the Digital Making course I have used TinkerCad to make a logo for my team. In the last class we were introduced to Fusion 360 by Jeff Smith, and instructor for Autodesk. We were instructed on how to go from the basics of Fusion 360 to creating more complex things. You could use that software to make everyday things very easily. I tried making a cake spatula. It has two components to it, a scoop part and a handle. After some more practice i should improve my skills with Fusion!

Fusion is used in many areas of life today. For things in our world and even out of our world! Autodesk had a “Space Challenge” where students competed in to design a 3D model of a cube satellite. This software can help solve real world problems.

Another speaker we had was Dot Silverman. She spoke to us about Biohacking. Biohacking by definition is the activity of exploiting genetic material experimentally without regard to accepted ethical standards, or for chemical purposes. Biohacking has changed the way of life for some people. The vegan lifestyle involves not eating any animal products. It is mostly a plant based diet. So just think of never eating ice cream, having a steak, or enjoying cheese on your pizza. Except biohackers have made a breakthrough that allow vegans to enjoy cheese. They have created a vegan cheese. They are essentially “writing” genes for plant proteins that are mimicking milk proteins and putting them in yeast. Once it is put into the yeast it does something similar to when people make beer. When people make beer it is developed by the yeast excreting alcohol. Except with the modified plant proteins the yeast excretes milk. This is how the “Real Vegan Cheese” is made. This has changed the diet of a vegan and opened many doors for further exploration. Now that there is a vegan cheese, can there be a vegan chocolate or butter. This restrictive diet has become less restrictive. Many people believe the vegan lifestyle is the way to go, but do not think they could make it work with their current lifestyle.

There is no boundary for innovation and design. Today we have the software like Fusion 360 and TinkerCad to let us explore the “what ifs” in life. Today we have found ways to create a 3D modeled satellite cube for space and a way for vegans to enjoy cheese. Who knows what the future has to hold for innovation.

Week 4: Fusion 360

Image

This week we got the privilege of having an expert, Jeff Smith, come in and teach us how to use one of the most powerful CAD programs out there, Fusion 360. He structured the learning session by teaching us a lot of tools all at once, and then having us build on our own and seeing what we could create. It was really a privilege to have Jeff come in, and it amazed me the things that 3D printing was capable of doing. One of the things that really stood out to me was the sculpting mode of Fusion, where one could use several features to create complex objects that would take hours to create in normal CAD programs. Best of all, the creator of Fusion 360, Autodesk, offers the program as well as various others for free to students.

Fusion 360 Picture

A design like the one picture above could take hours with standard CAD software, but only took several minutes for me to create on Fusion.

This experience was truly awesome because our class got to learn the true power and potential of Fusion 360. Complex designs and parts that would normally take hours to create or modify now can be done with several clicks of a button. This is especially helpful in the world of 3D printing, where there is no need to worry about typical manufacturing constraints such as the increase in cost with an increase in complexity. CAD software like this will lead the charge in the 3D revolution as much as the actual 3D printers will. As Jeff Smith said when he talked to us, “without CAD these 3D printers are just paperweights, and without 3D printers, these CAD designs are just stuck on a screen.” The development of each is important to the advancement of 3D printing and I know I will be keeping close track of developments in each field in the future. The fact that this revolutionary software is offered free for students is also awesome, as the future of 3D printing lies in our generation, and the more young students who have access to the software, the better.

Now that I have learned the basics of Fusion 360, I will continue to play around with it at home, as well as continue to learn how to use it in this class. Jeff will be coming back later in the semester to teach us more advanced Fusion concepts, and I am very excited to see what he has in store for us next time. If you’re interested in Fusion 360, click here for a video that further explains what Fusion 360 does.

If you’ve read this and are interested in learning Fusion 360, then there are some awesome YouTube tutorials found in the links below. I have also added the link for downloading the Fusion software as well.

YouTube tutorials

Autodesk(Website to download Fusion)

Week 4 Reflection: An Attempt to Finesse Fusion 360

After a rough night of trying to figure out the Fusion 360 software from the set of 20 minute YouTube videos, I was already so frustrated with Fusion 360. This was so difficult for me to accept since it seemed as if everyone else finished their tutorial while it took me nearly 2 and a half hours just to get half way through with designing my object. I kept having to re-watch and rewind portions of the video because the right click on my history didn’t work the right way, or I couldn’t see what was really going on in the video, or I simply just messed up. I felt so defeated. Usually, I am really good and quick at learning to new programs. I guess I just have to keep practicing.

Animated GIF  - Find & Share on GIPHY

fusion360 tutorial


In high hopes of bettering myself, I attended class at the Armory to hear a lecture on the Fusion 360 Software by Jeff Smith. Jeff Smith works for Autodesk which sells the Fusion 360 software. Smith gave us an overview of Fusion 360 similar to the video playlist we viewed as homework, except he divulged more details on the many ways the user can zoom, change views, object visibility and move around. This was extremely useful to me as it really helped me navigate through the site and can help me build quicker in the future. Smith taught us how intuitive Fusion 360 really is during class. He said that Fusion 360 is positionally aware and allows for “time travel” in a timeline. Additionally, he taught us about parametric modeling, explained the difference between bodies and components, and how to create joints. It took some time but I eventually go the hang of some of the things he taught us. However, sometimes, I got hopelessly lost as shown in the gif below. I have to keep practicing if I want to become better and use the software flawlessly for our project.  Thankfully, I have wonderful team members and being in a group often helps foster learning and creativity. Each member is a piece of a puzzle. Some of us understand how to do certain function of the Fusion software and some of us don’t. It’s a matter of teaching each other and helping each other grow to put the pieces together. With each other’s help, I was able to make a few object in fusion (shown below).

Animated GIF  - Find & Share on GIPHY

fusion_inclass

fusion_inclass2

I still have a lot to learn so I plan on working harder on learning how to utilize this software and fully understand how to navigate and build on it. I plan on trying to learn how to make many objects through step by step videos similar to the tutorial video playlist I reviewed as homework earlier in the week. Additionally, my group and I have talked about possibly setting a time and date for us to collaborate and teach each other what we know. A few resources I plan to use to supplement my learning are shown below as follows:

Shortcuts in Fusion 360 to help navigate:
http://www.cadforum.cz/cadforum_en/keyboard-shortcuts-in-autodesk-fusion-360-tip10167

Making Parametric Models in Fusion 360:
http://hackaday.com/2016/02/02/making-parametric-models-in-fusion-360/

Fusion 360 Projects on Instructables:
http://www.instructables.com/id/Fusion/

Puzzle Cube Project
https://www.youtube.com/watch?v=3Cu3I4rTYsY
https://www.youtube.com/watch?v=-u1u02ZeiLg


Fusing Fusion 360

Prior to this week’s session with Jeff Smith, I had downloaded the Fusion 360 Software and begun experimenting with the various settings by following the Absolute Beginner Videos created for Fusion 360. When I first started using the software I was having some difficulties trying to follow the videos, as I did not have much experience with design and creating products through a technological format. However, I was eager to develop more skills during class and build a better understanding of the software as well as the company, Autodesk, itself.

Learning about Jeff’s experiences after college was incredibly insightful. Though he had very positive moments he still went through hard struggles, however, those struggles had helped him realize the strong connections he had unknowingly built and the skills that he had developed from being on the work force for so many years. With all his skills, Autodesk had found him to be incredibly competent in a position with them and he acquired this opportunity because Autodesk was once his client. Though he went into Autodesk, he had no knowledge of the software he would be teaching to college students. Now hearing how he has excelled in Fusion 360 only brings a light into my learning abilities, I could achieve the skills he has in using Fusion 360 for any future projects and creation of products or services. As Jeff spoke about Fusion 360, I was wondering what the intention of Autodesk providing free software for students were. Sure, we were a good group of individuals that would be able to learn the software quickly, but what the ultimate motivation for them to do so. Jeff had explained that the commercial companies that acquired Autodesk software’s required them to teach college students because they needed to be sure there were individuals that would be able to use these products to create innovations.

Fusion 360 has provided a way for designers to design products or services from what took hours to only a couple of minutes. We are all eligible to work on live versions of models, making it possible to bring designs to life. The software is allowing creativity to becomes designs within minutes. Furthermore, the software does not force the designer to be in a certain location but could design in the safety of one’s own home and still be able to collaborate with others. Through Jeff’s initial training of Fusion 360, I was able to have a grasp of the tools that were a part of the software. It’s amazing how powerful the tools are compared to other software’s that would require three moves; Fusion 360 would only require one. Overall, I enjoyed the experience of being able to have a hands-on learning of this new software, and I hope to be able to keep creating through this method.

Here is a model of a perfume bottle created through Fusion 360.