Week 8: Last week at the Fab Lab

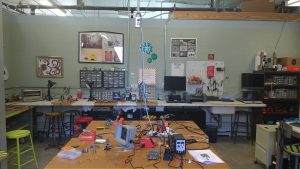
This week’s session marked our final week at the Fab Lab. Our time spent here was memorable and it’s sad to say that this is our last class time here, but the skills and know-how gathered here were quite memorable and are sure to last us quite a while. To conclude our 3 week journey, everyone participated in their last workshop to finish our light boxes. For me, it was finally time to code.

Having finished all the hardware aspects of the project, the last remaining task was the most integral to the box’s function: its programming. The Arduino itself is a powerful tool, but it cannot be used to its full potential without working with coding. The capabilities of a programmed Arduino are only limited by its user. Being an electrical engineering major, I’m required to have expertise in programming. Most of the programming that I currently do is in C programming, which is what the Arduino IDE (Integrated Development Environment) is based off of. I don’t really deal with the actual custom Arduino software much, however, so it was good to get some practice with this.

Arduino Software Application

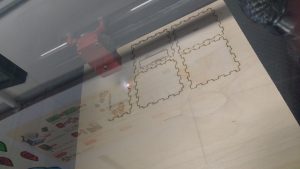
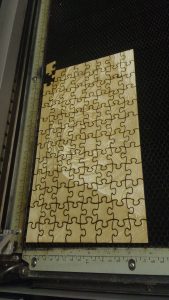
We began with the basics, making a simple LED blink. Then we gradually moved on through the Arduino language to where we would be able to design a program that would make the light box behave as we wanted it to: as a light sensor with LEDs that activate accordingly to the level of light. The Arduino IDE is custom built for the various modules that Arduino produces, and as such their certain commands and implications available only to it and not in conventional C programming. We began creating slightly more complex circuits on a test breadboard preparation for the final step of the project.  We were allowed to play around and “hack” the programs provided to us so we could get a better feel of the software. This also allowed us to customize each of our light boxes to our preferences. We could select which LEDs would light up and in what order, the amount of light exposed to the sensor which would cause it to send signals to the LED, and so on. Relatively small adjustments, but those little differences were what allowed us to differentiate our final projects from each other. We finished compiling our code and assembled our boxes that we got to take home as a trophy for our weeks of work.

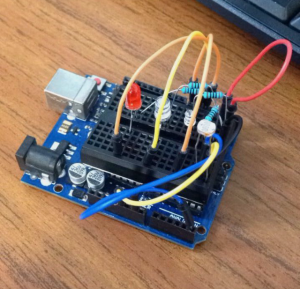
Test circuit for the final project

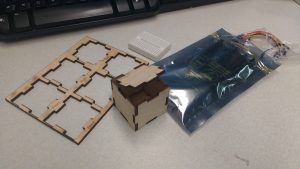
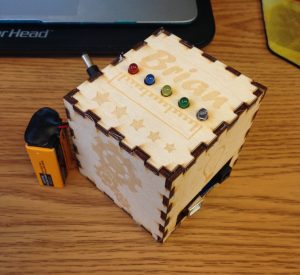
The long awaited finished product

It may have taken place over a few weeks, but our time spent at the Fab Lab seemed relatively short. I cherish the skills I’ve gained here and the memories of the fun I’ve had these past few weeks will last my lifetime as a maker(i.e. the rest of my life). We’ve come quite a way from our first session here, and our final class projects as well as our abilities as makers have certainly benefited from it all. The Fab Lab was such an amazing experience: I loved being surrounded not only by all the amazing technological tools and processes, but by other inspired and talented people as well.

Coding, Arduinos, and LEDS, Oh My!

As week 2 of constructing the light up box commenced, we took part in a coding and arduino workshop. Arduinos are electronics made of a combination of hardware and software tools. In our tool kit there was LED lights, an Arduino Uno, jumper wires, a breadboard, and a resistor. The first steps we took were to connect hardware to the Arduino Board.

We had to connect the different components together to create a circuit to allow for the flow of electrons or in other words electricity. I had trouble grasping the concepts at first, but when I started connecting the pieces together, things made more sense. Once we finished connecting the Arduino to the breadboard along with the LEDs, it was time to run some tests on it through software.

We used an Integrated Development Environment (IDE) software to upload a code, or a written text that tells the arduino what to do, onto the LED circuit that we had created. To test whether or not the code was successfully uploaded, we had to check if the LED light was blinking. I found it extremely frustrating trying to edit until the code worked, but once it was successful, I felt extremely satisfied. Afterwards, I had time to practice hacking the code and changing the time and frequency of when the LED would blink.

Overall I found the workshop to be a great first introduction to coding since I had never coded before. While coding is still a daunting skill, I am more motivated to learn it after having played around with it. I believe that coding is an incredible resourceful skill to have going into any industry.

I especially find it inspiration that companies and organizations are reaching out to children to teach and encourage them to code. Girls Who Code is a nonprofit organization dedicated in closing the gender gap in technology; they host after school clubs along with summer immersion programs for girls to learn coding and get exposure to the tech industry. Implementing coding into the fashion industry, Google’s Made with Code initiative allowed for girls to design a black dress with the help of designer Zac Posen and technologist Maddy Maxey.

Arduino Light Box With Ultrasonic

This week was the second part of our session with FabLab and I was so eager to learn more about what we would place inside the boxes we had laser printed last week. I got to work with Brandon Rice (Lab Assistant and Consultant) and Aakanksha Ardhapurkar (Lab Assistant) who taught us how to make LEDS controlled by an ultrasonic sensor. Honestly, going in to the session I was nervous because I had no experience with hardware though I did have some in software. Many of my friends had talked about using Arduinos as a great prototyping platform so I was excited to play with both hardware and software through it.

In the lesson we started out with learning how to make blinking lights on the hardware through a code that we would apply. In setting up the hardware we used an Arduino Uno, cable, LED, jumper wire, breadboard and resistors. I thought it was so amazing how there were so many different numbered and powered pins within the board that could create such powerful connections. Because all the objects we used to put on the breadboard and the Arduino was quite small it was sometimes hard to find the exact place to put it and those little mistakes would lead the blinkers to not blink. Brandon had taught us how the circuit would work in regards to the arduino, breadboard and LED as electricity only flowed in one direction around a circuit we had to put them in correctly. Once we finished building our hardware we started working on the software through Arduino Software that was in an integrated Development Environment, the software could be used to write code and upload codes to the Arduino board. There were various settings that we could change with the lights but we were specifically working on making them blink and the settings can be seen on the software (File à Examples à 01 Basics). Once we connected the software to the Arduino board we would upload it, though some of our boards took awhile to function properly we all learned that many of them were little issues with the wires that we hadn’t put in correctly. What I found great about this project was that even though we would make mistakes we had the chance to fix them and still make the system work properly. We were given some other activities such as hacking the code and making the lights blink in a certain beat. Near the last part of class we had complete the ultrasonic sensor wiring diagram and as a group we definitely worked together to make it all happen and all our boards ended up accomplishing what we had hoped for with the sensor lights.

Though we had to tear apart the hardware, I can’t wait for the soldering process when we put everything together. So far I feel that I’ve been learning so much from my experience with the FabLab and am very grateful!

In the process of building:

Final results:

Designing & Laser Cutting A Box With Inkscape

This past week, we were given a grand tour of the Fab Lab on campus. The Fab Lab is a Maker Space available to students and people within the community. Plentiful of technology are provided at the lab including: work spaces for 3D printing, BioHacking, electronics, sewing to name a few. They offer workshops, summer camps for children, and open hours for you to kick start your projects.

During the next 3 weeks, we will attend different workshops to learn programming, designing, electronics assembly, and more. By the end of the workshops, we will be able to put together an electronic box that can light up depending on certain movements in the environment.

I took part in the designing phase this week, where we used open source software Inkscape to add special features for our box. As a vector graphics editor, Inkscape can also be used for many other purposes, such as sticker designs and creating logos. Using http://boxdesigner.connectionlab.org/, we added parameters as inputs and were given a laser cutting file in .PDF. The file served as a template for our box, which we imported into Inkscape. The shape tool allowed us to add holes and squares to our box template, which would later be used to connect the electronic hardware.

Then, we selected b&w image files online and imported them into the software to rasterize. Once our designs were completed, we sent our files to the laser engraving machine to watch the magic unfold. Our designs from the computer screens were being engraved onto the piece of wood. Another project that was being worked on at another laser machine was an intricate puzzle piece.

Different laser cutters have other properties that allow you to engrave in glass and metal. More complex and intricate designs require more time and high degree precision. In addition, there are machines out there that can cut textiles in a cost efficient way saving resources and time. Small laser cutters & engravers run from a few hundred dollars, while larger machines run in the thousands price range.


I cannot wait to see the final product that will be made with my own two hands. The Fab Lab is a great resource and environment to experiment ideas and learn new skills; I definitely recommend checking it out along with other makerspaces in your area!

Week 4 Summary

We all come form different backgrounds and experiences, some of us with the knowledge of using software’s to build parts and others with absolutely no experience. Regardless of which skill level we were at we all were able to takeaway a life long learning experience from Jeff Smith, an individual from AutoDesk that had come to teach us the ins and outs of Fusion 360. We all were inspired by Jeff’s story of reaching his current position at AutoDesk. Even though he had many shining moments he had also faced many struggles. In the end, the struggles he faced had helped him identify the connections he had unknowingly built. Putting together his network and his strong skills he began to learn Fusion 360 in order to empower college students to innovate with the software. Because many commercial companies would like the future generation to be able to maneuver through the software skillfully in order to help the company, they require AutoDesk to provide these lessons for college students. As college students, learning Fusion 360 is an added skill that will only bring us more benefits in our careers.

Throughout the class period Jeff had given us a live tutorial of Fusion 360 while allowing us to have hands-on experience with the software throughout each step of the tutorial. Specifically he wanted us to learn the tools and functions of the software so we would be able to continue creating in the future. Fusion 360 essentially is creating designs digitally and immediately transforming them into real life products. Prior to the class we were all given the task of using introductory videos to learn the tools of Fusion 360, a few of us were able to create the final model from the video while many of us had slowly trudged through the process of creating the model while continuously honing our skills in the new software. The process of learning was well stated by Veronika, “Diving into Fusion 360 during this weeks class session was like jumping into the deep end of the swimming pool in an attempt to learn to swim; needless to say, there was initially quite a bit of floundering.”

Many of the students were amazed with this CAD software, as it was a popular one with very powerful tools. As stated by Jorge, “One thing that makes Fusion 360 such a great CAD program is the whole cloud system they are using…” We all realized that with the software any innovation was possible. We had the ability to design through parametric designing, which included specific constraints and dimensions and free-form designing or sculpting through the Tee-Spline Body. Taofik was intrigued with the software, “They use a top-down componentry/modeling system system unlike other CAD software such as Creo Parametric or SolidWorks which use bottom-down modeling. You could even type code and create a model instead of clicking around the tools.” We were all amazed that the software gave its recommendations of the innovations that were created, a new and powerful concept we had not experienced before, the software had the ability to teach us efficiency on a design.

After learning the tools of the software we were given the task to create any everyday object by taking apart the object and building it on Fusion 360. As Ian had commented, “I think throughout the workshop I realized just how much I took for granted simple engineering feats. Taking a simple water bottle the shape itself is complex enough but it actually has several parts working together to provide us with a coherent product experience. Without great designers with software like Fusion 360 we wouldn’t have most of the products in our world today.” The realization of the importance of designers and new creations in the world suddenly seemed so relevant. If we wanted to create products for this world, we needed to continue honing our skills in this software so we could build more innovative and efficient products for future consumers.

Here are some of the models that students had created after taking apart everyday products and rebuilding them on Fusion 360:

Chase had created a water bottle and found that, “The most difficult part of the design was instructing the software as to what parts were components, bodies, joinings, cuttings, etc. Albeit at first it was frustrating, I gradually began to understand how the software functions.”

Kenny had also created a reusable water bottle and commented that, “Every aspect of every object you use has been analyzed and reiterated until it was ready for consumer markets. This means that there are elements of design everywhere in everyday objects and this exercise gave me the insight to develop a product for the class.”

Jorge, who had experience in inventing throughout high school was able to create an intricate model of a flash drive.

Overall, the workshops had created a large spark for each of us and had allowed our creative juices to begin flowing. We all believe that capitalizing on all that the program has to offer will create tremendous results. This CAD software, Fusion 360 allows any individual to create whatever their mind thinks of and that in itself is revolutionary. It is true; Fusion 360 truly has no boundary for future innovation and design.

Fusing Fusion 360

Prior to this week’s session with Jeff Smith, I had downloaded the Fusion 360 Software and begun experimenting with the various settings by following the Absolute Beginner Videos created for Fusion 360. When I first started using the software I was having some difficulties trying to follow the videos, as I did not have much experience with design and creating products through a technological format. However, I was eager to develop more skills during class and build a better understanding of the software as well as the company, Autodesk, itself.

Learning about Jeff’s experiences after college was incredibly insightful. Though he had very positive moments he still went through hard struggles, however, those struggles had helped him realize the strong connections he had unknowingly built and the skills that he had developed from being on the work force for so many years. With all his skills, Autodesk had found him to be incredibly competent in a position with them and he acquired this opportunity because Autodesk was once his client. Though he went into Autodesk, he had no knowledge of the software he would be teaching to college students. Now hearing how he has excelled in Fusion 360 only brings a light into my learning abilities, I could achieve the skills he has in using Fusion 360 for any future projects and creation of products or services. As Jeff spoke about Fusion 360, I was wondering what the intention of Autodesk providing free software for students were. Sure, we were a good group of individuals that would be able to learn the software quickly, but what the ultimate motivation for them to do so. Jeff had explained that the commercial companies that acquired Autodesk software’s required them to teach college students because they needed to be sure there were individuals that would be able to use these products to create innovations.

Fusion 360 has provided a way for designers to design products or services from what took hours to only a couple of minutes. We are all eligible to work on live versions of models, making it possible to bring designs to life. The software is allowing creativity to becomes designs within minutes. Furthermore, the software does not force the designer to be in a certain location but could design in the safety of one’s own home and still be able to collaborate with others. Through Jeff’s initial training of Fusion 360, I was able to have a grasp of the tools that were a part of the software. It’s amazing how powerful the tools are compared to other software’s that would require three moves; Fusion 360 would only require one. Overall, I enjoyed the experience of being able to have a hands-on learning of this new software, and I hope to be able to keep creating through this method.

Here is a model of a perfume bottle created through Fusion 360.