Product Testing

We are at a time in the semester where everything is coming to an end. This is also a time where everything on our product is coming together. Throughout the semester we have developed a product through rapid prototyping. Now we have reached the point of product testing. This will help teams figure out what they need to fix to either make their product better or appeal to more consumers.

It has been a journey for my team to get to where we are now. Last week, we had a small prototype of our product. It was functional. As we held it in our hands, we realized what we could improve. We thought we needed a bar at the front of the device to keep it from letting the sliding mechanism from sliding out. We also thought the sliding mechanism could be longer. Besides the improvements we were able to notice as a group, we met with other groups to get their feedback. This was very helpful to get their feedback. Since others teams are going through the same process of developing a product, they have helpful insight. One team told us that they felt some of the sides need to be made thicker. If we increase the sides then we are less likely to have weak points in our design. Other than those comments, the teams liked our design and that we were going to use the Flex material to the sliding mechanism.

After getting that feedback, my team and I went to work on making changes to our design. We essentially made everything thicker. We also added a bar to the edge of the base. This is to prevent the sliding mechanism from sliding off. In order to make this adjustment we had to make the sliding mechanism into 2 parts. The handle on the sliding mechanism is separate from the entire mechanism. We will just need to glue those two parts together. I thought this would be fine because the handle does not need to be very strong since it does not come into direct contact with the door.

These adjustments got us closer to our final design. Although since we did make more adjustments, it did set us back on properly testing our product. We should be able to put our print on again to have it printed in the flex material. Then we will be able to do proper testing!

Idea Coming Toegether

My team and I had a lot of things to get done this past week. We did learn a lot from asking other people what they thought of our design and implementing those thoughts into our design. Although this did put us more towards the beginning of the design development process. Needless to say we had a lot to accomplish.

Our time in class was dedicated to working on our product. My team and I talked about our feedback from others and were able to come to an agreement and create our design on Tinkercad. We came about this by deciding what parts of our product needed to be finalized before we moved onto the next part. Instead of worrying about the material design and testing all at once, we decided one thing at a time. We thought we needed to at least finalize a design.

We had gone through a lot of designs. Our final design will be attached to the side of the door and have the ability to slide out to ajar the door and then slide back in and then let the door close. SInce it will be positioned horizontally on the door we do not have to worry about it moving around too much without the user moving it. Also, the moving part will have a handle to make it easy to move the device in and out.

Now that we had finalized we put it on the printer to see if the dementions were correct. In the time our product was printing, we discussed on what materials we think would work best for our product. Our main concern was trying to find a material that would hold up to a door slam. We needed something to absorb the shock a little bit. We thought the base part that is attached to the door could be made out of PLA since it does not come in direct contact with the door. For the sliding part, we think using the material Flex will be the best because we can print it thick and it has some give to it.

We did do trials in class. We wanted to see if the prototype we printed in class would hold up to the door in the MakerLab. Sadly, the door won after a few trials. But we intend to increase the size and density of our product and use the correct materials for the real trials!

Seeking Advice

Last week, my team and I still had a lot to decide. After the previous week of completely changing our product idea, we had a lot of ground to make up. We were basically starting from scratch. We still did not have a clear product idea and wanted advice on where to go. So our goal by the end of class on Monday was to make a plan. We decided on a design. Our design was to have on piece that had a notched design attached to the door. Then we would have a moveable part that moved in the notched part to slide out to ajar the door and slide back in when you would want to door to close. We were unsure on what materials to choose, but we were thinking of using thick metal and coving it in a rubber resin.

The next day we went over to the Fab Lab seeking advice. When we got there we showed them our plan. We went back and forth on what would work and what would not work. We decided that using metal was not the way to go. It in the end would be very expensive and we would probably have more luck with either wood or plastic. The problem we might have with wood is that we might put out more effort and time than necessary. They suggested that we us CAD software to try different variations and we could always print it and see how or design works. Going to the Fab Lab was very helpful because we had a better idea of where to go with our design!

Now we have to figure out exactly what we are going to do. We have thought of two designs so far that we have run through this past week. One design was like the original slide out the side of the door. Another design we had was to have something we could slide a bendable material to ajar the door from the top. These ideas are similar, but go about ajaring the door from different sides of the door. Currently we have not decided on which design we will choose, but hopefully by class on Monday we have made that decision. I think it is better that we have thought of different options to go about solving our problem instead and drawing a blank. This is a process we are consistently going through.

Designing & Laser Cutting A Box With Inkscape

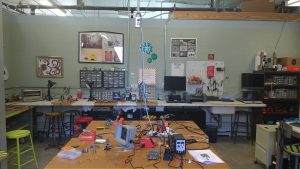
This past week, we were given a grand tour of the Fab Lab on campus. The Fab Lab is a Maker Space available to students and people within the community. Plentiful of technology are provided at the lab including: work spaces for 3D printing, BioHacking, electronics, sewing to name a few. They offer workshops, summer camps for children, and open hours for you to kick start your projects.

During the next 3 weeks, we will attend different workshops to learn programming, designing, electronics assembly, and more. By the end of the workshops, we will be able to put together an electronic box that can light up depending on certain movements in the environment.

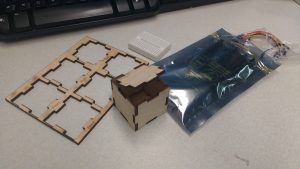
I took part in the designing phase this week, where we used open source software Inkscape to add special features for our box. As a vector graphics editor, Inkscape can also be used for many other purposes, such as sticker designs and creating logos. Using http://boxdesigner.connectionlab.org/, we added parameters as inputs and were given a laser cutting file in .PDF. The file served as a template for our box, which we imported into Inkscape. The shape tool allowed us to add holes and squares to our box template, which would later be used to connect the electronic hardware.

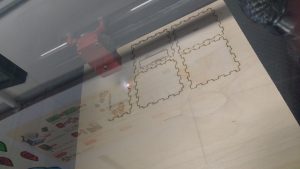
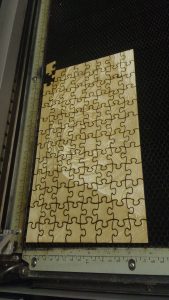
Then, we selected b&w image files online and imported them into the software to rasterize. Once our designs were completed, we sent our files to the laser engraving machine to watch the magic unfold. Our designs from the computer screens were being engraved onto the piece of wood. Another project that was being worked on at another laser machine was an intricate puzzle piece.

Different laser cutters have other properties that allow you to engrave in glass and metal. More complex and intricate designs require more time and high degree precision. In addition, there are machines out there that can cut textiles in a cost efficient way saving resources and time. Small laser cutters & engravers run from a few hundred dollars, while larger machines run in the thousands price range.

https://www.youtube.com/watch?v=xBUBUlOYRrc
I cannot wait to see the final product that will be made with my own two hands. The Fab Lab is a great resource and environment to experiment ideas and learn new skills; I definitely recommend checking it out along with other makerspaces in your area!

The Ideation Process

In this week’s class our group brainstormed ideas for the semester project. Our main objective during this session was identifying everyday problems that people face. We delved deeper into the process and targeted college students. At the end of the session, our group came up with three How Can We statements:

#1. How can we help young professionals tie a tie more efficiently?

#2. How can we help college students stop losing their items (phones, wallets, and keys)?

#3. How can we help young adults have more optimal audio experience?

Through these statements, we were able to think of products that could address the issues. For example, in addressing statement #2, we came up with a stopper that clips onto the bottom part of a T-shirt and the pant pocket to prevent things from falling out. As a group we decided to spend more time outside class to brainstorm ideas and coming up with more HCW statements. I think the HCW statements are a great starting point for a business idea because they are empathetic to the consumer’s needs and asks a question that can be answered in a variety of ways.

In an article from Science magazine, the authors argue that creativity is more efficient when there is a structure laid out or a framework to follow. The structure is clearly defined and may have constraints imposed. HCW statements fall under this type of creative process, since there is a sentence format to follow. Creating ideas from randomness, while still holding value, is seen as inefficient in problem-solving. I agree with the authors’ statement that creativity is “assessed by  the eyes of the beholder.” I believe both brainstorming creative ideas and coming up with an idea randomly are both effective. However, the ideas will need fine tuning as suggested in this article on evaluating business ideas.

The questions evaluate business ideas by placing them in reality. Are there enough resources? Do they address consumer needs? What are the positives and negatives of this business idea? Once you are able to answer all the questions posed, I believe your ideas will become more concrete and well defined. From this, you can set strategies for moving from the ideation phase to the prototyping phase.

There are several ways to help with the creative process. Forbes suggests individually working out and solving the problems and then meeting with your group to brainstorm. It’s important to note that brainstorming sessions can be ineffective unless certain guidelines are established. Another article from Entrepreneur suggests shying away from the need to be perfect and coming up with as many ideas, even if they’re bad. At the end of the day, I think we should try out whichever creative processes and stick with the one that work better for us.

Searching For Needs

Businesses are created by an individual or multiple people because of an idea, an idea they believe in strongly because of the strengths they each hold as stated in the article, “10 Ways To Evaluate A New Business Idea”. These ideas are developed through sparks, which we learned from the second article, “Creative Sparks”, that there is a controversial thought on the nature of the creative process. The creation ideas that businesses have are through watching people’s struggles or their own personal struggles to realize what consumers will need. In the 60 minute video watched during class it was clear that being empathetic was the best way to understand what consumers truly value. These products or services are produced for consumers; therefore, we obviously need to understand these individuals in order to have them purchase these products or services.

During class we worked on an activity as a group to brainstorm needs that people have on the daily, we weren’t trying to create solutions yet because we didn’t want to narrow our brainstorming results. My group had come up with three ideas through the “How Can We” statements learned from the class that Design for America had spoken in. Our first idea was generated because we realized that many of our phones and laptops were being overcharged especially overnight as it was the best time to have them be charged but we wanted to figure out a way to time the charging so the product didn’t end up losing battery life. Thus, we came up with the statement, “How can we find a more efficient way to charge phones or laptops?” After discussing this first idea with an individual from another group we had changed the statement to, “How can we reserve battery life of an object to find a more efficient way to charge phones or laptops?” We agreed that the changed statement was still broad enough to solve the need in the future, yet had the specific details about the issue. The second idea was in regards to the need of better and cheaper public storage alternatives. Our last idea was to create a more efficient way to manage the PSI of objects. I believe our group did a good job on finding needs of individuals, but we do hope to continue thinking up of more needs in order to find a good product or service to solve for our final project.

After our class activity I wanted to find ways to come up with ideas for our final project. I had looked through various links and found two useful ones. The first one, “How to Find New Invention Ideas in Six Easy Steps” (http://www.inventions-handbook.com/new-invention-ideas.html) was helpful because it provided a list of steps to follow in order to create that spark of creativity. With this in mind, I plan on observing the niche I am and finding needs within the college sector. The second article, “5 Steps for Turning Your Invention Ideas Into a Product” (https://www.entrepreneur.com/article/77962) would be more useful once my group has found a need within the niche we are in. The one aspect that the article mentioned and I found particularly important was documenting the process. I like how Vishal had created a documentation process for each group on “Instructure Canvas”, I believe that it will be incredibly beneficial for every group to look forward and think back on future creations.