Looking Back

Looking back at this semester and thinking about everything that I have learned is incredible. This class has introduced me to things I was unfamiliar with. It gave me the skills to be able to go about an idea in serveral different ways.

I thought back to some of the speakers that made an impact on what I learned. Even on the first week, when we had two speakers. The video call from John Horlick kicked off the semester. He had written a book on how 3D printing was really becoming more and more prevalent in business and our everyday life. This opened my eyes to Digital Making. I realized that things were constantly changing in how things were being made, but I did not realize how much of an impact innovation was actually making. Even though this presentation was mainly on 3D printing, I felt like it spoke for more than 3D printing. It showed that there is always a better or smarter way to do something. There are also many ways to achieve that goal and I believe that is what Digital Making entailed.

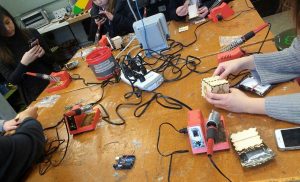
Most of everything I learned in this class, I had not been exposed to before. Something that was really foreign to me was coding aurduinos. I never thought I would mess with that. I had understood some of the code because I had dealt with coding before, but it had only been solely on the computer. I had never used a breadboard before. It was also awesome to see a product come together after our few weeks of class spent at the Fab Lab. Not only did we code Arduinos, but we lasercut wood boxes and soldered wires together. This was great experience that helped prepare us and our teams create and develop a product of our own for our final product.
Throughout the entire semester, I felt like each class taught us the skills to tackle a problem or accomplish a task that we would encounter as we did our final project. The guidelines of the final project were for you to create a project that solves a problem.

When I decided to take this class, I was hoping to get a better understanding of using different softwares. I took this class because I really liked the work I did in the lab and I wanted to be able to do more. I only had one class freshman year that I was taught a CAD software, Creo Parametric 3.0. Other than that, the only time I have had experience with other softwares was when I would help out with workshops at the MakerLab. I wanted to be able to learn them well enough to create things of my own.

I feel like that expectation I had about the class was met. I was taught various softwares through a workshop type environment in class. That helped with figuring out where to start and what to look at to finish a design. Then I had to apply those skills I learned to the final project. It really tested me on how well I knew how to use them. I used Tinkercad for most of anything I did with the final project including the team logo. I was able to do it from my laptop in my free time. When I was looking at a folder I created on TInkercad and photos of designs I had sent my partners, I could see how my skill had improved throughout the semester. When I started, I did the basic shapes and a lot of things were uneven and had odd proportions. As I practiced, I was able to fix those problems and create more complex things. It was frustrating at points, but I was able to get my designs to how I wanted them to be.

This class opened my eyes to many things.  I was able to explore different ways of making I had never done before. I also, went through the product design process that made me explore every aspect of a design even if it is identifying what you can do yourself and when to seek outside help. In this class, I learned what I wanted to learn and more.

Product Testing

We are at a time in the semester where everything is coming to an end. This is also a time where everything on our product is coming together. Throughout the semester we have developed a product through rapid prototyping. Now we have reached the point of product testing. This will help teams figure out what they need to fix to either make their product better or appeal to more consumers.

It has been a journey for my team to get to where we are now. Last week, we had a small prototype of our product. It was functional. As we held it in our hands, we realized what we could improve. We thought we needed a bar at the front of the device to keep it from letting the sliding mechanism from sliding out. We also thought the sliding mechanism could be longer. Besides the improvements we were able to notice as a group, we met with other groups to get their feedback. This was very helpful to get their feedback. Since others teams are going through the same process of developing a product, they have helpful insight. One team told us that they felt some of the sides need to be made thicker. If we increase the sides then we are less likely to have weak points in our design. Other than those comments, the teams liked our design and that we were going to use the Flex material to the sliding mechanism.

After getting that feedback, my team and I went to work on making changes to our design. We essentially made everything thicker. We also added a bar to the edge of the base. This is to prevent the sliding mechanism from sliding off. In order to make this adjustment we had to make the sliding mechanism into 2 parts. The handle on the sliding mechanism is separate from the entire mechanism. We will just need to glue those two parts together. I thought this would be fine because the handle does not need to be very strong since it does not come into direct contact with the door.

These adjustments got us closer to our final design. Although since we did make more adjustments, it did set us back on properly testing our product. We should be able to put our print on again to have it printed in the flex material. Then we will be able to do proper testing!

Idea Coming Toegether

My team and I had a lot of things to get done this past week. We did learn a lot from asking other people what they thought of our design and implementing those thoughts into our design. Although this did put us more towards the beginning of the design development process. Needless to say we had a lot to accomplish.

Our time in class was dedicated to working on our product. My team and I talked about our feedback from others and were able to come to an agreement and create our design on Tinkercad. We came about this by deciding what parts of our product needed to be finalized before we moved onto the next part. Instead of worrying about the material design and testing all at once, we decided one thing at a time. We thought we needed to at least finalize a design.

We had gone through a lot of designs. Our final design will be attached to the side of the door and have the ability to slide out to ajar the door and then slide back in and then let the door close. SInce it will be positioned horizontally on the door we do not have to worry about it moving around too much without the user moving it. Also, the moving part will have a handle to make it easy to move the device in and out.

Now that we had finalized we put it on the printer to see if the dementions were correct. In the time our product was printing, we discussed on what materials we think would work best for our product. Our main concern was trying to find a material that would hold up to a door slam. We needed something to absorb the shock a little bit. We thought the base part that is attached to the door could be made out of PLA since it does not come in direct contact with the door. For the sliding part, we think using the material Flex will be the best because we can print it thick and it has some give to it.

We did do trials in class. We wanted to see if the prototype we printed in class would hold up to the door in the MakerLab. Sadly, the door won after a few trials. But we intend to increase the size and density of our product and use the correct materials for the real trials!

Seeking Advice

Last week, my team and I still had a lot to decide. After the previous week of completely changing our product idea, we had a lot of ground to make up. We were basically starting from scratch. We still did not have a clear product idea and wanted advice on where to go. So our goal by the end of class on Monday was to make a plan. We decided on a design. Our design was to have on piece that had a notched design attached to the door. Then we would have a moveable part that moved in the notched part to slide out to ajar the door and slide back in when you would want to door to close. We were unsure on what materials to choose, but we were thinking of using thick metal and coving it in a rubber resin.

The next day we went over to the Fab Lab seeking advice. When we got there we showed them our plan. We went back and forth on what would work and what would not work. We decided that using metal was not the way to go. It in the end would be very expensive and we would probably have more luck with either wood or plastic. The problem we might have with wood is that we might put out more effort and time than necessary. They suggested that we us CAD software to try different variations and we could always print it and see how or design works. Going to the Fab Lab was very helpful because we had a better idea of where to go with our design!

Now we have to figure out exactly what we are going to do. We have thought of two designs so far that we have run through this past week. One design was like the original slide out the side of the door. Another design we had was to have something we could slide a bendable material to ajar the door from the top. These ideas are similar, but go about ajaring the door from different sides of the door. Currently we have not decided on which design we will choose, but hopefully by class on Monday we have made that decision. I think it is better that we have thought of different options to go about solving our problem instead and drawing a blank. This is a process we are consistently going through.

Making Adjustments

Last week team Supra went in with a trash compacting idea and have completely changed the whole idea. As we were approaching the prototyping stage of our product we had a lot to consider. Does our product solve the problem? Does it appeal to the consumer? Is it still low cost?

My team and I faced a few problems. We did not feel like our product had much of a need since we had redesigned it. So we needed to start over with our design of the trash compactor. We thought from the perspective to get maximum compaction. We modeled it after the Big Belly trash can you can see around campus. The design would have the look of the Big Belly so that you could throw trash in the top side to the trash can. Then the top would have a board with a weight attached that could be released to compact the trash in the can. Then the weight/board would be connected to a leaver arm that could crank it back to the top of the trash can. After thinking of this complex design we asked the question “Why would people actually need this in their household?” There is really no need for “maximum compaction” in a household trash can. We found ourselves overcompensating to fix some problems in our design and under compensating in some parts of our design. This created a massive problem for us. We thought it was best to revisit different product ideas.

We went back to our original idea list. One idea intrigued us. We wanted to create an improved version of a door stop. We find the conventional door stops that have already been designed faulty. They never really hold the door open and are hard to maneuver. So we plan on developing a door stop that you can attach to the door a few inches above the door handle. It will have a sliding function that will allow you to have it hold the door open when it is slid out and then slid in to allow the door to close. We are still in the beginning stage of figuring out how we are going to attach it to the door and what material we will use. I was originally thinking thinking plastic so it would be cheap, but I am afraid a hard slam might break it. So then I thought about using metal so it is more sturdy, but I think a thick rubber material might actually be the best. We still have a lot to figure out, but we are making a lot of progress!

The Final Product

After three of making at the Fab Lab, we finally completed our light-boxes! For me week one was all about learning how to laser cut and designing the outside of my light-box. Then week two was learning about coding and testing an arduino. My final week at the Fab Lab was dedicated to soldering my arduino.

I have had zero experience with soldering. I did have a few concerns though. I was concerned I would burn myself and that i would soldering the wrong wire. Recalling from the time I coded and tested the arduino the previous week, I found connecting the wires slightly confusing. If you put one wire in the wrong spot then it can throw off the entire arduino. Although I founded soldering easier to pick up than I had previously thought. We were given a brief lesson of how soldering works and then the soldering began! We first connected all the wires together by twisting their ends together to make sure that we ad the structure correct. Then we soldered the connections to make them permanent. I found it crazy how fast the soldering metal would melt and the solidify. A few good tips I learned from soldering were:

  1. Clean your iron off on the sponge.
  2. Do not touch your eyes or face once you have touched the soldering metal.
  3. Do not hand your iron to someone else.

These tips were the keys to my success!

After I had completed soldering then I had completed all three stages in developing a light-box. The only thing left to do was assemble it. Now that everything else was done, this part was simple. To assemble the box, you needed to put the arduino inside the box and assemble and glue the box around the arduino. Then you are left with a completed light-box!

These past three weeks have given me a lot of experience with developing a product from start to finish. It has given me great insight to somewhat of what it takes when you actually start developing a product. You need to individually develop each component of your product. This reassures that each part is working properly. Then once you have done that you can confidently. I will take what I learned with me to make my team’s product for this class. I have really enjoyed these past three weeks and everything the Fab Lab has taught me!!

Arduino Testing and Experience

This was week two in the Fab Lab. My group, group White, was switching from laser cutting to coding and testing Ardiunos. I have had very little experience with coding and zero experience with Arduinos. I was not sure how this would go.

The first thing we did was grab the box we had laser cut the week before along with the pouch that would help us assemble our Arduinos. Each of us sat at a station with two monitors. On one monitor we pulled up a slide show that would help us follow along with how to code. We ran a series of tests to make sure our Arduino would function properly. I found the most difficult part of this process was figuring out where exactly to place everything on the bread board in order for it to work. Luckily the final product turned out!!

When I looked more into what kinds of things arduinos are used for, so many things came up! Something that stood out to me was a “smart house” controlled by arduinos. At first, my mind immediately went to the Disney movie “Smart House” that was created in the late 90s. When I read into it, I found out that arduinos control more of the environment of the house. For example, controlling the internal temperature of the house, letting know which windows are open or closed, or which doors are locked. These are small things, but they are helpful. Every time my family and I leave our house, we ask the same questions. We are not for sure we locked all the doors, turned off all the lights, or even made sure the stove was off. An arduino for our house would be very convenient. We would not have to wonder and would have the answer at our fingertips by checking our phones. Click here to read more about smart houses.

I am curious to see what arduinos hold for the future. I know I have only recently had experience with probably one of simplest functions of an arduino, I was amazed. I have never made something that was motion sensitive. I think exposure to arduinos will broaden our ideas as a class for our development of our products for Digital Making. This could make something touch sensitive or notify you what the temperature is. Arduinos can upgrade an idea that you may of already had!

More Ways to Make

Last week, we had class in a different setting. A similar, but different setting. Just east of the BIF is the Fab Lab. Here is were we were introduced to more opportunities of making. I feel that the introduction to this lab will broaden our thinking.

Jeff Ginger, who had previously visited the MakerLab, showed us around the Fab Lab. We started in the front left side of the lab that contained computers. They seemed similar to the computers in the MakerLab with the tapes of software. Also in the front of the lab were 3D printers. Some were less sophisticated than the printers in the MakersLab, some were more sophisticated. They also had a section in the lab dedicated dedicated to playing with different types of materials. They had backpacks and plush toys that they had designed. As you move further through the space they are messing with many other things such as other electronics and teaching others how to make!

The Digital Making class is going to be having class at the Fab Lab over the span of three weeks. Our project teams are split up into three different activities. Last week I was in the laser cutting wood activity. I had zero experience with the software we used to prepare our wood with our designs. The software we used was Inkscape. This software was tricky to use at first, but I was able to get the hang of it. We were going to make a box with our own designs on the side. Once we completed our designs we could start laser cutting. One thing to watch for when the laser is cutting the wood is if the wood catches fire!

Laser cutting wood has many advantages. One advantage to laser cutting wood is that you can make a prototype of an idea you have at a very low cost. I had laser cut before at an engineering camp(GAMES Camp) when I was in high school. When I attended GAMES camp at UIUC in the Summer of 2014, I was on the GBAM track. GBAM was the Mechanical Engineering track at the camp. We were given a task of designing an new innovative design of a wind turbine. We laser cut our wind turbine panels and then created curved panels out of purple duct tape. Then the base of the turbine was made out of PVC pipe. This was my first experience using this type of making. Even in 2014 I was making!

Wind turbine design from GAMES camp 2014

Trial and Error

When coming up with an idea for a product, you will have a million ideas and you have to narrow down to the ideas that appeal to the most people and have a need for it in the world. In class last week, all of the teams had to brainstorm about three ideas that are potential ideas for our final project.

My team, Supra, and I knew we wanted our product to fix problems everyone has. Most of our ideas fixed “first world problems” that everyone has. Our first idea was trash compactor for trash cans in households. This appeals to everyone who makes trash. I struggle with this personally. If the trash is building up in my apartment, I do not think to push it down myself because I do not want to touch the trash. So I usually end up taking it out of the trash can and when I do, the bottom portion of the trash bag is empty. This means I am only using half of a trash bag. That is wasteful and expensive!

For our idea, the trash bag would attach to the bottom of the trash can so if would be more open for trash to fall to the bottom. Also, when you step on the foot pedal that opens the lid, an arm would press the trash down to ensure you used as much of your trash bag as possible.

I found it very helpful to get feed back from other groups. This helps bring up more things that we may need to address or small improvements we could make. I found an article by Forbes Magazine that has ten questions listed on it to ask ourselves for us to have a successful product. This is a good reference to use when you are brainstorming. The questions are focused around a few main things.

  1. Appeal to a broad audience
  2. Simple enough to use
  3. Solve a problem

If your product can appeal to a large audience then it will be successful. Everyone will find a need for your product and go out and buy it. Simplicity is crucial. If something is too complicated to use or understand the use, no one will put out the extra effort to understand it. Then one of the most important things to keep in mind is that it actually solves the problem. After you have passed all of the checkpoints then your product is ready for sale!

No Boundary for Innovation and Design

There are a million and one ways to make something. So far in the Digital Making course I have used TinkerCad to make a logo for my team. In the last class we were introduced to Fusion 360 by Jeff Smith, and instructor for Autodesk. We were instructed on how to go from the basics of Fusion 360 to creating more complex things. You could use that software to make everyday things very easily. I tried making a cake spatula. It has two components to it, a scoop part and a handle. After some more practice i should improve my skills with Fusion!

Fusion is used in many areas of life today. For things in our world and even out of our world! Autodesk had a “Space Challenge” where students competed in to design a 3D model of a cube satellite. This software can help solve real world problems.

Another speaker we had was Dot Silverman. She spoke to us about Biohacking. Biohacking by definition is the activity of exploiting genetic material experimentally without regard to accepted ethical standards, or for chemical purposes. Biohacking has changed the way of life for some people. The vegan lifestyle involves not eating any animal products. It is mostly a plant based diet. So just think of never eating ice cream, having a steak, or enjoying cheese on your pizza. Except biohackers have made a breakthrough that allow vegans to enjoy cheese. They have created a vegan cheese. They are essentially “writing” genes for plant proteins that are mimicking milk proteins and putting them in yeast. Once it is put into the yeast it does something similar to when people make beer. When people make beer it is developed by the yeast excreting alcohol. Except with the modified plant proteins the yeast excretes milk. This is how the “Real Vegan Cheese” is made. This has changed the diet of a vegan and opened many doors for further exploration. Now that there is a vegan cheese, can there be a vegan chocolate or butter. This restrictive diet has become less restrictive. Many people believe the vegan lifestyle is the way to go, but do not think they could make it work with their current lifestyle.

There is no boundary for innovation and design. Today we have the software like Fusion 360 and TinkerCad to let us explore the “what ifs” in life. Today we have found ways to create a 3D modeled satellite cube for space and a way for vegans to enjoy cheese. Who knows what the future has to hold for innovation.