Coding, Arduinos, and LEDS, Oh My!

As week 2 of constructing the light up box commenced, we took part in a coding and arduino workshop. Arduinos are electronics made of a combination of hardware and software tools. In our tool kit there was LED lights, an Arduino Uno, jumper wires, a breadboard, and a resistor. The first steps we took were to connect hardware to the Arduino Board.

We had to connect the different components together to create a circuit to allow for the flow of electrons or in other words electricity. I had trouble grasping the concepts at first, but when I started connecting the pieces together, things made more sense. Once we finished connecting the Arduino to the breadboard along with the LEDs, it was time to run some tests on it through software.

We used an Integrated Development Environment (IDE) software to upload a code, or a written text that tells the arduino what to do, onto the LED circuit that we had created. To test whether or not the code was successfully uploaded, we had to check if the LED light was blinking. I found it extremely frustrating trying to edit until the code worked, but once it was successful, I felt extremely satisfied. Afterwards, I had time to practice hacking the code and changing the time and frequency of when the LED would blink.

Overall I found the workshop to be a great first introduction to coding since I had never coded before. While coding is still a daunting skill, I am more motivated to learn it after having played around with it. I believe that coding is an incredible resourceful skill to have going into any industry.

I especially find it inspiration that companies and organizations are reaching out to children to teach and encourage them to code. Girls Who Code is a nonprofit organization dedicated in closing the gender gap in technology; they host after school clubs along with summer immersion programs for girls to learn coding and get exposure to the tech industry. Implementing coding into the fashion industry, Google’s Made with Code initiative allowed for girls to design a black dress with the help of designer Zac Posen and technologist Maddy Maxey.

Soldering: An Art of Trial and Error

Trial and error: the phrase that best describes my experience during our second session in the Fab Lab.  After our work with red boards and coding during Week 6, my group progressed to the soldering station to create circuits sans red boards. Before beginning, we were warned that the day’s activities would vastly increase our appreciation for the simplicity of the red board systems; this held entirely true. As an incredibly impatient perfectionist, this activity tried my ability to make repeated attempts to complete a single step of the project. However, the sometimes-tedious nature of soldering did not bother me in the way I expected; rather, I really enjoyed the process! It was perhaps my favorite skill we have learned in the course thus far due to the hands on nature, and the fact that you can test and check your physical progress as you move from stage to stage.

The soldering station and my relative success in the activity inspired me to incorporate a new aspect into our garbage condenser – an LED sensor that lights up when the trash cannot be further compacted or pushed down in the bin, therefore indicating “full.” I think this will both incorporate another useful technology and create added value for the consumer, as the product will have dual functionality. Furthermore, I feel as though this sets our product apart from other products on the market as well as “DIY” alternatives, as it is more technologically advanced – an upgrade that is important to many consumer groups in an increasingly digital world. I hope that, in improved my soldering skills and combining with the other abilities we have developed throughout the course, my group is able to develop an effective product that can accomplish the desired task in the simplest way possible.

While I will not be participating in the soldering station during our next course in the Fab Lab, I hope to take time outside of class to assess the best possible way to include a soldered LED circuit and code in our product in order to enhance its functionality. In conducting outside research, I found a very useful tutorial that instructs one on how to code an LED Arduino to blink at one second intervals (which I think would work well as a “full” trash alert.) Furthermore, I performed a bit of industry analysis to see what products are currently on the market – none incorporated technology in such a way, making our product both unique and advanced in this niche market. See here for one comparable offering on Amazon. 

Soldering at the FabLab

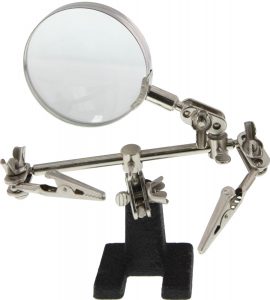
After last weeks lab session where our group wired a breadboard and uploaded our code onto an Arduino Uno, the next step was to set stone our circuit design with the help of a soldering process in which wires are joint together by melting metal. Our task was to wire up the LED’s and the photoresistor so that they have fixed joints and can be easily wired into the arduino board. As we sat around the table with soldering machines and wires in front of us, we were pretty overwhelmed and somewhat scared about using the solder as even a small touch of it onto our skin could result in a 2nd degree burn. Some of us used “soldering helping hands” helpers to keep our wires fixed in place while soldering them together as shown in the picture below. Due to the delicate nature of the soldering components and wires the helping hands proved to be very useful in keeping everything stationary and out of harms way.

Soldering basically uses a hot iron rod and a solder flux (a metal with a low melting temperature) to join two wires or two metal components together. The hot iron melts the flux in between the junction of the two metal components and quickly solidifies thus keeping them in a fixed state. Due to the fluxes metal characteristics it does not impede the flow of current in the circuit. The instructor was incredibly patient and helpful as she guided as through each of the soldering tasks. I quickly realized that soldering was an art form of its own as it required immense precision and concentration. The worst part about the soldering process is the smoke which is given off when the flux melts and it can be really suffocating at times. Due to this we took a 15 minute break to clear the smoke and also to rest our eyes.

Finally after soldering and wiring the arduino to our LED’s we powered it up using a battery and yes it did light up! In the video here, you can see the LED’s light up when my hand is close to the photoresistor and vice versa. The next step of the project is to laser cut a wooden box to house all these cool LED’s.

**Here is a link for beginners to learn more about the soldering technique!