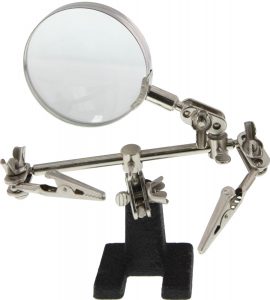
After last weeks lab session where our group wired a breadboard and uploaded our code onto an Arduino Uno, the next step was to set stone our circuit design with the help of a soldering process in which wires are joint together by melting metal. Our task was to wire up the LED’s and the photoresistor so that they have fixed joints and can be easily wired into the arduino board. As we sat around the table with soldering machines and wires in front of us, we were pretty overwhelmed and somewhat scared about using the solder as even a small touch of it onto our skin could result in a 2nd degree burn. Some of us used “soldering helping hands” helpers to keep our wires fixed in place while soldering them together as shown in the picture below. Due to the delicate nature of the soldering components and wires the helping hands proved to be very useful in keeping everything stationary and out of harms way.

Soldering basically uses a hot iron rod and a solder flux (a metal with a low melting temperature) to join two wires or two metal components together. The hot iron melts the flux in between the junction of the two metal components and quickly solidifies thus keeping them in a fixed state. Due to the fluxes metal characteristics it does not impede the flow of current in the circuit. The instructor was incredibly patient and helpful as she guided as through each of the soldering tasks. I quickly realized that soldering was an art form of its own as it required immense precision and concentration. The worst part about the soldering process is the smoke which is given off when the flux melts and it can be really suffocating at times. Due to this we took a 15 minute break to clear the smoke and also to rest our eyes.
Finally after soldering and wiring the arduino to our LED’s we powered it up using a battery and yes it did light up! In the video here, you can see the LED’s light up when my hand is close to the photoresistor and vice versa. The next step of the project is to laser cut a wooden box to house all these cool LED’s.
**Here is a link for beginners to learn more about the soldering technique!


Hi Jai,
Great post, and thanks for sharing about your experiences with the soldering portion of the project at the Fab Lab. Regarding the actual process of soldering, I would definitely have to agree with your sentiment: it is an art form in itself, requiring immense concentration and precision. I would also add that it demands a certain measure of patience, as each joint and fusion commanded your full attention and often called for multiple attempts. Surely, the smoke emitted during the heating acted as a distraction, yet I was proud that our whole team managed to create the final product. Again, thanks for sharing!