Team IJK Summary Post

Introduction

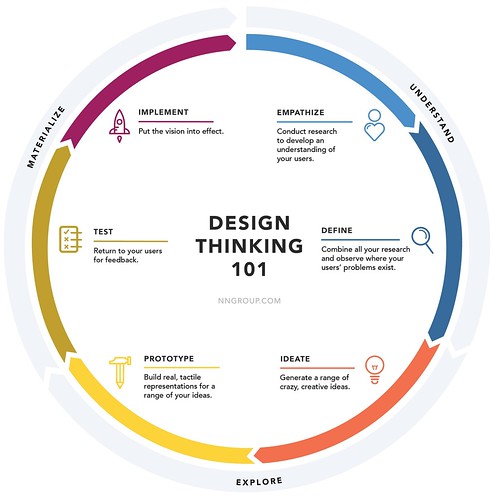
One of the first weeks of the semester, DFA (Design for America) came to our class and talked to us about the design process, specifically design thinking. We learned that when coming up with a new product, one should not first think of the product. Instead, they should think of a problem they have encountered that could be solved with a product. After they have identified a problem, they could then come up with possible solutions and eventually pick the best option.

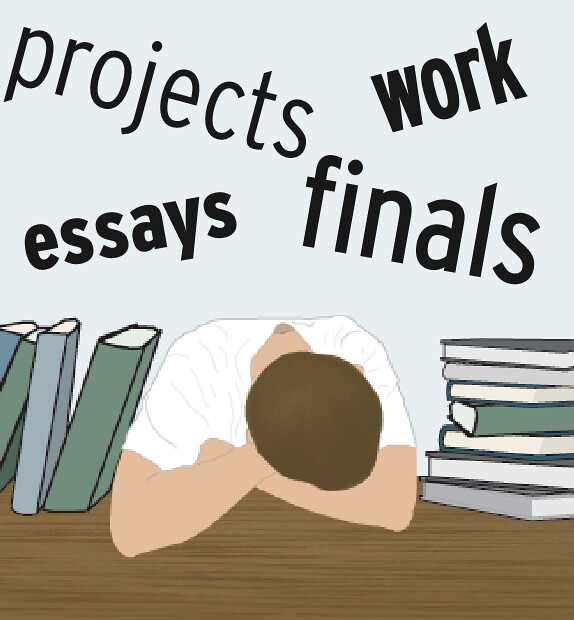
The problem that our group identified early in the year was that many college students encounter great levels of stress throughout the year due to adjusting to living on their own, as well as grades. Our group set out to find a relatively low-cost solution to this problem, as many college students won’t have a lot of money to spend.

Design Thinking

Possible Solutions

After brainstorming in class one day, our group came up with three possible solutions that could help reduce levels of stress in college students. The first was a stress monitor that could measure some sort of bodily signals, such as blood pressure, that could signal that you’re stressed. If one’s blood pressure got too high, the sensor could let you know that you’re getting too stressed and that you should take a break. However, this product had no real way of relieving stress, only identifying it. Our second idea was a product that would allow students to have their own garden indoors. We did some research and found that gardening has great effects on people. We knew that many college students wouldn’t have large yards to garden in, so we wanted to make sure that it could be done indoors. Our last idea had to do with meditation, which has also been shown to decrease stress levels in people. We were thinking to possibly make something that could help facilitate meditation for someone.

Stressed Picture

Research on Plans

We decided to go the indoor gardening route after seeing all the positive effects gardening had on people. Some of the research we found is listed below, there are a ton of benefits to gardening!

A University of Michigan study showed that gardening increased memory retention in subjects by up to twenty percent. It has also been shown to positively affect concentration both at home and at work. Tasks that were performed under the influence of nature also were performed with greater accuracy. This is because nature stimulates both the senses and mind, which improves mental cognition and performance. All of this research showed our group how gardening could truly serve as a powerful stress-reducing agent. After we saw this research, we knew that creating a product involving indoor gardening was the way to go.

Final Solutions

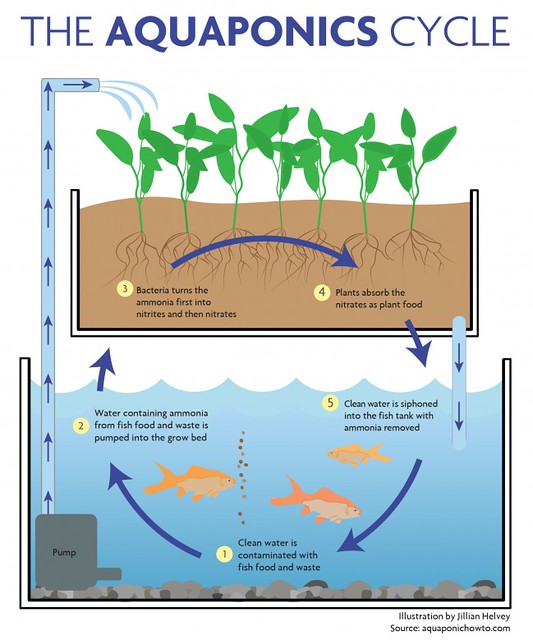
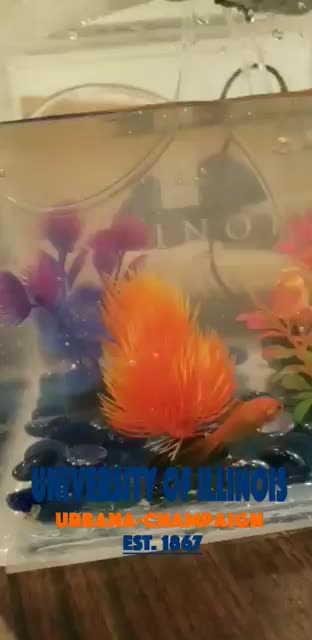
After surveying the various options at hand our team decided to pursue a solution that allowed students to do indoor gardening in small contained environments like apartments or dorm rooms. Our innovation on this indoor gardening system was the idea to make the growing of plants modular, therefore you could plant as little or as many as needed. The modular holsters for the plants would be placed on top of a fish tank to make a makeshift aquaponic system. The aquaponic system would allow for easy maintenance of the plants, fish, and the entire ecosystem. Perfect for a college student with little time on their hands.

View post on imgur.com

Prototyping Process

The prototyping process went through three phases: low fidelity paper prototype, cardboard, and finally a functional product. The low fidelity paper prototype was meant to figure out if this could be done at all. To see if our product could exist in 3D space and allow our team to easier visualize what our finished aquaponic tank might look like. The paper prototype helped us with the sizing of pieces. Next, the cardboard prototype served as a sturdier paper prototype that helped our team figure out what realistically made sense for the stacking of modular pieces. The cardboard prototype helped us learn that four pieces were most likely the ideal number. Finally, we made the functional prototype. The functional prototype was extremely useful for testing the product in an open environment to get feedback and improve it before making the final finished version.

View post on imgur.com

Testing the Product

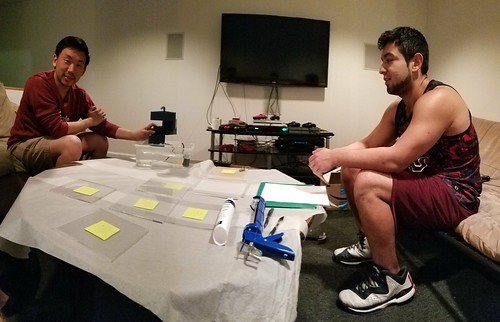
To test the product we purchased a bin from the store and placed our acrylic lid on top with water going through our modules to replicate what the product might look like and function like. Overall, it was very useful for showing it to our two users. We asked questions ranging from how they felt about it to what they would prove about the product itself. From this, we were able to compile notes about the product and moved forward to figure out how we could work on improving the product from what we had.

View post on imgur.com

Challenges Encountered

There were three main parts in which our team encountered the majority of our problems: Fusion 360 modeling, 3D printing, and building the aquarium itself. For the Fusion 360 modeling, it took a lot of work just getting up to speed with the software. The software itself is quite complex and can make quite complex shapes in a matter of minutes. Once we learned the software itself we went through quite a few iterations. Getting it to work well with exporting it to a 3D printer posed some difficulties with getting the shape just right so each modular piece would perfect stack on each other. The aquarium, on the other hand, took a different nature of the issue. Getting the materials proved quite difficult and a lengthy process given the amount of acrylic we needed for our project. Through it all though we were able to create a good product and learned quite a bit through all our product iterations and learned a great software and where to find a great campus resource in case we ever need to build something again.

Interview Results

Through the culmination of rapid and iterative prototyping, we now knew the direction we were heading towards when it came to fine tuning our project.  Therefore, once we got to our prototyping stage we were able to formulate a questionnaire to interview our test subjects, Ian Szetho and Anthony Bermeo.  The survey that we conducted revolved around the functionality, aesthetics, likes and dislikes and finally how they would improve the product.  

We conducted the interview with Ian first and he thought the prototype worked well.  However, the aesthetics of the design was negative for him as our prototype was primarily a plastic bin for the fish tank as the acrylic was not ready, which gave the prototype a cheap vibe.  Ian, however, did find the design to be very soothing and relaxing.  He also liked the modularity of the product as one can upgrade it with more or fewer plants as needed.  Overall, he enjoyed the relaxing and modular characteristics of it but disliked the aesthetics of the prototype. Next, we interviewed Anthony Bermeo and he believes that he can see himself using the product in his home.  He provided some details about how he disliked the pump noise as well as the aesthetics of the bin.  Surprisingly even though Ian found the noise soothing and relaxing it seemed Anthony saw that as a negative. Saying the noise was little too loud and something that he would definitely change for the final product.  At the end of both interviews, we knew we needed to fine tune our product and so we decided that we needed to increase the quality and aesthetics of the products and identify an optimal power level for the water pump to minimize noise levels.

20170424_211201

Final Product

After taking as much constructive feedback as we could accumulate, we were able to meet the demands of our testers by constructing the tank out of acrylic and tweaking the motor speeds.  Our final product is essentially emulating nature in a compact ecosystem.  This combined tabletop ecosystem is basically a self-cleaning fish tank with a self-sustaining indoor garden.  Our main goal was to provide a relaxing tool for dorm rooms and students that wanted to engage in light gardening.  We believe that we were able to develop a product that emits a tranquil ambiance as well as provide indoor vegetation for students all year round.

Aquaponics-Diagram-41-649x779

Snapchat-1849388938

What We Learned & Conclusions

The process of creating our own product from the conception, to prototyping to user feedback taught us a lot about the human-centered design process.  The ability to go back and forth to fine tune a product means that it will perform as anticipated as well as fulfill its duty.  The prototyping stage really enabled us to make our product better with each step with trial and error.  The tools such as laser cutting, 3D printing, Fusion 360 and everything else we used helped grow our knowledge base and can be applied to numerous future projects of our own.  From rapid prototyping to acting as a drivetrain for innovation, 3D printing has the ability to shape the world and we believe that our project is one of many examples of its limitless possibilities.

Full Presentation Slides: http://bit.ly/2pQX1yc

That’s a Wrap! 4 Awesome Things about BADM 395.

Over this past semester, I’ve learned so much in the digital making realm. I came in wanting just to earn a credit for school but ended up gaining so much more out of it. The experience was invaluable and I’ve learned so much more about what this university can offer to its students. I’m sure the knowledge I’ve learned this semester will certainly benefit me in the future and beyond college.

What I learned:

3D Printing

One of the big lessons I learned, of course, was how to 3D print objects at the Maker Lab. Learning how to 3D print was definitely one of my main goals that I wanted to achieve coming into the class. From learning how to load up filament into the 3D printers to how to properly slice an object prior to uploading it to the printer I think I learned a lot about the functional capabilities of 3D printers. I learned the limitations of 3D printing and at the same time what the maximum limit of what they can achieve. For example, one issue we encountered was that our water pump’s exit valve wasn’t properly fitted for the tubing we bought. To resolve this we simply took the dimensions of the current water pump valve and 3D printed a new exit valve that fit more to the dimensions of our tubing. Then we attached it to the valve and it worked!

Below is a small GIF of us working with Vishal on 3D printing.

View post on imgur.com

Watch the full video about BADM 395 here: https://vimeo.com/216385308

Fusion 360

Personally, I didn’t expect at all to learn how to any type of modeling or creation of actual objects in software. When we were exposed to Fusion 360 my mind was thoroughly blown. The software could really achieve incredible things that I had never even thought of. There were seemingly no boundaries to what could be made in Fusion 360, which was absolutely incredible. It even exported your models into Cura ready to be 3D printed just like that! Fusion 360 for our project was absolutely vital because we were making brand new objects that had never been made before. So we were working off from scratch and had to use a semi-advanced software to make what we needed so TinkerCAD was off the table. Pictured below was just one of many iterations of our modular plant holders. Learning Fusion 360 was definitely frustrating at times but honestly, the reward of transitioning a product in your head to a real life functioning object was more than worth the steep learning curve.

View post on imgur.com

Full post on Fusion 360: https://publish.illinois.edu/digitalmaking2017/fusion-360-making/

Prototyping

Learning how to iterative prototype in BADM 395 was a great experience. With how the class is structured you naturally get into the groove of making, testing, and then (most likely) failing. Which is a great way to learn how to iterative prototype. The idea itself we had honestly morphed, changed, and evolved into what we ended up doing. Being able to go through all the stages of prototyping and physically building out different models was extremely helpful for the whole process. Personally, we built everything from paper to cardboard prototypes it was a great experience. Especially when we interviewed people on how they felt about our product using the prototype which was valuable in how we intended on changing or improving our product before the final presentation. Below is a picture of two of our three prototypes. The paper prototype was the first one we made before moving onto a more solid cardboard prototype. The third prototype we made was a water functional one with a $0.98 Wal-Mart bin as our fish tank.

View post on imgur.com

Full post on prototyping: https://publish.illinois.edu/digitalmaking2017/cardboard-fun-near-bif/

Learning About Fab Lab

Exploring the Fab Lab was certainly one of the highlights of the entire class. There our class got to learn about the various resources offered at the Fab Lab and their overall mission. The things that the Fab Lab does for the community is also very incredible. From teaching the art of making things to hosting workshops for kids they do awesome work at the Fab Lab. They also help advise students, just like us, on how to make. For our own personal project, we used the Fab Lab to help us cut out the glass materials we needed to make our final fish tank. Additionally, we used the Fab Lab’s resources to help us order the acrylic in order to make the fish tank in the first place. Overall, they have a ton of resources over at the Fab Lab ranging from physical tools to the great mentors and instructors they have there that can assist you with pretty much anything you want to do.

View post on imgur.com

Full post on Fab Lab: https://publish.illinois.edu/digitalmaking2017/learning-the-fab-lab/

Conclusions & Takeaways:

Honestly, I loved my time in BADM 395. It took a lot of hard work and a lot of time but overall this one of the most rewarding classes I’ve taken in college. In the College of Business there isn’t a lot of opportunities to make physical objects and products but here, in this class, we were able to do just that. It feels very empowering to be able to have thought of something and execute it to that degree of actually making the product happen over just a semester’s worth of work.

Moving on and going to California I really do hope I’ll be able to find similar resources such as the MakerLab or the Fab Lab. They are certainly organizations that I’d like to stay involved with moving forward as their potential to impact people seems almost limitless in scope.

With that, I hope everyone in their life at some point gets to experience the joy of imagining a product and then actually making it in real life because it is just wonderful. That, I believe, is how the future problems of the world will be solved. By regular people who are affected by the world’s problems getting access to tools like these and working to get their ideas made into real world products that can help people.

For more information about any of my projects or the video feel free to reach out to me at szethoian8@gmail.com.

Wrapping Up

As we near the final presentations and showing off our final designs our team is assembling all the parts needed to finish our aquaponics model. We’ve been working towards creating functional pieces for the modular plant holders. Last week we finally finished a final design that we think will work well for holding the plants above the fish tank. Kenny and I also worked on creating the actual fish tank for the fishes. The acrylic just came into the Fab Lab so we paid them a visit to try and cut out more of the sides. The visit was very successful as we were able to print out a couple of the sides for our project.

After that we began working on 3D printing a tubing that will help connect our own fish tank to the tube that will run through our modular plant holders. That in itself wasn’t too difficult. We also designed a spout for the water to come out of the containers into our modular plant holders.

Kenny and I also began shopping for prototype fish containers in case we wouldn’t have the final acrylic fish tank ready. We purchased a plastic bin from Wal-Mart to substitute in and hold our fish/water. This will be useful in testing before we work on sealing a whole fish tank. We’ve also begun looking into what type of fish to get as Kenny will be keeping the fish tank to take care of it after we’re done with the project and the semester. Our team also began shopping for vanities for the fish tank to make sure it has a good aesthetic appeal. We bought some blue stones that should give the fish tank a good look. We’re also looking to get some good pebbles that will fit our design for the modular plant holders.

Approaching the Final Prototype

For this week’s class, we worked once again on finishing up our prototype! We made a lot of progress today from being able to figure out how to interlock our different pieces to how we’re going to pump water through our aquaponics tank. A lot of our equipment arrived today so we were able to test out our water pump in addition to using the hose to push through the water.

Originally, a lot of our squares didn’t quite fit with each other so we until we sanded down the middle joint. Sanding it down made it actually fit perfectly and tighter. With that, we had actually solved one huge major problem that we had in our prototype. From there we filled up a bucket of water and started feeding water through our prototype. The water flowed perfectly through the pipe and into our modular plant holders. One issue though that we did encounter early on that we had to fix was that the pipe adaptor wasn’t quite fitted to our modular plant holders so we actually had to 3D print an adaptor to the adaptor attached to the water pump. Which proved to be quite easy after building custom modular pieces.

Our prototype is really starting to come together and the next big thing to tackle is making the actual fish tank. We’ve been utilizing the fab lab and ordering our fish tank sides through their lab. As of now, we’re still waiting on the shipment which should come within the next week according to the people at the lab.

Unfortunately for this lab, I wasn’t able to take many pictures but I am working on a video now for the overall class and one following my team. So hopefully, as I edit it I’ll be able to post small segments as part of my blog post. I’ll definitely be updating my progress on the video inside this blog in addition to what we do. I’m really excited for making the full fish tank for sure.

Cardboard Fun Near BIF

This past week our group decided to go one step further than our paper prototype and make a cardboard prototype. One that would let us visualize our structure a little better so we could figure out how exactly it would need to be made. Additionally, we printed off prototypes of our product.

To start off with making the paper prototype was extremely helpful in the visualization of what the final product would look like. Then making the cardboard prototype was even more helpful as we saw something that would be more akin to what the final product would look like. To make it we used the space in Flagg hall to cut out our cardboard and used super glue to piece it all together. It was great seeing solid triangles put together to really get a feel for how it would look like all stacked up on each other.

IMG_1066

After we finished working on the cardboard prototype we started figuring out how we could finalize the CAD model so we could start printing off the 3D pieces. That came with its own challenges, in particular, it was difficult figuring out the centerpiece that would interlock all of the triangles together in one organized stack.

Screen Shot 2017-04-10 at 11.10.33 AM

Above is a pictured visualization of what we had to make in Autodesk 360 including the centerpiece which we printed out separately in order to quickly test how the joints fit with each other. We’ll probably have to continue to test how those pieces interlock with each other as the product goes on. Unfortunately, we still haven’t found an ideal diameter that makes the pieces interlock smoothly and securely.

IMG_1070

As we move on the project has been coming on quite nicely. Pictured above are our two prototypes side by side. It’s awesome to see how long we’ve come and we’re definitely looking forward to working on the final iteration in 3D printing.

Paper Fun @ BIF

This week in our class we were given the go ahead as a team to start working on our prototype aquaponics. For this, we went downstairs into the BIF atrium and started drafting. Our biggest challenge would be how to 3D print the actual water funnel part of the aquaponics. As we started drafting we came up with a couple of ideas but ended up settling on one concept actually inspired by how staircases are formed.

IMG_1036

The idea behind the staircases would be so that the water coming from in the middle with a hose would trickle down the staircase and then back into the fish tank. Each water stair would have three small holes that the water would seep through and go into the next row. The purpose of doing this is so that each plant gets an ample amount of water to keep growing and as the water goes through each plant it gets filtered, meaning that no filter is needed for the fish tank at all.

Making the pieces into stairs for a full staircase also allowed the structure to be modular. Meaning someone could as many or as little pieces as they wanted to, depending on how high they wanted it to go. At the end of the class, we were actually able to piece together a prototype of what it would look like out of paper, pictured below.

IMG_1040

We were overall quite happy with how it turned out and look forward to 3D printing the staircase design. We’re also currently thinking about making a card stock prototype of the object that would be more sturdy and easier to work off of than the paper model. We’ll also need to figure out how we’re going to have each triangle piece attach to each other and the hose in the middle. Those problems, however, should be resolved soon!

Putting it All Together

For the final week in the Fab-Lab, we were tasked with figuring out soldering which wasn’t that difficult and a lot of fun. We utilized a tool that basically would melt the solder and that melted piece of metal would lock in the joint that we were melting it onto.

From there we created an intricate group of LEDs that would serve as the LED structure for the main part of our final box product that we were putting inside our wooden box.  The soldering instruction was fantastic as they told us exactly how to use it and more importantly how to use it safely. The only real difficulty with soldering was making sure that when you soldered it looked clean. Which, unfortunately, I was not very good at doing at all.

IMG_0579

Pictured above is the soldering device that we used during the demo. The main component is the device that looks like a pen. That device’s tip would heat up and allow us to melt pieces of metal called solder onto different objects that would link it all up together. The nob on the device controlled heat but we didn’t touch that at all. Then most importantly you should always clean the solder pen off on the sponge after using it so no leftover pieces stick onto the solder pen itself.

IMG_0595

Pictured above is the final product that we worked up too. Unfortunately, I was unable to finish my own box but I was able to get all the LEDs inside the box! The reason for me not being able to finish the whole box was because I couldn’t get the puzzle pieces to match correctly. only when I had hot glued most of the sides together did I realize that I actually glued them in the wrong order, unfortunately. This honestly kind of sad when I ended up with it but I think I might return to try and redo the whole box now that I know how to make one myself!

Overall, the Fab Lab experience was incredible. I learned a lot about making things and gained a lot of confidence for the future whenever I need to make something that involves not only hardware but also the software as well. I’m looking forward to being involved with Fab Labs in the future for sure.

Coding with Bread(boards)

This past week our class was once again at the Fab Lab where we were able to learn how to code with Arduino breadboards! Here we utilized cables, a breadboard, Arduino, and a couple of LEDs. We learned the basics of coding with Arduinos in order to light up a single LED first. Along with that, we learned how ECE works in order to wire up the breadboard. Although we only really touched the surface of ECE it was pretty cool to learn how another discipline works outside of the College of Business. The very first task was to try to figure out how to light the LED and make it blink with the SOS pattern. Which could be done by figuring out the right amount of timing to delay the lights within the code so that it would blink in the right pattern.

Following that more complexity was added to how the lights would blink. We added more lights to the board so more light was blinking and changed up the code. How the relationship between the code and the Arduino worked was that we would change the configuration on the breadboard, hook it up to the Arduino, then upload the code from the computer into the Arduino. After everything was uploaded you would sit there and wait to see if everything worked ok and if it did the LEDs would start blinking!

It was really cool to be able to build something totally different than what we would make at the MakerLab. For the final step, we added a sensor that would make the lights blink depending on how much light was available. If a lot of light was available then the far right LED would be lit then it would descend to the left as light availability lessens. Finally, if there was no light available then the whole thing would just start blinking.

Animated GIF  - Find & Share on GIPHY

The end result was very cool and I was amazed that I was able to build something like that in such a short amount of time. Albeit we had a lot of help from our amazing instructors. A lot of the breadboard configuration and the code was premade but it certainly got me a lot more interested in coding Arduinos. The final step it seems to be for the whole project is to put that blinking breadboard inside of our wooden cube – needless to say I’m pretty excited!

IMG_0499

Learning @ The Fab Lab

This week our class took a little detour to the Fab Lab. It was our first time visiting a MakerLab space other than our own. The Fab Lab was actually really incredible in a lot of ways and actually quite different from the Maker Lab. I was honestly expecting it to be super similar to the Maker Lab but it definitely had a way different feel to it that the Maker Lab.

IMG_0449

For starters, it felt a lot more rustic and upstart due to the nature of the building itself. We were told it actually used to be a place to hold horses and they used to shove the waste outside of the huge doors. Since then the Fab Lab space has been transformed to hold an electronic’s space, a biotech space, a wood laser printing space, a dance studio, and more. It’s also filled to the brim with people attending workshops, teaching, and of course making.

They have all sorts of tools on hand ranging from 3D printers to Arduino. There’s also helpful staff there to help you out if you need to learn anything or don’t know how to do something. We even saw a kid print out his own customized puzzle of a tiger. The workshops themselves seemed really cool. We were told they really try to incorporate everything from electronics to fabrics if they do a workshop you could learn how to sew and code all in one day.

IMG_0456

I think our class really enjoyed moving through the space and getting to see all the cool things that are done at the Fab Lab. Particularly the making tools outside of 3D printing. Which is really all our class has covered up until this point. So, it was very fascinating to see what else is out there in terms of physically making things with the power of modern technology, like the laser wood cutter that could make a box much quicker than a 3D printer could.

Brainstorming with Freedom

This past class our team was able to spend a lot of time brainstorming and figuring out different problems that we could solve. A big lesson we learned was that not to brainstorm product ideas in search of solutions to solve but to rather focus on finding a good problem to solve. By focusing on finding a good problem to solve you leave room to make any product possible and leave a lot of creative freedom for your team to figure out what to make. For us certainly did fall into the trap of focusing on creating products first rather than finding a proper problem to solve. We thought of drones for kids, an aquaponics, and a way to better manage your time.

All decent ideas on their own but again the issue is that we definitely limit ourselves by just focusing on the product rather than the problem statement. By moving backward into the problem statement we give ourselves a lot more freedom in regards to what to make.

In the brainstorming process, we were given a ton of freedom to pretty much find any problem we want to try and solve. That alone was incredibly exciting. The possibilities were pretty endless without considering anything like costs or even to some extent feasibility of the idea itself. We were given a huge sheet of white paper and some markers to which we just pushed forward to start writing anything we felt like.

Moving forward I think our team will be looking to figure out “how can people who want to urban garden in small areas grow plants”. So for this, we’ll be drawing inspiration from a couple of existing solutions. Typically to make this aquaponics it requires a single fish and some sort of environment for the fish to live in. The plant then uses the fishes’ waste to grow and in turn, the plant provides nutrients to the fish so it can keep on living. We would look to probably 3D print the parts necessary to contain the fish and contain the plant.

Example Aquaponics: https://flic.kr/p/SqJFZY

All In all, we’re very excited to start making the product and here are some resources that we hope to use to help us keep on brainstorming ideas and solutions!

Brainstorming tips:

http://www.inc.com/john-boitnott/10-longtime-brainstorming-techniques-that-still-work.html

https://www.wrike.com/blog/techniques-effective-brainstorming/