Research and Continuous Improvement

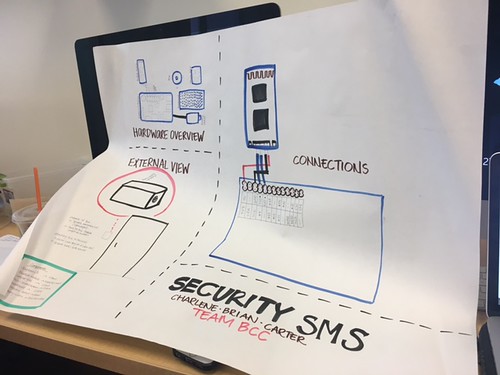
In this weeks session we had first started off with a quick presentation on scanners. I found it really interesting that we can scan with just our own phone cameras; they take pictures and stick them all together through a 3D mesh. They are created through triangles, so the more triangles the more resolution on the surface. The application that this feature could be done through is call Trnio and can be downloaded through an app store. After learning about scanning we began to work on our groups project again. Last week we had accomplished the main gist of how we wanted our product to look like, what components we would need and approximately how we would put it all together and into the 3D printed housing. However, in the last class we had only a general idea, which is why in this week’s class we had to go in more depth to understand more in detail what we would have to do and accomplish.

As none of us are engineers, we don’t have a solid understanding of how we should go about the project, which is why we had done a good amount of research to understand what components we would need as well as the placement of them. We had looked into various websites and videos, checking out the different tutorials and the ways other individuals had created a similar home security product. We had decided to use different tutorials and grab code from some of the already made products. Afterwards, we were able to receive all our components from Vishal and grabbed the rest of the components from the FabLab.

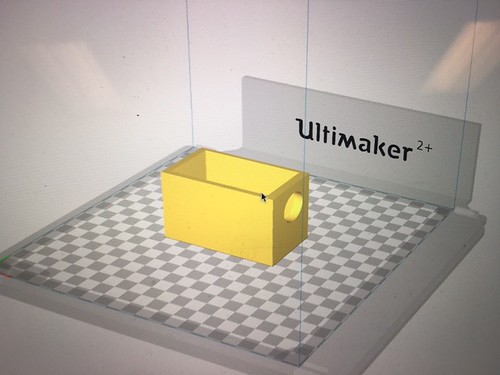
We then ended up meeting at the end of the week to work on the project together with our engineering friends. They had helped us with the installation of the Raspberry Pi and helped us with grabbing the correct code to run the system. We were able to put all the hardware together and plugged in the sensor accordingly. We had some difficulties with installing Twilio into the Raspberry Pi so we had tried to use a different method of Google Voice but that also did not turn out as we had expected even after adjusting many settings. Thus, we went back to trying to download Twilio, and to our surprise it could be done but we also had to download some other things to make it work. Finally, we tested the sensor with Twilio and the product worked! We still need to work on creating a way for the system to start on its own when plugging the power on and off so we will be doing more research on how to work that. During this time we had also started creating our 3D printed housing through Fusion 360 and we will begin printing it during the next class.


Ready, Set, Make!

It’s hard to believe we have been away from the Maker Lab for over a month! Week 9 found us back in the Maker Lab after a week away for Spring Break and the previous 3 weeks away at the Champaign Urbana Community Fab Lab.   I think all of us were glad to be back “home.” This week we focused on design and prototyping as we start to bring our project ideas to life.

IMG_1468

One of the most important points we learned emphasized that design sketches and prototypes are by no means a final product. They can (and should be) rudimentary, use household items, and use temporary solutions. David Kelley, of IDEO, in this presentation says, “Design is an iterative process.” The quicker you can get feedback from a product, the more successful it will be. Each presentation allows you to get more feedback, and people will always tell you “everything that is wrong with it.” Kelley continues in this video to talk about the design of Apple’s mouse, and how a temporary prototype solution to keep dust off the optics can turn into a permanent part of the design. As you improve, you will quickly have a better prototype on your hands and you can even start using custom parts. Jeremy Losaw in “ProtoTYPING: Tips to Get Started on Your Product Idea” says “3D Printing is a great way to get custom parts quickly.” Luckily for us, we have access to the Maker Lab and Fab Lab to make those custom parts with the very talented staff in both labs.

IMG_1467

After going over all these discussion points, it was time for our groups to split up and start designing and prototyping. My team, BCC creations, settled on making a low cost security system to provide college students some peace of mind when they are away from their apartments. We have named our product “Security SMS” and will use motion detection to alert of unauthorized entry. When someone enters the apartment, they will have 10 seconds after the motion detector is tripped to turn off the alarm. Otherwise, an alarm will sound and a text message will be sent to the roommates living in the apartment. We will use a Raspberry Pi with Twilio to send the SMS, Piezo for the alarm, and an ultra sonic sensor for the motion detector. We will 3D Print the housing that will hold the alarm, which can be attached to a wall with Velcro. Originally we considered using a Bluetooth unit for the SMS function, but after I went to the Fab Lab during class, we decided to try Twilio.   Aakanksha at the Fab Lab offered to help us, and Charlene and I have friends studying Engineering that have offered their talent to us should we need it when programming. Our next step is to start working on putting together a circuit and programming the Raspberry Pi. When we know how big the circuit will be, then we can start prototyping the housing for 3D printing. Although it may be tricky to design in the software, we presume it will be an easier task that working with the technical specifications of the alarm. Regardless, with the three of us working together, we are all excited to prototype!

Team BCC Creations Designing and Prototyping Reflection

This week we mainly focused on our final project in regards to designing and prototyping. Prior to having group time Vishal had given us resources on the process of prototyping, and reminding us that this would not be the first prototype we would be creating but instead we would keep learning, rebuilding and growing form our prototypes that we create.

My group is Team BCC Creations; we are trying to provide college students with a peace of mind through a cheaper security alternative for their apartments. We have come to a conclusion that many students leave campus during breaks and during those times there are higher chances of trespassing. Thus, we have come up with a “cheap” alarm for a college student, as we don’t have the funds to be purchasing nice alarm systems that some of us may have at our parents’ homes. The alarm can be placed by any door and the alarm will detect whether the door is opened or not. If the door were to open the individual that enters has 5-10 seconds to shut off the alarm before it begins to ring and text the roommates of the apartment. Therefore, unsolicited entry will immediately cause the alarm to ring as well as notify the roommates of the apartment through text messages.

In order to create our alarm we will need a raspberry pi, Twilio, jumper wire, piezo, breadboard, ultrasonic sensor, battery pack, 3D printed housing and Velcro. During our group time we had created a poster that had a diagram of how the components would be connected to each other as well as a sizing guide so we could have a better understanding on how big the housing had to be as well as the alarm system itself. While drawing the diagram we had some concerns on how the parts would fit in but the breadboard gave us more leverage. Because we didn’t have the parts physically in front of us, we still need to approximate some of the components such as the piezo, because we may using a different alternative for the sound system. During class one of our group member had gone to the FabLab to check if they had any Bluetooth modules available for our use, but after speaking with a FabLab assistant we came to an understanding that we could use Twilio as cloud communication platform to send our texts instead of the Bluetooth module which we would need to have Vishal order. The raspberry pi has the capacity to use Wi-Fi and connect with Twilio, so we will still need to test it out but I believe that it could be a very suitable alternative.

After this weeks session we definitely have a better grasp as to how our product will look like, what it will be made of and where to get our components from. I can’t wait to see what we will be able to do in our next class once we have gathered all our components and have them physically laid out in front of us.

The diagram we had drawn in class.

Our ultrasonic sensor and breadboard.