A Reflection Of My Digital Making Experience

My learning experience throughout this course had gone beyond my expectations. Though we only had class once a week the Digital Making Seminar had impacted my thinking process and brought in a different perspective of the world. Now, I would like to describe my journey and the various learnings and knowledge I had picked up on the way.

The first two weeks were more of introductory classes, allowing all the students to have a better understanding of what we would be delving into. We immediately were given the hands on experience to create our own 3D printed object after given a quick tutorial. I had learned about various sites and chose to use Tinkercad to print out an Illinois keychain. During the class we learned about the large amount of resources (ex. FabLab) available on campus for making and creating.


During the third week of class, Vishal had brought in UIUC’s Design For America. I really enjoyed their presentation because it truly helped my group, BCC Creations get our creative juices flowing. I realized how naturally creative the human kind is, it is easy for anyone to have the ability to design products or services through the design thinking process in order to meet a consumers demand. The group had taught us through a hands-on activity to create a prototype that would benefit our customer group: senior citizens. We had brainstormed various products that would allow a senior citizen to be more at ease.

Our fourth week we met with Jeff Smith from Autodesk who was teaching us about Fusion 360, the software allowed designers to design products or services from what used to many hours to only a couple of minute. Each of the tools in Fusion 360 were incredibly powerful unlike other softwares. With the step-by-step tutorial given by Jeff, I was able to create my own version of a perfume bottle I had through Fusion 360 after the session,


By the fifth week of class I had learned about different websites and softwares that could be used for designing, now I was excited to see how this could be incorporated to my final project. We met with our groups to brainstorm needs people have on the daily and create “how can we” statements. Furthermore, we had to make sure the statements were broad enough to solve the need and we weren’t delving into finding the perfect product for the need.

Week six, seven and eight we were at the FabLab working on creating a blinky box through three steps: Inkscape/laser cutting, soldering, and coding, My group started out with learning how to use Inkscape, we were given a template of the press fit box, we learned to change the settings for the laser cutting and added designs to our boxes. Once our designs were done we laser cut them, it was an interesting experience and the laser cutter had to be carefully monitored. The next week I learned how to make the lights blink on the hardware through coding. It was an incredible experience and a great learning process for me as my core classes don’t touch computer science coding or work with hardware pieces. In the final class we learned how to solder, it was a new experience for me and I learned how soldering melted filler metal onto metal joined objects by creating an established thin layer. Overall, I had a strong understanding of how everything came together to create the box and learned how all the components could be used, which would come in handy for my final project.


During weeks nine, ten, eleven and twelve we focused on our project, we went through prototyping, researching, improvements, auditing and making final adjustments. Once we decided on creating our “cheap” alarm system we began the prototyping process. We researched on the components needed for the hardware as well as the software side. Then we drew up a diagram so we had a clear understanding of how the hardware would look, what the software would need to accomplish and the shape of the housing. We gathered our components from Vishal and the FabLab. Throughout the process we had challenges, we had received help from the FabLab on useful components and my friend, Alvin Wu (Electrical Engineering) to assist us with the coding and putting together the hardware. In the four weeks I had learned so much about the product we were creating, I learned how to use the Raspberry Pi, searching up code as well as the incorporation of them, how the components worked and starting up Twilio so we could send text messages to the user. Once we were done with the product we worked on the housing which was a bit difficult to make the adjustments as we started out using Fusion 360 and moved on to Tinkercad. We made several adjustments to our housing so all the components could fit inside. FInally, we began our testing process of how our consumers would use it, we added on an extra text message so users would know when the security system was on and once it turned on there would be 60 seconds before startup.


Prior to taking the Digital Making Seminar course I had heard great things about it, not only from Vishal during an advisor meeting but also from students who had taken the course or were about to take the course during the same semester. I was very excited to see where this class would take me, as I had no experience with 3D Printing and all the functions we learned throughout the course. Thus, coming in I had little expectations but I was ready to experience a different side of what IT could offer. Now, that I have reached the end of the course and reflected on my learnings and experience I can definitely say the course reached beyond my expectation. I had not expected to be able to learn so many different aspects on designing and was really amazed by all the results as well as support. Throughout the process, I learned that even though I never saw myself as being a creative mind I was still able to create a final product design that would be suitable for our consumers need. I will definitely be taking all my knowledge from this course and apply it into my future career.

Continuing the Prototyping Process

Coming into this week’s class, our team finally has a good grasp of the project in regards to the hardware and the software portion. As stated in last week’s reflection we were able to complete almost all the coding besides some minor adjustments and ensured that the hardware is able to work. During this week’s class we worked on the housing component and started some testing in regards to the sensor.

The first half of the class we worked on the housing unit, we had started off by using Fusion 360 last week and were having some issues especially with creating the correct holes into the housing unit. Thus, Vishal had suggested that we use Tinkercad to create the holes, as it was much easier to do through their website. We downloaded our already created dimensions from Fusion 360 and uploaded it onto Tinkercad. Tinkercad was much more efficient, we were able to edit at the same time. Immediately we had figured out all the hole dimensions for the lid, the sensor and the power cable. We also decided to add on our team name to the product. When we decided to print it we realized the time of the print was incredibly long and we were figuring out methods to shorten the time of printing. Finally, we were able to start the printing of the housing and will be done for us to pick up the next day.

After we had started printing out housing we decided to start working on some of the testing of our product. We were coming up with different inquiries on our product. First, we realized that we wanted to input location when the text sends to the user but that would require us to include some type of tracker and we realized that would be easiest done through an actual application, which would be the next step after creating the actual product. Some other issues we thought about were related to starting up the product, to leave a 30 second to 1 minute leeway before it started up and started sending texts of an intruder entering the home. Finally, we decided to test the sensor because we wanted to make sure it was reliable and we wouldn’t need to order a different type of sensor, as Vishal had suggested other sensor types like the laser sensor. We realized that our sensor went 120 degrees and was like a dome shape in sensing, we were thinking about purchasing a different sensor because a laser one might be more simple or 3D printing two walls around the sensor. However, we thought more about it and realized that it wouldn’t matter if it did sense all 120 degrees because if there were any movement it would be able to sense it. Thus, we decided to continue using the same sensor but reducing the distance it reached so it wasn’t as sensitive.

This is our housing model we created through Fusion 360 and Tinkercad.

Vishal and Brian were getting the printer started.

We began our testing plan, first testing our sensor.

Process of our housing.

Trying to change the sensor range.

Research and Continuous Improvement

In this weeks session we had first started off with a quick presentation on scanners. I found it really interesting that we can scan with just our own phone cameras; they take pictures and stick them all together through a 3D mesh. They are created through triangles, so the more triangles the more resolution on the surface. The application that this feature could be done through is call Trnio and can be downloaded through an app store. After learning about scanning we began to work on our groups project again. Last week we had accomplished the main gist of how we wanted our product to look like, what components we would need and approximately how we would put it all together and into the 3D printed housing. However, in the last class we had only a general idea, which is why in this week’s class we had to go in more depth to understand more in detail what we would have to do and accomplish.

As none of us are engineers, we don’t have a solid understanding of how we should go about the project, which is why we had done a good amount of research to understand what components we would need as well as the placement of them. We had looked into various websites and videos, checking out the different tutorials and the ways other individuals had created a similar home security product. We had decided to use different tutorials and grab code from some of the already made products. Afterwards, we were able to receive all our components from Vishal and grabbed the rest of the components from the FabLab.

We then ended up meeting at the end of the week to work on the project together with our engineering friends. They had helped us with the installation of the Raspberry Pi and helped us with grabbing the correct code to run the system. We were able to put all the hardware together and plugged in the sensor accordingly. We had some difficulties with installing Twilio into the Raspberry Pi so we had tried to use a different method of Google Voice but that also did not turn out as we had expected even after adjusting many settings. Thus, we went back to trying to download Twilio, and to our surprise it could be done but we also had to download some other things to make it work. Finally, we tested the sensor with Twilio and the product worked! We still need to work on creating a way for the system to start on its own when plugging the power on and off so we will be doing more research on how to work that. During this time we had also started creating our 3D printed housing through Fusion 360 and we will begin printing it during the next class.


[Final Project: Maker Lab Bot] But First, Map it Out

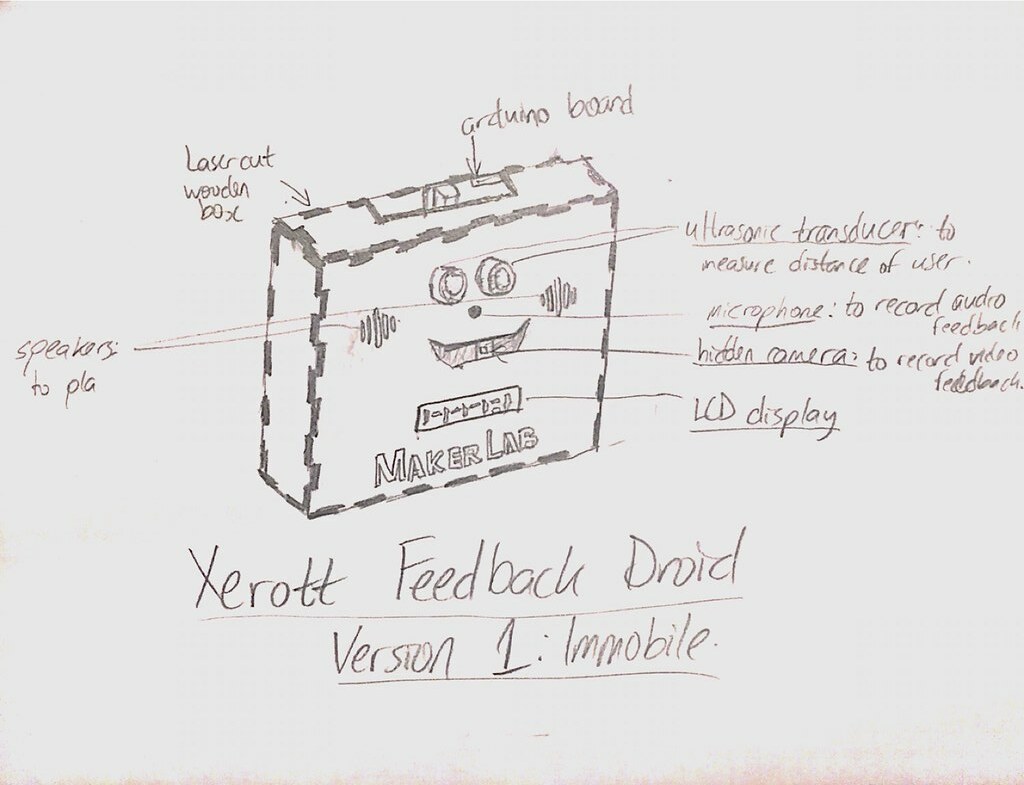
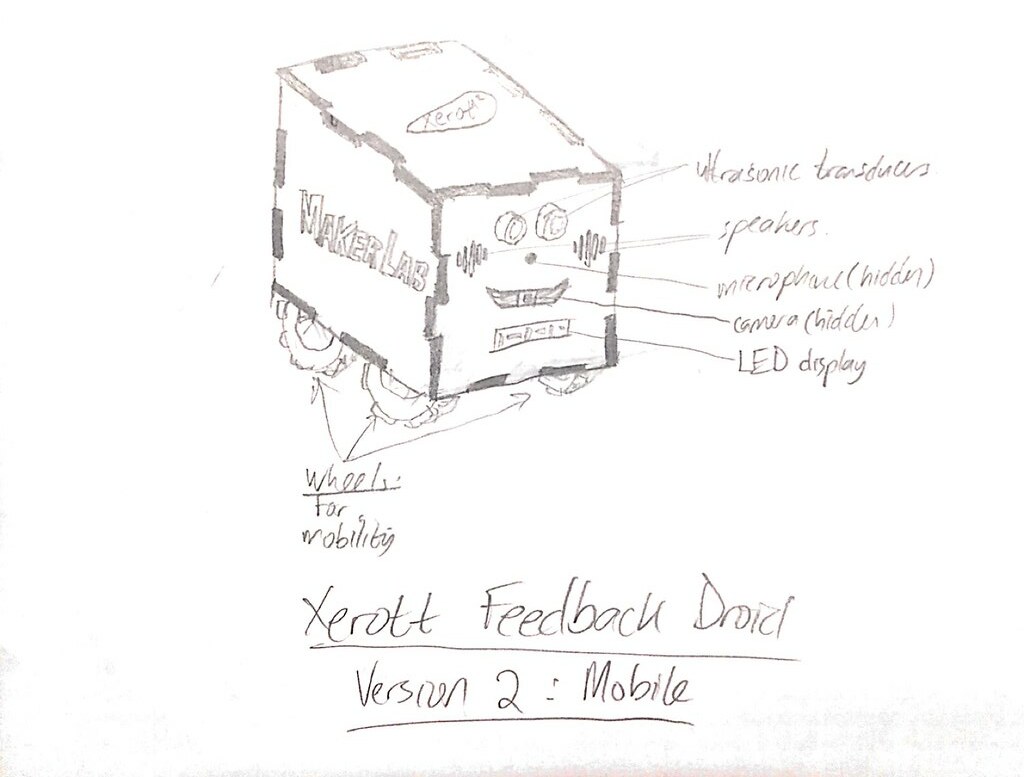
This week in class we returned to the Maker Lab and continued to work on our final projects with our teammates. We, Team Zerott, have decided on creating a small, friendly-looking Maker Lab bot that records people’s ideas and stories or any feedback they have for the lab. The bot will also have the ability to sense when someone gets close to greet the person. The video/audio recorded by the Maker Lab bot will be saved to an SD card/USB which could help in keeping a record of the things that are going on in the lab as well as collecting data for future use.

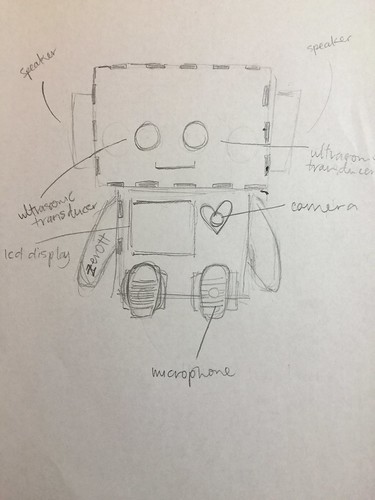
To start the prototyping process, we first made a few sketches on how we wanted the bot to look like. The inspiration for our bot came from both the BlabDroid and TJBot.

Super adorable BlabDroid

cbcdd83a20394a03ac88711a2d5960b4

One of the earlier sketches

2a8e1dfb46c64d28a5fcaca6d2607556

IMG_6990

Most recent sketch

After making these rough sketches, we discussed how each component of the bot should be made and who should be responsible for what. To run the code for the entire system, we’ve decided to use a program similar to Arduino called Raspberry Pi. Holding that would be a 3D printed body with plywood board covering the entire outer portion of the bot and finally, 3D printed arms and legs.

During this session, we were able to jumpstart on 3D printing the part that holds the Raspberry Pi. With the help of TJBot’s open downloadable files on Github and instructions on Instructables, we were able to successfully print out the inner portion of the bot.

Our next step will be to start on the laser cutting of the outside portion of the bot as well as the coding. I am happy about our progress so far and cannot wait to continue working on this project!

Team BCC Creations Designing and Prototyping Reflection

This week we mainly focused on our final project in regards to designing and prototyping. Prior to having group time Vishal had given us resources on the process of prototyping, and reminding us that this would not be the first prototype we would be creating but instead we would keep learning, rebuilding and growing form our prototypes that we create.

My group is Team BCC Creations; we are trying to provide college students with a peace of mind through a cheaper security alternative for their apartments. We have come to a conclusion that many students leave campus during breaks and during those times there are higher chances of trespassing. Thus, we have come up with a “cheap” alarm for a college student, as we don’t have the funds to be purchasing nice alarm systems that some of us may have at our parents’ homes. The alarm can be placed by any door and the alarm will detect whether the door is opened or not. If the door were to open the individual that enters has 5-10 seconds to shut off the alarm before it begins to ring and text the roommates of the apartment. Therefore, unsolicited entry will immediately cause the alarm to ring as well as notify the roommates of the apartment through text messages.

In order to create our alarm we will need a raspberry pi, Twilio, jumper wire, piezo, breadboard, ultrasonic sensor, battery pack, 3D printed housing and Velcro. During our group time we had created a poster that had a diagram of how the components would be connected to each other as well as a sizing guide so we could have a better understanding on how big the housing had to be as well as the alarm system itself. While drawing the diagram we had some concerns on how the parts would fit in but the breadboard gave us more leverage. Because we didn’t have the parts physically in front of us, we still need to approximate some of the components such as the piezo, because we may using a different alternative for the sound system. During class one of our group member had gone to the FabLab to check if they had any Bluetooth modules available for our use, but after speaking with a FabLab assistant we came to an understanding that we could use Twilio as cloud communication platform to send our texts instead of the Bluetooth module which we would need to have Vishal order. The raspberry pi has the capacity to use Wi-Fi and connect with Twilio, so we will still need to test it out but I believe that it could be a very suitable alternative.

After this weeks session we definitely have a better grasp as to how our product will look like, what it will be made of and where to get our components from. I can’t wait to see what we will be able to do in our next class once we have gathered all our components and have them physically laid out in front of us.

The diagram we had drawn in class.

Our ultrasonic sensor and breadboard.