Week 7 Summary: Building on Our Skills in the Fab Lab

In Week 7 of the Digital Making Course, our community of Makers once again ventured over to the Champaign-Urbana Community Fab Lab. Similar to week 6, our class broke into our three groups to work on the next rotation in making the Blinker Boxes. However, since we were already familiar with the layout of the building and the resources available to us at the Fab Lab, we were able to hit the ground running. Once again, our three groups were split up to working on Coding with the breadboard and Arduino, soldering the electronics, or designing the press-fit boxes for laser engraving and cutting.

Our time in the CUC Fab Lab serves many purposes. First and foremost, it provides us the opportunity to practice skills that can help us with our own making endeavors. It is especially helpful for our project groups to develop a diversified skill set that we can utilize on our semester projects. The workshops at the Fab Lab also familiarize us with the technologies and physical tools available to us. Learning from the staff also helps us get a feel for the greater Maker Community and hearing about their personal projects helped us understand their skill sets and how each of them may be able to help with our projects. Finally, spending time in our own Maker Lab, the Fab Lab, and with all the staff and volunteers gives us a better idea of the Maker Movement that is revolutionizing businesses across the nation and around the world.

Supra

Team Supra’s Concept

As we keep going through the semester, we are rapidly approaching the design and prototyping phases of our semester projects. All of the project teams are refining their “How can we” statements while defining the actual problem they are looking to solve. Our first project idea submission was due on Wednesday of Week 7. To give you an idea on some of the concepts the class is working on, Team IJK is trying to help college students decrease stress by using indoor gardening. Team XNihilo is attempting to have busy professionals or college students drink more water. The MakerLAX is hoping to “help teenagers, young adults, and anyone else who struggles” tie a tie properly. Team Zerott is trying to improve patient satisfaction at hospitals. In Week 8, the project groups will be moving forward based on the feedback they have received. Once again we will be submitting our “How can we” statements, but this time we will include a concept details, key components of the solution, the capabilities of team members, outside resources for skills and fabrication tools, and any information resources identified.

Odelia Code

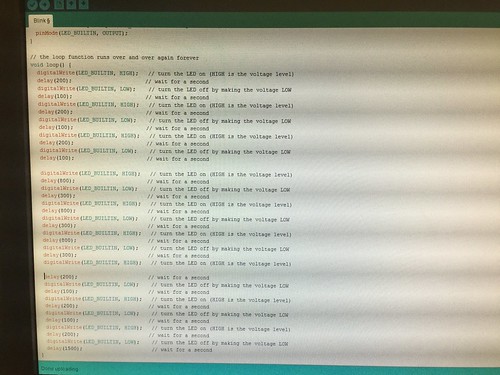
Odelia spent this week in the computer section of the Fab Lab code the Arduino for the Blinker Box. Odelia said, “This was my first time actually seeing a computer board up close and I was definitely quite surprised by how it looked. Personally, I thought that it seemed quite fragile and easily breakable. However, it was quite sturdy and it could hold quite a bit of force. Along with the Arduino board, the following things were included.” After setting up the circuit and trying to adjust the code, she found working with the light sensor was the most difficult part of the lesson. I think many would agree, as the range of values corresponding to which LED flashed depended on the specific sensor and how bright the part of the lab you were sitting in was.

Chase Soldering

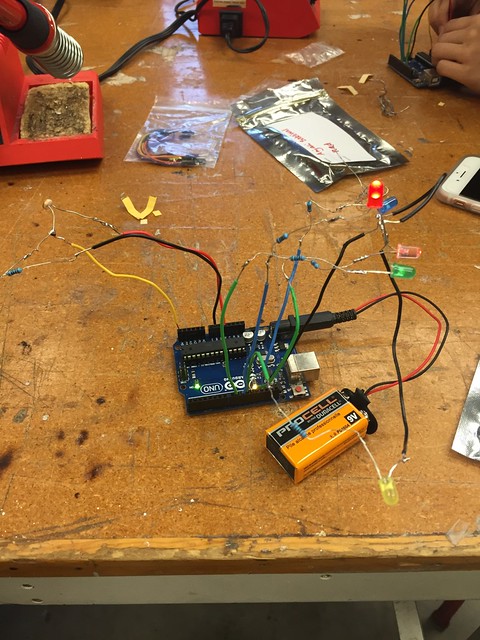
Chase spent the class time in the electronics section of the lab soldering his LED’s together. Reflecting on the class , said “the instructional course ultimately proved to be very time consuming and required incredible delicacy, there is little doubt in my mind that this is a crucial tool in any maker’s arsenal of building tools.” For many in the class, this was their first experience with soldering. However, we all were able to pick up on tips and tricks such as using the “helping hands” or tape to hold wires down while soldering multiple pieces together. By the end of class, Chase and his group mates were able to wire the LED’s and sensor into the Arduino he programmed in Week 6 and the LED’s flashed as planned! Finishing off his post, Chase, like many, said he hopes to “incorporate soldering in some capacity” into the final project.

Kenny Design

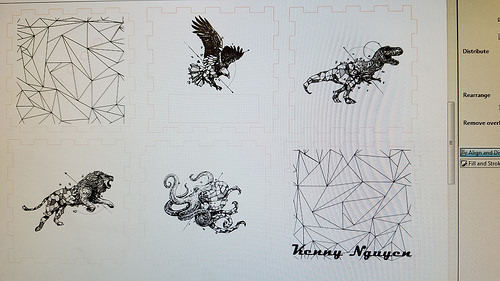
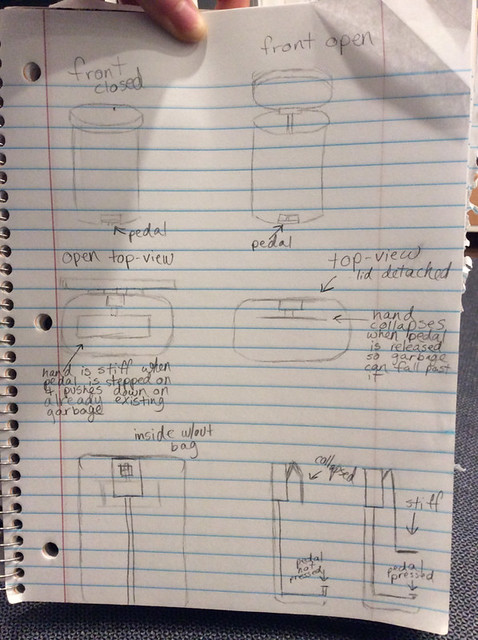
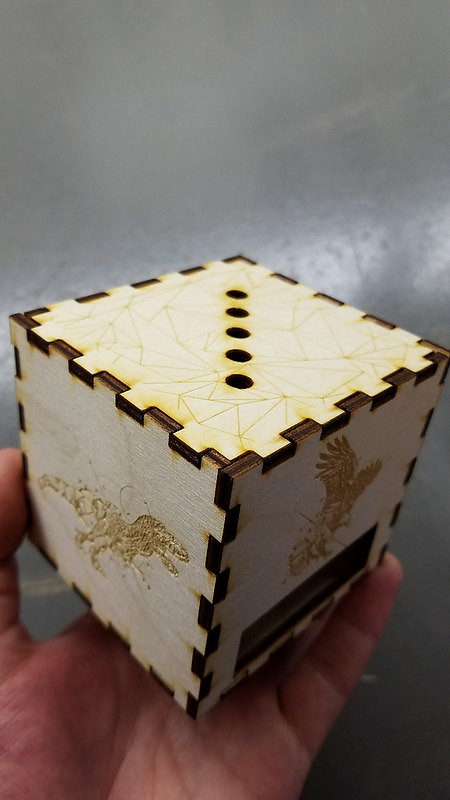
The final phase of the Blinker Box is the making the press fit box. Kenny wrote about using the free Inkscape software to design his box. By taking images from the Internet and vectoring them using the Trace tool, the images became compatible with the laser. Kenny chose artwork from one of his favorite designers to put onto his box. Once it was finished, he said, “It was very rewarding to be able to see something you design on a computer come to life in a matter of minutes. There was something satisfying from watching it go back and for until your vision comes true.”

Kenny Box

All of our blinker boxes are coming together as we build on our skills at the Fab Lab. Week 8 will be the last class session in the Fab Lab but many of us will be back to work on our projects. Happy Making!


Week 2 Summary: Diving Deeper

Week 2, Monday, late-afternoon and the MakerLab is filled with the sonorous sound of the 3D printers whizzing away. Walking into the familiar classroom to not only hear the soothing buzz of creation but also to feel the ambiance of the eagerness to learn and have fun were certainly worth the climb and much-needed exercise up to the top floor of the Business Instructional Facility.

Week 1 was all about settling into the class with an introduction and overview of what “making” with alumni Arielle Rausin and John Hornick. Arielle, a local entreprenuer, talked about her glove business (mainly for wheelchair racing) and how 3D printing enabled her to become so successful in her innovations. John Hornick, the author of 3D Printing Will Rock the World dove into what 3D printing has in store for users in the future and how it changed the way people design, make and interact with the world. This week, we learned about additive manufacturing and rapid prototyping. We had the privilege of listening to the guest lecturer and Director of the Champaign-Urbana Community (CUC) Fab Lab, Jeff Ginger. We also successfully reviewed the two learning objectives: discovering different websites where other people create and share different designs of objects and learning the basics of 3D printing.

To start off the class, we split up into 7 different groups to explore different sites in which different people from all around the world shared their creations. Many of these sites such as thingiverse.com and youmagine.com are open source and let beginners and advanced makers alike share and create designs to tinker with. These sites are platforms that make such “blueprints” easily accessible and have become important in the Maker Movement.

Here are the links to the sites that we explored in this class:
http://www.thingiverse.com/

http://www.shapeways.com/

https://www.youmagine.com/

http://www.instructables.com/

http://www.myminifactory.com/

After going over these online sources, Jeff Ginger talked about the CUC Fab Lab, which is an open and collaborative workshop space for technology-driven innovation and design. The facility and other Fab Labs are central players in the Maker Movement (a social, economic, and political movement that incorporates both technology and DIY culture). Within the CUC Fab Lab, Jeff brought up the extensive equipment such as engravers, electronic cutters, sewing machines, and 3D printers, that enables local entrepreneurs and students alike to create their own products. The CUC Fab Lab also enable and encourages people of all ages and backgrounds to stop by and explore the facilities with the help of the staff and volunteers. One example Jeff showcased was Monet and the Waterlily Friends, a children’s book by Judy Lee, an artist, and entrepreneur, that started at the Fab Lab and was successfully kickstarted. The Fab Lab encourages people to become makers through exploration of the design. You can learn more about the Fab Lab by visiting http://cucfablab.org/ .

After the guest presentation, we learned more about the basics of 3D printing such as the STL file (a file format used in 3D printing). We went onto http://thingiverse.com to find simple objects such as a toothbrush holder, a grocery bag holder, and an Illinois state keychain to print. We used the computer application, Cura, to help transfer the data to the 3D printer (through an SD card).

A 3D printer in action.
Charlene's finished Illinois keychain
In general, the students this week had fun and learned more in depth what 3D printing is. Many of the students before this class never saw 3D printing as something important. For a lot of the students and certainly myself included, this week was the first week we printed. Personally, I was definitely surprised and felt pride and accomplished that I was able to make my own keychain. The following are several students’ views of the course and Week 2’s activities:

“Before this course, I had never realized the importance of the Maker Movement that was being created and developed within the community.” – Charlene


“As we approach week 3 of the Digital Making class, I can say that this class has been extremely enjoyable thus far. There have been many things I’ve learned already and this is coming from someone who was going to buy a 3D printer about two years ago.” – Jorge


“Mesmerized by the 3D printer in action, buzzing away as it slowly built my model one layer at a time, I certainly felt like I was a little kid again.” – Tiffany

Before the class meetup, we were also required to read The Maker Mindset and Neil Gershenfeld’s “How to Make Almost Anything.” While Gershenfeld raised more legal and moral concerns regarding the printing and possible fabrication of designs, The Maker Mindset took a more positive approach in commending how the Maker Movement transforms education by challenging and offering limitless opportunities for students to innovate and create their own objects. Personally, this hit a chord with me and reminded me that while this course encouraged us to push for creativity, challenge our thinking, and succeed in our projects, it was also an opportunity to fail and learn from mistakes. Many courses in the business school do not allow a lot of buffer room to make mistakes, learn from them and redeem them. Yet, after just week 2 and being able to observe not only an excellent professor with over 10 years of teaching, 4 of those years as the director of the Illinois MakerLab guiding us, but also being able to have hands-on experience and first-hand accounts of the digital making process, this class has already surprised me and have definitely spiked my interest. I am sincerely and genuinely excited to see how this class will shape and mold us into the creative and innovative future generation. I hope that in Week 3 will be just as enticing when Design for America presents about Design Thinking.

If you want to learn more about Week 2 and are interested in what individual students learned, here is the link to the Week 2 reflections:

https://publish.illinois.edu/digitalmaking2017/category/week2/