Soldering at the FabLab

After last weeks lab session where our group wired a breadboard and uploaded our code onto an Arduino Uno, the next step was to set stone our circuit design with the help of a soldering process in which wires are joint together by melting metal. Our task was to wire up the LED’s and the photoresistor so that they have fixed joints and can be easily wired into the arduino board. As we sat around the table with soldering machines and wires in front of us, we were pretty overwhelmed and somewhat scared about using the solder as even a small touch of it onto our skin could result in a 2nd degree burn. Some of us used “soldering helping hands” helpers to keep our wires fixed in place while soldering them together as shown in the picture below. Due to the delicate nature of the soldering components and wires the helping hands proved to be very useful in keeping everything stationary and out of harms way.
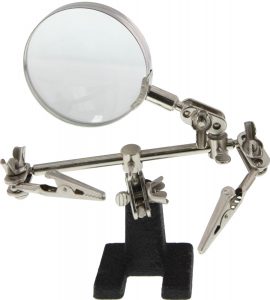
Soldering basically uses a hot iron rod and a solder flux (a metal with a low melting temperature) to join two wires or two metal components together. The hot iron melts the flux in between the junction of the two metal components and quickly solidifies thus keeping them in a fixed state. Due to the fluxes metal characteristics it does not impede the flow of current in the circuit. The instructor was incredibly patient and helpful as she guided as through each of the soldering tasks. I quickly realized that soldering was an art form of its own as it required immense precision and concentration. The worst part about the soldering process is the smoke which is given off when the flux melts and it can be really suffocating at times. Due to this we took a 15 minute break to clear the smoke and also to rest our eyes.

Finally after soldering and wiring the arduino to our LED’s we powered it up using a battery and yes it did light up! In the video here, you can see the LED’s light up when my hand is close to the photoresistor and vice versa. The next step of the project is to laser cut a wooden box to house all these cool LED’s.

**Here is a link for beginners to learn more about the soldering technique!

Arduino Testing and Experience

This was week two in the Fab Lab. My group, group White, was switching from laser cutting to coding and testing Ardiunos. I have had very little experience with coding and zero experience with Arduinos. I was not sure how this would go.

The first thing we did was grab the box we had laser cut the week before along with the pouch that would help us assemble our Arduinos. Each of us sat at a station with two monitors. On one monitor we pulled up a slide show that would help us follow along with how to code. We ran a series of tests to make sure our Arduino would function properly. I found the most difficult part of this process was figuring out where exactly to place everything on the bread board in order for it to work. Luckily the final product turned out!!

When I looked more into what kinds of things arduinos are used for, so many things came up! Something that stood out to me was a “smart house” controlled by arduinos. At first, my mind immediately went to the Disney movie “Smart House” that was created in the late 90s. When I read into it, I found out that arduinos control more of the environment of the house. For example, controlling the internal temperature of the house, letting know which windows are open or closed, or which doors are locked. These are small things, but they are helpful. Every time my family and I leave our house, we ask the same questions. We are not for sure we locked all the doors, turned off all the lights, or even made sure the stove was off. An arduino for our house would be very convenient. We would not have to wonder and would have the answer at our fingertips by checking our phones. Click here to read more about smart houses.

I am curious to see what arduinos hold for the future. I know I have only recently had experience with probably one of simplest functions of an arduino, I was amazed. I have never made something that was motion sensitive. I think exposure to arduinos will broaden our ideas as a class for our development of our products for Digital Making. This could make something touch sensitive or notify you what the temperature is. Arduinos can upgrade an idea that you may of already had!

More Ways to Make

Last week, we had class in a different setting. A similar, but different setting. Just east of the BIF is the Fab Lab. Here is were we were introduced to more opportunities of making. I feel that the introduction to this lab will broaden our thinking.

Jeff Ginger, who had previously visited the MakerLab, showed us around the Fab Lab. We started in the front left side of the lab that contained computers. They seemed similar to the computers in the MakerLab with the tapes of software. Also in the front of the lab were 3D printers. Some were less sophisticated than the printers in the MakersLab, some were more sophisticated. They also had a section in the lab dedicated dedicated to playing with different types of materials. They had backpacks and plush toys that they had designed. As you move further through the space they are messing with many other things such as other electronics and teaching others how to make!

The Digital Making class is going to be having class at the Fab Lab over the span of three weeks. Our project teams are split up into three different activities. Last week I was in the laser cutting wood activity. I had zero experience with the software we used to prepare our wood with our designs. The software we used was Inkscape. This software was tricky to use at first, but I was able to get the hang of it. We were going to make a box with our own designs on the side. Once we completed our designs we could start laser cutting. One thing to watch for when the laser is cutting the wood is if the wood catches fire!

Laser cutting wood has many advantages. One advantage to laser cutting wood is that you can make a prototype of an idea you have at a very low cost. I had laser cut before at an engineering camp(GAMES Camp) when I was in high school. When I attended GAMES camp at UIUC in the Summer of 2014, I was on the GBAM track. GBAM was the Mechanical Engineering track at the camp. We were given a task of designing an new innovative design of a wind turbine. We laser cut our wind turbine panels and then created curved panels out of purple duct tape. Then the base of the turbine was made out of PVC pipe. This was my first experience using this type of making. Even in 2014 I was making!

Wind turbine design from GAMES camp 2014