Digital Making Log: Week 3

Design for America (DFA) visited our class this week for an extensive workshop on how designers get from a problem, to an idea, and to a solution. We implemented the same processes the professionals use, and started out by watching this video:

It’s pretty fascinating. They sniffed out all the problems consumers had with the traditional shopping cart, came up with solutions for each individual problem, and synthesized a good final product that addressed everyone’s concerns. The most interesting thing to me about this video is the actual processes they used: post-it notes and a constant, unabashed flow of ideas.

Our workshop took on pretty much the same format.

– We were given a problem (distracted driving)

– We were given research testimonials (people talking about how distracted driving affected them)

– We went on to do our own research with questioning our classmates

– We came together as a group to share the problems we found, from boredom to the necessity of using a smart phone GPS

– We came up with a slew of solutions, ranking the feasibility and consumer desirability of each solution

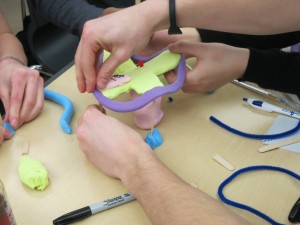
– And then we (my group) came up with a product that incorporated the solutions, prototyping and demoing it for the rest of the class (see the picture below for one group’s prototype)

Photo by Zong Ze Chua

Photo by Zong Ze Chua

My group had a less photogenic prototype: A sheet of paper representing a windshield that was gamified and interfaced with the driver’s smartphone.

So what?

I never knew the actual processes of design, as I said in my last post, I’m a journalism major and haven’t really done anything with design. Now that I know how the pros do it, I think I have what it takes to come-up with a problem consumers have, and print a solution to that problem.

Looking toward the future, I’ll keep an eye out for problems I run into that could be solved with some ingenuity and layered plastic. I’m still pretty ignorant on the technical skills necessary to model, so I guess my next step is to focus on that while I ideate.

Digital Making Log: Week 2

I walked into this class without knowing anything about modeling, and after this week, I think I can safely say I know a little more than nothing: I’ve learned how to think in a maker mindset, something not easy to come by given my area of study (journalism).

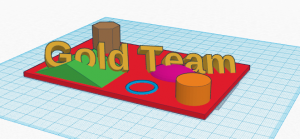
We got to play around with Tinkercad.com, a very basic platform for modeling with preset shapes that can be scaled, cut, bent, etc. I ended up piecing together a nametag for my team (gold team), and using the “box hole” feature, I was able to angle the words without having a failed print.

Well, without having more than one failed print. Ha. Below is what I made.

Gold Team rules

This was just an exercise to get us exposed to modeling; the harder stuff comes later. And I can’t wait.

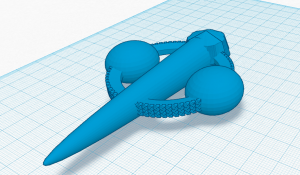
Just using some free time, I modelled a sci-fi space ship with the existing Tinkercad shapes. I had to use a wheel preset, so it doesn’t look all that cool.

space ship

Notice there aren’t really any engines, or any jagged details, like a torpedo bay. No discernible bridge. The eventual goal for me is to have the modeling skills to make fleets of ships that I’ve been working on with graph paper for my entire nerdy adolescent and college life. They’re a lot more complex.

Another component of week 2’s class was an introduction to 3d modelling sharing sites, most notably, thingiverse.com.

I found four really cool things that I could use in my life and I’ll list them for you now:

Settler of Catan replacement pieces

This is something very essential in my life, as I have lost a few wheat pieces to my set. One thing I might tweak with this before I print it, and presumably learn more about modeling, is beef up the terrain. Whoever made this took care to make what is normally a 2d landscape in normal Catan, to a 3d, much cooler landscape. However, it still took on the same look as the 2d pieces, down to the location of the wheat farms. Me, I might want to add a river, or a dinosaur. The possibilities are endless!

Tri-dimensional chess set

As a trekkie, I’ve spent a large part of my life wondering how the hell people in Star Trek play 3d chess. When I looked into buying a set two years ago, the cheapest one was $300. With this print, it would come out cheaper and look a lot sleeker, with custom colors even. The only thing I would change: I would probably put Vulcan ears on the pawns, just to be cute.

Batman shelf

I’ve been deprived of a night stand for two consecutive years of my college career. To one side of my bed, there’s a book shelf, to the other, there’s a wall. I’ve had to put my alarm on the other side of the room, and let me tell you, snoozing that in the wee cold hours of the morning is pretty brutal. Having this shelf on the wall slightly above my bed would make life quite easier, though I think I would have to increase the width to make my clock fit.

Saturn V rocket

The Saturn V rocket seems pretty essential to me, maybe not so essential to most other people. As someone who wants to make a hobby out of printing spaceships, I’d be remised if I didn’t include her in my collection. The only improvement I could make would be a launch pad.


14 tips that will help your maker post succeed

When it comes to writing for the internet, you have to always remember that lolcats.com is just a click away for your reader, so when it comes to blogging, generally the quicker you get your ideas across, the better you’ve done.

Readers of the internet like gleaming the meaning of a story from its words, so they don’t necessarily want to read every word in a sentence. You have to construct your narrative so that the important stuff sticks, which is a tricky thing to do.

You probably “skim” all the time too, right? So intuitively, my first piece of advice would be to write for yourself – write in a way that would keep you tuned-in as a reader.

Outside of that, here are some guidelines:

  • Don’t be afraid of using bullets. If you have a list of things, particularly things that need to be explained, use bullets. Throw in some bold if you’re feeling extra fun. Readers like seeing a change in format. They like knowing what the key concept is, and what they can glaze over.
  • Keep paragraphs short. In journalism, we drop the prefix from the word and refer to them as just “graphs,” just a fun fact I thought I’d share. The idea is that you give the reader some breathing room, and additionally, access points for when they jump ahead.
  • Inverted pyramid. So along with the previous bullet, try and structure your graphs like this: 1st graph should have a hook and something that explains what your post is about. The 2nd graph should follow that up with more details. Then you get to the meat of your story, and with these graphs, try to move what you view as important up.
  • Use subheads. It helps organize your story better.
  • Hyperlink important things. This helps you seem more credible, and makes you a resource for your reader. It helps to add some depth to your blog.
  • Have a “flow.” You know, transition from paragraph to paragraph. Don’t use “First” or anything like that, just flow from concept to concept. Try to end your sentences in a way that leads into your next sentence.
  • Be concise. If you don’t, the reader will think you’re grasping for word counts.
  • Share anecdotes. Just be sure you’re telling them in an interesting way, like with quotes.
  • Be conversational. It’s a blog, not a report. Directly address your audience, ask rhetorical questions, etc.
  • Explore different formats. We’re all familiar with the Buzzfeed list format that’s taken the internet by storm. I mean, even the Weather Channel has them now. It takes on a completely different format than your standard blog, but it works. Imagine “7 simple steps to make your very own ____.” There are other formats out there too, just look around and be creative.
  • Use extra elements. WordPress allows you to not only upload media, but also to imbed using the text feature. The class itself has a limited amount of server space for our photos, so we probably could only post a couple per story, depending on size. However, we are allowed to embed. You can upload a video to Youtube and embed it onto your blog. You can also upload your photos to box and embed a whole slideshow onto your blog. You can even imbed Spotify playlists.
  • Market your content. Every writer is their own best salesman. Write your story for a particular audience, and then market it to that audience. Post it to twitter and use a trending hashtag in that audience, and at least post it to your wall for your friends and family.
  • Optimize your headline. Essentially, label your post something with words you think your audience would Google. So if you’re blogging about your favorite beat recipe, label it “The Best Beat Recipe.”
  • Add tags. Search engines use tags to help searchers find what they’re looking for. The more specific your tags are, or the tags that you think most people would use to find a story like yours, the better your post will do. Also, always add a tag for whatever week you’re post is going in, like “week2.” You can add tags on the sidebar of your post page.