About Brian Kobiernicki

Brian is a junior studying Information Systems & Information Technology and Business Process Management. On campus, Brian is President of the Association for Information Systems. Last summer, he interned with W.W. Grainger, Inc. as a Business Systems Analyst and will be returning again for Summer 2017.

Design and Build: Learning to Use Fusion 360

Screen Shot 2017-02-17 at 5.03.53 PM

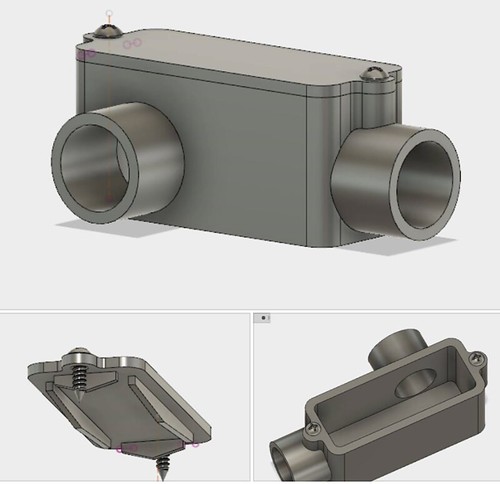
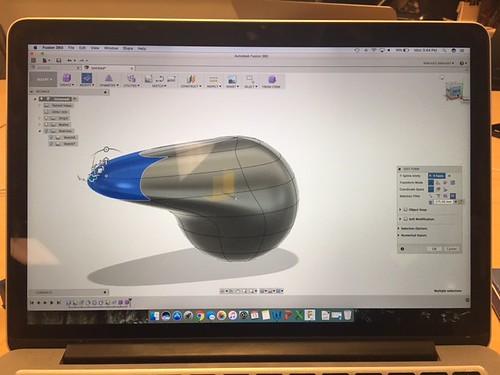
This week, we take a step further into product design by learning how to use Autodesk Fusion 360.  Luckily as students, we have free access to Fusion 360, a tool we all found to be quite powerful and intuitive.  Prior to our class session we were able to follow a series of tutorials to become familiar with the software, and I was proud to finish this model before class.  I really enjoyed playing around with the software while learning its capabilities.  In our class session, Jeff Smith, an Instructor from Autodesk presented to us and taught us how to use many of the features of Fusion 360.  Following Jeff’s presentation, Dot Silverman came and presented on her work with Biohacking.

As with many software programs, Fusion 360 is a very powerful and complex program.  Initially, it can be difficult to navigate and to achieve your desired outcome in design.  However, once you become more comfortable with the program, designing can come naturally to you.  Playing around with the tools has been really helpful in learning how to properly use the software, and I found the tutorial videos very helpful.  I also found this slide deck which gives an overview of how to use many of the tools in Fusion 360.  I personally am a big fan of tutorial videos and slide decks as I can go through them many times until I fully understand each step. Something else I have already realized is that there are many design implications to keep in mind when designing for 3D Printing.  This article gives a brief overview of mistakes to avoid when designing.  Many of these echo what Jeff mentioned we must be mindful of when designing in Fusion 360.

IMG_1025

Moving forward in the class, our group is approaching the point at which we will need to start designing on our own.  We all need to learn and practice using the design software, 3D printers, and the many other technologies and machines that are available to us.  We want to make sure that our design is desirable, viable, and feasible.  We need to be sure that our design is logical on the screen and in its physical form, so being comfortable with the design software is paramount to our success.

IMG_1026

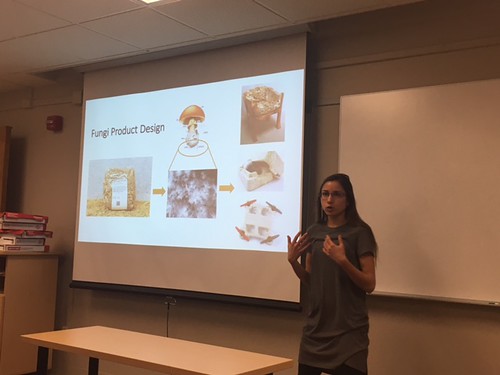
Unfortunately we did not have much time to cover Biohacking in class,  Dot introduced us to the concept of biohacking which could involve anything from product manufacturing to medical uses.  This article gives many examples of how makers can “biofabricate” clothes, furniture, and other special materials to turn manufacturing into a more sustainable process.  As we continue to evaluate future implications of making and 3D Printing, biohacking will become a major discussion point.

Product Development for the End User: Define, Design, Refine.

This week in class our group of makers completed a design workshop hosted by Design for America at UIUC.  Working in our project groups, we were able to work through a design process starting from basic guidelines and ultimately present a final mock prototype.  Towards the end of our class, we also learned how to use Tinker Cad to design our group logo’s and print them at the end of class.

IMG_1015

In the Harvard Business Review article “Design Thinking”, Tim Brown discusses the mindset needing for designing.  In order to successfully design a product, you need to be able to design for a purpose that people would find useful.  This mindset can be defined as “a methodology that imbues the full spectrum of innovation activities with a human-centered design ethos.”  Brown attributes Thomas Edison’s success to being “able to envision how people would want to use what he made” and engineer toward that insight. In order create a successful design, you must have a specific problem or task at hand to which you are trying to solve.  This allows the design to be more useful and applicable to consumers.  Additionally, Dr. David Weightman, Professor of Industrial Design in the School of Art + Design says that a design must have desirability, viability, and feasibility.  This means that a design must be human centered, it must be able to follow a business model, and it needs to be physically and technically possible.  Personally, I think too many people try to come up with an idea and then find a market to sell it to.  However, we now know that the process should be reversed.  Determine the market, identify a problem, then create a solution.

In the Forbes article, “How to Use Design Thinking and Agility to Reach Product Development Breakthroughs”, Steven Widen says that often product teams fail to find a solution to their problems because “they never involved the end-consumer in the process.  That’s where design thinking comes in.”  Instead of looking at data or their own processes, designers need to “focus on the problem from the consumer’s perspective.”  Designers should ask “Why?” at every step of their brainstorming process.  In the business blog post, “Design thinking for a competitive advantage” published in the Times of India, Dr. Mayank Dhaundival says “Design thinking is a structured approach to finding innovative, out of the box solutions to multiple types of problems.”  Rather than focusing on the problem, it focuses on the solution.  Dhaundival continues to say that design thinking removes constraints until you can narrow down choices or ideas to fit the reality.  Similar to what Brown says in “Design Thinking, Dhuandival says design thinking gives a lot of importance to prototyping, and that also of the rapid variety. The initial prototypes are not the well-made workshop prototypes but much more modest; the ones made by chart paper, tape, scissors and colour pens.”  Again this is where 3D printing is advantageous.  Once you have access to the proper equipment, there is a low cost of failure and it is possible to rapidly design and refine products for testing.

IMG_1021

Although our workshop with Design for America had us create unrealistic products, the same concepts hold true.  Before you can come up with a design, you need to have a specific population and a specific problem to solve in mind.  As you design the product, it needs to be realistic and be able to be manufactured, and it needs to be profitable.  Fortunately for us, our access to the Maker Lab and CU Fab Lab allows to rapidly design, create, and test prototypes.  Regardless, It is important for us keep desirability, viability, and feasibility in mind throughout the entire process.  Going forward, the readings and the workshop will guide our group, BCC Creation, in our semester project.


3D Printing and the Future of Making

Image

Our group of Makers is quickly diving into the world of 3D Printing.  In our second class together, we formed our project groups and began learning our strengths and interests.  I am excited to see what ideas Carter, Charlene, and I will pursue this semester.  For the three of us, this is our first experience with 3D Printing.

For me, learning about the entire process from concept development to design to final print is what motivated me to take this course.  With no prior knowledge or experience, I felt naive walking into the Maker Lab for the first time.   It is fascinating to think how the same technologies are being used right now to revolutionize manufacturing, medicine and healthcare, and so much more.  However, what I soon learned is that Making can, and should be, a collaborative, continuous learning process.  I was truly surprised by the extent to which the Maker community collaborates and shares.  Certainly this can have legal implications for intellectual property as 3D Printing becomes more ubiquitous, a topic that we discussed in class.

In “How to Make Almost Anything,” Neil Gershenfeld discusses moral and legal concerns regarding 3D Printing and fabrication.  With Fab Labs appearing around the world and 3D Printing becoming more assessable, intellectual property is at risk of being stolen.  Besides that, some are even concerned that these machines may soon be able to self reproduce, resulting in “gray goo.”  Gershenfeld calls this “doomsday scenario” where these machines could multiply out of control and consume all available resources.  However, many dismiss these claims as unlikely.  In my opinion, I believe we are far away from that becoming a reality, but I understand why some have called for increased regulation on 3D printing as it can be used for illegal activities.  Regardless, everyone could benefit from viewing 3D Printing and all of Making from multiple angles.

In The Maker Mindset”, Dale Dougherty says that “the biggest challenge and the biggest opportunity for the Maker Movement is to transform education.”  Listening to Jeff Ginger, Director of the CU Community Fab Lab made me realize that the transformation has already begun.  Making gives people of all ages the opportunity to think creatively, problem solve, and develop new skills every day.  Listening to Jeff also helped me get a better understanding of how I should approach the course.  It is an opportunity to learn, experiment, succeed, and yes, even fail.  I am really excited to have so many machines and technologies at my disposal and by the end of the semester I hope to be more confident in my making abilities.

With websites like Thingiverse and YouMagine, the community of Makers can create, modify, and share designs instantly.  At the end of class, within 10 minutes of time, I was able to find a design, download it, and begin printing on the Ultimaker 2+.  After about a half hour of printing, I had my first 3D Print, a replica of the Lion from the Art Institute of Chicago.

After looking through the sites, I have found a number of practical items that I could print and use in my own apartment.  The first object I chose was a spice rack.  Sharing a small kitchen with three other roommates can mean cabinet space is at a premium.  To improve this design, I would add brackets to hang the rack from the cabinet door instead of having to attach it to the door with screws.  The second object I found was this cable saver.  My chargers often fail because the cords become frayed,  Hopefully, this would prevent the cord from fraying.  I would add length to the saver and make it bigger so that I could aslo use it for my laptop charger.  The third object I would use is this earbud holder.  Every time I walk to or from class I have to untangle my headphones before I could use them.  I like this design, but I would take away the movable covers because I personally don’t find them necessary.  A fourth object I would use is this iPhone charging station.  Printing my own would be much cheaper than buying a “real” one, and I wouldn’t have to leave my phone on the floor to charge anymore.  I would make the base bigger so that the cord does not bend too closely to the end causing it to fray.  With these ideas in mind, I am starting to see how I can come up with my own ideas and prototype my own in the Maker Lab.  I am excited as we continue on towards design!