Semester Wrap-up


Ran Jin & Jiaqian Claire Chen


Idea Inspiration

Jin Ran and I get our inspiration from a Youtube video in which Mike Francesa spilled soda all over the desktop during his radio talk show. As a naughty girl growing up, there were countless times I spilled my drink all over the place. I personally found it very easy to spill your drink when you are concentrating on other things, like when you are typing a report on your laptop. So we came up with this idea of adjustable can/cup/bottle holder that can fit container that of any size and that can even charge a cellphone. The designed main function is to hold the container stable on the desktop.

Initial Design

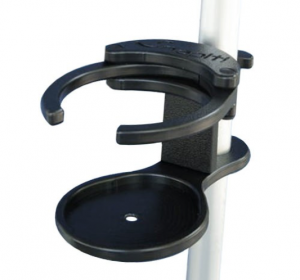
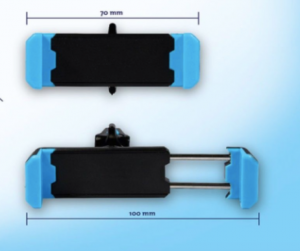
After exploring more about charging function and adjustable structures and considering our time budget, we decided to lower our expectation to design and print an adjustable cup holder that can fit most common-sized cans. We looked several existing products online (as shown below) and accessed their doability. For the first existing product, we were worried that if 3D printing out the sliding arms, the friction at the touching parts would be too big to allow the arms to slide out smoothly.  For the second existing product, even though it’s a very good bottom part that can fit a lot of different-sized can, we need a vertical supporting structure that can change corresponds to the bottom, and we didn’t come up with a doable idea and we decided to look for more designs.

455123


Design Process (C&R)

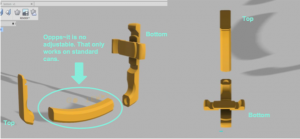
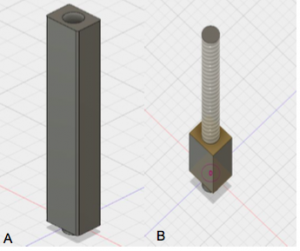
To create our own design, the initial step we did was collecting a variety of cup/can holder models from thingsverse.com. After analyzing the pros and cons of those projects, Clarie and I start to sketch the design on the paper. Later on, we transfer the final drawing to Fusion 360. The first prototype only works for standard size can because we ignore the large size drinks, such as Monster Energy or Arizona. Hence, we redesign the vertical holder part to be more adjustable so that it can fit any height of cans. Thanks to the suggestions from our classmate, we solve this problem with a spiral structure design. Part A applies for general size of cans, and depended on needs, Part B as a complement to adjust the height of Part A.  

IMG_1641[1]

ll9


Difficulties and Challenges

The most challenging work of completing this project is utilizing Autodesk Fusion 360 to design the model. We are the beginners to learn this brand new software, although the course offered two relevant workshops to help us get familiar with the interface. Particularly, in the beginning, we spend lots of time and efforts on creating and modifying models. Thanks to the collaboration feature of Fusion 360, we are able to work individually on each small part and combine the designs together. However, the shortcoming of this feature is mismatching the sizes or measurements when we work separately. Another difficulty that we confront is size differences between the design and printing versions. For example, the diameters of the joint part are 10 mm on Fusion 360, but the printed sizes are changed somehow because these part are either larger or smaller to fit together. Last but not least, during the 3D printing, we find that there are several failures happening; particularly, the shape of the vertical holder is messed up due to the need of support.


Alternative Design

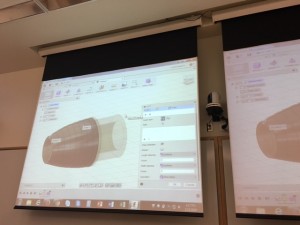
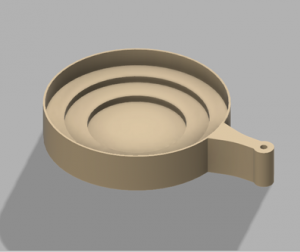
After printing out all the  component parts, Jin Ran and I explored more in the Fusion 360 software. We found Fusion is a very efficient tool to design simple but useful everyday designs. For instance, if you want to design a cup holder, you can easily create one that is good for three different sizes by just using the cylinder and extrude function. (See below) We human once to live in a way that whenever we need any tools we make them, now I think it’s a great time to inherent this spirit given the presence of 3D printing technology.

77

Summary

The goal of our project design is to build an adjustable can/cup holder which will give the users the best drinking experience. The design should be comfortable and user-friendly for daily usage. The project also tries to prevent the issue of freezing hands when people hold cold drinks. In addition, the temperature sensor works as a reminder to help the users be healthy. The major reason why adding the monitor on the can holder is that cold drinks decrease human immune system function according to health researches/studies. Furthermore, long term taking cold drinks shrinks blood vessels and impacts digestion system. Therefore, with the temperature sensor add-on design, users could easily find out the optimal time to drink the beverages. Additionally, our design is strong and stable enough to protect personal property safety caused by spilling.


Takeaways

This project not only gives us a good learning opportunity to get hand-on experience on product design and 3D printing, but also inspired to use technology in solving small problems in our daily life. Although the current model we have is not perfect because several improvements can be done in the future, we still believe that the can holder is a meaningful product which makes drinking easier and safer. Design For America-UIUC workshop encourages us to brainstorm the idea, and Fablab workshops motivate us to make it practical for daily usage. In addition, we realize the importance of using a simple and creative design to solve difficulties through this project. A simple design and a small correction of existing design can make a huge impact on individuals and communities.


Completing our prototype, we try to self-questioning and think about future improvements to make the can-holder and even 3D printing become better and efficient. First and foremost, during the printing process, the printers do not function very well since the the object fails two times. Fortunately, we break down the design into couple of parts which allows us to print separately. However, unnecessary material and time waste still happen in this case because if the project fails in the progress, we have to restart it in the beginning. The possible solutions on this issue include perfecting design in advance or increasing the functions of 3D printing machines. In addition, one thing we should take care in the future is having a product design plan before starting the project The plan covers details on different stages, such as define, ideate, prototype, build and analyze. Without a successful plan, it will be difficult for each team member to follow the instructions and make right decisions. Lastly, focusing on the project itself, we would like to continue to work on the design by adding other useful features. For example, the product is able to collect the energy from drinks (hot/cold) and convert into electricity for cellphones, watches, any USB applied products. The holder is a sustainable design that transfer energy and also be able to collect water on cold drinks due to liquefaction. Another interesting function we are discussing is adding the bluetooth design that connects to phone or car. Similar to the popular sports bands, the can holder could provide personal drinking and health records.


Week 12 Reflection + Project update

This week we had a guest speaker from Indiana University MakerSpace to introduce us some of their current equipment and products they have made. The MakerSpace of Indiana University is of a more comprehensive setting compared to the 3D printing Lab we have in the business building. But by having 3D printing Lab and C-U FabLab separated, I guess U of I will be able to satisfy larger student demands. Anyway, I am very excited to see the technology I am so interested in gaining more and more attention. After skyping with the guest speaker, every group gave a brief presentation about their semester project. Our group project is to make a adjustable cup-holder, and after listening to my introduction, my classmates generously offered their knowledge and Vishal also suggested us to find something that would adds more value to the final product. I really appreciate everyone’s suggestion.

For our group project, we(Jiaqian Chen & Ran Jin) already ordered a temperature sensor from ebay and the basic/fundamental model is already made in Fusion360. The plan for next week is to change the middle part of the second photo to a adjustable structure, something like a 3D spiral. We are also going to figure out how to adhere the sensor to the entire structure.

IMG_1640[1]IMG_1641[1]

Individual Assignment Week 10 Summary- CUFab Lab Workshop III

As the third and final week our class spent at the CU Fab Lab, we students were divided into 3 groups and explored Arduino, Digital Embroidery, and Laser Cutting respectively. I am going to skip the description of procedures since Andrew already covered those in his Week 6 summary. Instead, I am going to present some of my classmates’ work/creations and provides some extra resources and personal thinking about each technology.

Arduino

Harina Jayswalby Harina Jayswal Abhi Mahendrakar by Abhi Mahendrakar

This is a YouTube video about “How to Program an Arduino”, and you can also find tons of resources about Arduino programming at this online learning community https://www.arduino.cc/en/Tutorial/HomePage

Digital Embroidery

Lois Holmanimage by 

Digital Embroidery is such a efficient tool to realize simple designs mainly for aesthetic purposes. As we designed and printed our own clothing patches, it is clear how this technology helps to achieve affordable individuation. But I can’t stop wondering how this technology would influence embroidery art, which is indeed an intangible cultural heritage. Currently, thousands of people in Asia and some ancient tribes make livings by selling hand-made embroidery artworks. And it usually takes them days to complete one small piece because embroidery by nature is very time-consuming and requires a lot of inspiration and artistic talent. Digital Embroidery technology, is massively applied in production, will cause the price of embroidery artwork to steep decline and even cause the extinction of embroidery art.

mp15437367_1431924226253_1_thimage from baidu.combaiduimage from baidu.com

Laser Cutting

2016-04-04-16.05.13-300x169by  kkby Jin Ran

Here is an article about Laser Cutting techniques and projects http://makezine.com/2013/10/23/tutorial-laser-cutting-techniques-and-projects/. Like Digital Embroidery, Laser Cutting technology is more useful in serving aesthetic purpose as of right now. We as students and digitalmakers should definitely explore more of its functionality.


Week 11 Reflection

This week we were finally back to the MakerLab in BIF doing a 3D scanning workshop. 3D scanning & printing is kinda like a reverse engineering for what we had been doing so far, and its current major application is more on the medical field I assume.

First we were divided into groups of 2 people, one person hold the scanner to get the meshes picture of the other’s head. There were 2 scanner we used, one is plugged into an ipad and one is connected to a pc, and it turned out the ipad one actually worked better and was more convenient. Second we moved the file from the ipad to our computers and open the file in Meshmixers, which is also a software developed by Autodesk. Meshmixer’s function is quite similar to Fusion 360, which allows you to make adjustment to the scanned image. In my case, I want the exact scanned model so I didn’t make adjustment. The third step is just the same as in any 3D printing. You just open the file in Cura, select the appropriate size/printing speed and everything and then import the data to Ultimaker machine to print the object.

IMG_1386[1]IMG_1394[1]IMG_1392[1]

I think 3D scanning technology can make a lot of difference in the medical/surgery treatment. There are car accidents everyday and people lose their arms/legs because of that. By using this technology, people can get artificial limbs that matches better.


Week 10 Reflection

This week the six of us get to explore laser cutting, which is quite eye-opening because I have only heard laser tech’s application in organ surgery but have never actually seen a laser cutting machine before. This week was the last week that we spend at the Fab Lab, and I just want to thank the people there, for how they have been helping us to get familiar with various interesting technology.

To laser-print, the first step is to design what you are going to print. You can either download a silhouette image or you can design your own image on Inkscape. The instructor Duncan said there are other similar software but he thinks this one is probably easier to use. For me, I downloaded a Chinese Dragon silhouette image (which represents power and positiveness not evil) and used Inkscape to clear the lines to make it easier to print. Second, you get to choose a object for you to print the design on. I chose the front cover of a notebook. Other people chose wooden plate to make a key chain. You can also print the design on a bottle, you can basically print it on anything as long as you know what the object is made of so when melted by laser-cutting machine it won’t be toxic to those in the same room. The last step is just copy the design (in pdf ) and bring it up on the laser-cutting computer and place the object in the machine, and it will just start printing for you.

I think the best part of the class is that we are introduced another tech that is so close to our daily life. I can’t tell exactly how it’s going to change my life. But I want to say life about accumulating inspirations, and I can at least make my personalized notebook covers!

IMG_1201[1]IMG_1202[1]IMG_1203[1]IMG_1212[1]


Week 9 Reflection

This week we had a quite challenging assembly workshop at the BIF atrium.  My group’s task is to build a 3D printer out of a knit. Frankly, at the first sight, I was thinking there is no way that we are going to put it together during the class time because there are literally hundreds of different pieces: things like wooden joint parts, nails,wires. It turned out I was not wrong, but we did accomplish way more than I expected.

One thing I learned from the assembly process is that it is so important to have step-to-step instruction that pertains to the exact printer we assembly. The instruction we had was a out-of-date one, so it was very confusing at certain points where the way things were put together already changed from version to version. The other thing I have learned is that it is probably not a good idea to have more than 2,3 people to work on the same part. Once there is too many people, efficiency starts to decrease, but I do appreciate everyone’s spirit in wanting to contribute.

I guess after this workshop I have more respect towards industrial designers and towards technology. Those people are definitely genius and they are able to design such meticulous structures. And I will definitely appreciate the fact that I can just buy complicated machines such as personal computers and stuff instead of having to assembly them myself. I guess now when my computer or ipad failed, I would probably have less complain because it’s just not easy to put everything together and making sure it will be working perfectly.

IMG_1106[1]IMG_1105[1]IMG_1104[1]

Week 8 Reflection

This week we learned how to soldering electronic kits with Mitch Altman. Mitch is a really cool guys, he is the founder of “TV B Gone” and had this remote that can turn off any TV at public space. I really admire his spirit. He is really a practitioner that every time he feels like to do something he makes it happen on his own.

As for the technical stuff, we basically used a soldering iron (I forgot the name) to melt a lead stick in order to adhere the electronic kits with the circuit board. This process answered my question since the ardorino workshop, by then I was wondering what are those silver little dots that looks like mini Hershey chocolate. The soldering process even though is quite straightforward, it do takes a lot of practice. First because the soldering iron is super hot so that there is only certain ways you can play with it. Second is that the circuit board is just too small. Third is that you sometimes wish you have a third hand to hold those irregular-shaped kits in place. Anyway I enjoyed the whole process, and I am very glad it finally worked. The LED lights changes to red color once my fingers gets closer to it.

I think able to soldering is very useful. Even though say embroidery skills is great, but soldering allows you to create something that answers to your action, and that’s a whole other level of human technology. (No offense to embroidery) I would also imply this sensor/detector tech to my semester project, and right now I can even solder the sensor kits myself. How great is that!

IMG_0940[1]IMG_0945[1]

Week 7 Reflection

This week, our group got to work with the sewing machine. It was very exciting for me because I am the type of person who have never made anything on my own hand even though I do think I have a artistic talent.

In order to “print” on the embroidery machine, you first have to pick the picture your want to print, you basically download a jpg/gif document on the internet and then open it on a software named “SewArt”. Using that software, you are able to decide on the printing size, reduce the number of printing colors so that the machine would be able to do a better job, and also merge/delete some tiny parts that won’t necessary have an impact on the whole picture. I have chosen a picture of a very cute monkey for this time because this year is the year of Monkey in China.

Once you are done with editing the picture using SewArt software, save it as a spe document and copy it to a USB drive and them paste it to the computer that is connected to the sewing machine. And then the sewing machine will be able to read from the computer and start printing your stuff. The picture I chose was kind of complicated and had quite a few colors so I had to change the thread when it’s done printing certain colored parts.

IMG_0834[1]IMG_0840[1]IMG_0836[1]IMG_0844[2]

I think students being able to print this kind of small objects it’s important. There are a lot of organization/sororities on campus, and there is a need for them to decide on their logo and able to print it and see it in physically at a relatively low cost before they mass produce say T-shirts with logos. I guess the existence of the Fab Lab makes that possible. Also, I think Fab Lab is a place where you can examine your creativity, a lot of the backpacks and dresses there are made by hand. And where we are taking the class, there were people coming to use the machines and software to help their own design or project and I think that’s awesome.

Now that I have learned how to use the sewing machine, I guess I will add more artistic component to my semester project — adjustable cup holder. Maybe the outside layer of the holder can be covered with a embroidery art.


Week 6 Reflection

This week our class was held at the Champaign-Urbana Fab Lab. It was truly an eye-opening experience, especially for me, a business student who never made anything by my own hands. I got to see a lot of equipment/machine/little pieces that I don’t know the function of, nor do I know their names. I got to see that 3D printing technology can get combined with a lot of existing skills, and that’s exciting. I guess being presented 3D printing machines alongside a lot of other equipment and little pieces made me view this technology in a more “down-to-earth” kind of way. 3D printing is not “fancy”, and it can actually been applied to advance a lot of the existing skills.

The students were divided into two groups. The other group was working with a loom or a laser cutting something like that. Our group got to work with the Arduinos, which I basically think it as a hardware that through programming can be used to sense/control physical objects. With the help of the instructor, we were able to make a touch sensor and a pilot light that blinks according to our setting. Photos and videos are attached below. I think by learning this, now I am able to explore further on my semester project (a temperature-sensitive cup holder). The Arduinos is definitely helpful in control physical object part, it’s just I have to get a temperature sensor or something like that.

IMG_0698[1]IMG_0700[1]

IMG_0702[1]

IMG_0703[1]


Week 5 Reflection

Image

For the last two weeks, we were basically getting familiar with Fusion 360 by practicing designing a daily object using the software. The interface was kind of hard for me to play around at first because I was confused about the 3-dimensional rotation function. Luckily we had Lucas from Autodesk who gave us a step-by-step tutorial on how to create a pencil (pencil tip) on Fusion 360. I think it was a very rich tutorial, and it was the first time that I get to think as a designer. At first, the pencil tip was just a line we draw, and we had to draw it in a way that when it gets rotated it will have the exact inner structure a pencil tip would require.

IMG_0549

It was a pity that I had to miss the second class due to some personal issue. I guess I will have a lot to catch up on. Below is what I have created using Fusion 360 at home, really can’t create anything complicated as of right now LOL.

IMG_0691