Week 11: Project Update

After the virtual tour of Indiana University’s Makerspace, we continued to work on our projects.

Glasses Project with Paige and Harina

For this week, we worked on remodeling the initial design we had. The initial design was not capable of remaining on the glasses without external pressure, and did not fit as well on most glasses.

With the new design, it was able to remain on the glasses and provide support to the glass when lying down.

Next week in class we should have the NinjaFlex and hopefully be able to test out a couple of prototypes in the lab to see what is the best fit.

Interchangeable Hooks

For my personal project, I finally had the base done! With the help of Reid, I was able to get a design for the wall attachment of the hook.

Now to get the base of the hook itself to fit with the wall attachment. The one I managed to get printed this week was a little too big for the wall attachment, and got stuck halfway through it.

Next week in class I will try again to adjust the size of the base hook and see if I can get it to fit, and start printing all the different attachments!

Week 11 How-To and Summary

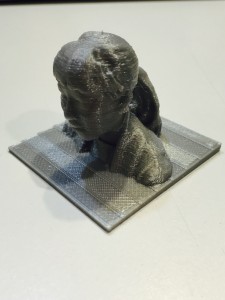
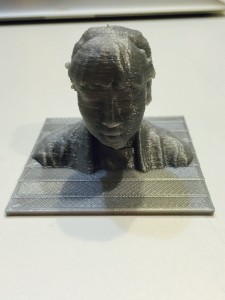
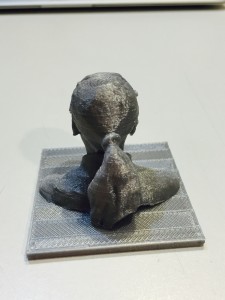
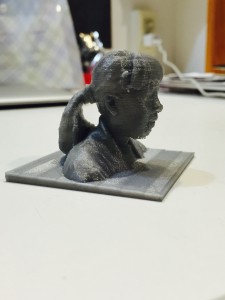
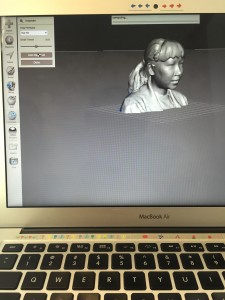
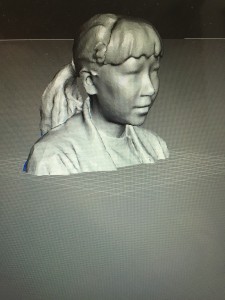
Week 11 was an exciting one for the digital makers, as it marked the last time we would be learning a new technology in our makerspace, the Digital Making Lab in the BIF. Week 11 was dedicated to using Meshmixer software in conjunction with two types of 3D sense scanners, the Sense 3D Scanner as well as the iPad mounted Structure Sensor. Some of the members of the course had a previous exposure to this technology during our build-a-printer event, however, it was a new learning experience for the majority of us. The scanner I used was the Structure Sensor, and it was rather intuitive to use. My partner simply did a 360 degree capture of my torso as I struck a pose. The scan was almost perfect, and the imperfections could be touched up in Meshmixer later. From there, I used the app connected to the scanner to e-mail the raw sensor data to myself.

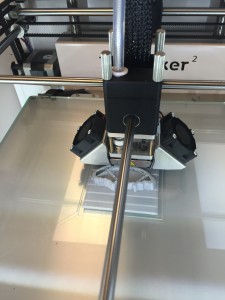
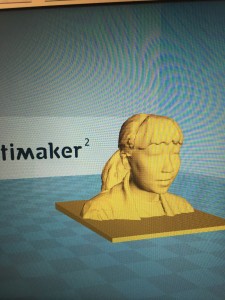
Next comes the Meshmixing. This software by Autodesk allowed us to clean up the raw scanner data by patching any holes and smoothing strange bumps in our scan. There were a number of meshmixing tools that allowed us to do this, and Arielle, our guest speaker, was able to walk us through any issues. Meshmixer also allowed us to add additional shapes onto our scans, such as a base for our busts. After smoothing out of busts, we then saved them as .stl files, and transferred the files to an SD card so they could be loaded into our 3D printers. Most of the students prints took less than an hour.

Additionally, Arielle Rausin came in once again to speak to our class. She has had experience using the SenseScanner in her Digital Making project last year. Her project is one of the most successful projects to come out of UIUC’s makerspace. Last year, Arielle used one of Beckman’s Institutes scanners to scan and print a model of her wheelchair racing glove. By recreating the glove with 3D printer filament, Arielle was able to create a lightweight version of her glove, that was also more injury resistant. You can read more about her story at the following blog from last year’s digital making class: http://makerlab.illinois.edu/2015/06/09/meet-the-maker-arielle-rausin/

Additionally, her story has even made it to the new 3D printing course on Coursera. Here is a more recent interview from Arielle. It definitely inspiring to our class to hear how own projects can actually make a difference in the real world! There is even a group of students this semester working on an improvement to Arielle’s model.

Based on my classmates reflection posts, it was clear that we all saw a great deal of potential for this canning technology. By using the scanners, any real-life object could be reverse engineered into a file that could be manipulated. The process of reverse engineering could be applied to a number of sciences that want to create models of things they want to study. One particular story that jumped out to me was from the Geomagic Community Case Studies. This blog talks about how archeologist have used similar scanning technology to study the Easter Islands heads, one of the biggest mysteries of the archeological community.

The students of our class had many interesting ways to describe how the 3D scanners worked. A few students compared the scanners to Microsoft’s Xbox Kinect. Paige mentioned that printing her bust felt like she was being carved into Mount Rushmore, which I would pretty funny. Many students mentioned that getting the initial scan was rather easy, and that the meshmixing was the harder part of the day’s lesson. Specifically, meshmixing the base to our busts proved to be rather troublesome. Once that hurdle was overcome, printing our busts was a matter of hooking our files up to the Ultimakers and printing, something that has come as second nature to us at this point in the semester.


Week 11 Reflection-Scan & Meshmixer

The topic of this week is 3D scanning in the use of Meshmixer developed by Autodesk (http://www.meshmixer.com). I saw some of my classmates use the scanner on the 3D printing expo last week, so I am very exciting to create my own model. There were three major steps from scanning to printing. 1. scanning 2. modifying 3. printing.

The professor provided us two different types of scanners for capturing human faces and part of the bodies. One of the scanners is very user-friendly, attached to an Ipad. Another one seemed more completed and time-consuming. During the class, the first step we did was collaborating with a classmate to finish the head scanning. Jiaqian and I were assigned to the Ipad scanner. Basically, one people just held the head and tried to keep it still. The partner rotated steadily on an axis in order to capture all details until the processing percentage reached to 100%. Since we were the second team to use the Ipad scanner, we got lots of suggestions from the first team. It helped us to save time and avoid failures. Then, after completing the scanning, we had to email the files to ourselves for further modification. “Meshmixer is state-of-the-art software for working with triangle meshes.” It is free software that is able to work on windows and mac. Meshmixer provides a large variety of tools which allow the user to do different types of modification, such as 3D Sculpting and Surface Stamping, Automatic Print Bed Orientation Optimization, Layout & Packing, etc. Some tools on the menu bar were confused me in the first place, but with the help from classmates, I quickly overcame the issues.  The most difficult part for me is attaching the bust to a base because it involved multiple adjustments to make it perfect and avoid the hollows between two parts. The final step was exactly like general 3D printing, which it was transferring the file to the Ultimaker 2. The overall printing took approximately 1 hour and 15 minutes.


FullSizeRender FullSizeRender 5 FullSizeRender 2 FullSizeRender 3 FullSizeRender 4 IMG_3049 IMG_3048 IMG_3047 IMG_3046 IMG_3045

The lesson about the scanning was a very interesting experience. We not only had the chance to learn benefits and current implementations of 3D scanning but also got a hand on experience to actually design and print out my bust. I believe 3D scanning will be extremely useful for the future model design because of the convenience and very few restrictions. Any completed shapes of the objects can be easily scanned and modified through certain software. The creations are able to make huge changes on the current models. It also saved designer time on sketching the outlines. The only limitation 3D scanning should be improved is the accuracy. There are some differences between the design model and the real case.


Week 11: 3D Scanning and Meshmixer

This week we learnt how to scan a 3D object as well as use Meshmixer to smooth the print out. Since I’ve printed my bust once during the 3D printing expo, I didn’t want to get another bust printed so I only scanned and edited myself in Meshmixer.

Getting a good scan is surprisingly hard! The scanner has to have a steady hand and move up and down to ensure that the top of the head is captured if not you’ll end up with a hole on the top of the scan. The person being scanned has to rotate steadily on an axis or risk going out of the scanning range. Lois and I also tried to scan my hand, and it took a couple of trial and errors before we finally figured out a way to get a decent scan out. Even still, we lost a couple of finger tips. Check out Lois’s twitter for a shot of the completed hand!

What we did with Meshmixer was basically smooth out the harsh edges so that the print will not come out with serrated edges. I took a shot of some of our classmate’s prints in progress. Check out the difference between an edited print and a non-edited one.

meshmix

print

^Smoother edges as compared to mine below

3dmimg

^Print done during the expo without edits using Meshmixer. See how the hair looks sharp?

I’m glad I learnt how to use Meshmixer in this class, since being able to edit a scan is much easier than creating a model from scratch and is very useful for a variety of purposes (beyond scanning body parts as we’ve done here). I might use this for the hooks in my semester project, but I have a feeling the hooks need to be more precise than this so we’ll see!

Learning to Scan and Meshmix – Week 11

On Monday, we met back in our home base, the digital printing lab. We have now moved far beyond simply looking up prints online, we have begun to create and edit our own 3D models. We used two different types of scanners to capture our faces, and create busts of ourselves using a program called Meshmixer. I was pleasantly surprised to see how well the scanner captured my head. All I did was rotate in a chair while my partner captured my head using a scanner attached to an iPad. From the iPad, I emailed my the file of my face to myself, and began to play with it in Meshmixer. Meshmixer was a really cool software to use, however, it was also a bit frustrating. Manipulating my own face on my laptop was difficult because I had to even out an strange edges the scanner captured and fill in any holes. After that, I attempted to attached my bust to a base with my initials attached. This part was much easier because the program attaches the shapes together for you. By the time I got all this done, saved on a SD card, and in the printer, my print failed. Just goes to show you 3D printing doesn’t always come out perfect. I still have the file, and will have to get back in the lab sometime before the end of the semester to print myself out correctly.

Learning how this type of technology works is especially important because it allows people to recreate things that they already own, and make any additions that they see fit. By owning one of these scanners and a 3D printer, one could print anything they already own. These scanners are basically replicators straight out of a science fiction movie. What’s even cooler, is the fact that by using Meshmixer, or a software like Fusion 360, one could improve on the products they already own. For example, if I had a coffee mug that was perfectly sized, but had an uncomfortable handle, I recreate the mug and design it however I wanted.

Although it was one of my more frustrating days in Digital Making, I would say that it was one of my more impactful lessons. When watching 3D objects get transferred to the computer, then reprinted in real life, I thought a lot about the economic impact this scanning technology could have all over the world. If poorer communities had scanners and printers like ours, they could provide household items and other living essentials for everyone they knowing simply by printing them out.

Week 11

This week we got to work with both the 3D scanners using iSense and MeshMixer to reshape the people that were scanned. I didn’t necessarily work with the scanners too much during this past class session because I was already familiar with them after manning the scanning station at the 3D Printing Expo we held in the atrium a few weeks ago. Because of this, I let other people learn how to use the scanners, too. I had not used MeshMixer, though, when I was working the station. And that was certainly helpful to learn about this past class session. Since we had been doing scans of people’s bodies, MeshMixer allows for us to reshape rough edges that were picked up by the scanner. MeshMixer would allow for us to actually give depth to people’s eyes as well as smooth out the rough parts of where the scan came together on the back of someone’s head. Just basic things to clean up the overall image.

2016-04-11 21.04.44
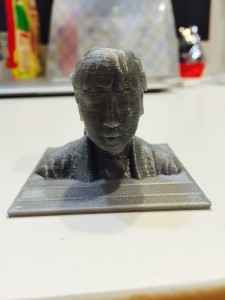
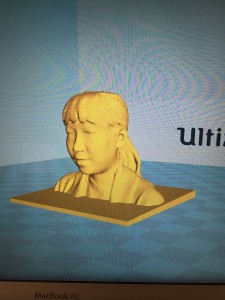
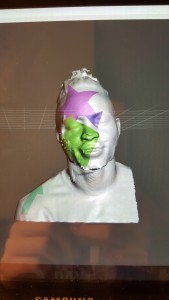
I found this software very useful for future scanning. I once received a 3D printed version of myself during a 3D printing expo held in BIF and just remember it looked like a very pixelated version of me. As if I was being carved into Mount Rushmore. With MeshMixer I can actually smooth out rough edges like my ears, nose, and stray hairs that the scanner picked up. MeshMixer simply allows us to create more accurate versions of our scans or do something completely crazy like combine body parts of different animals. Still not sure why that was a necessary feature someone thought to throw in there, but it definitely showcases MeshMixer’s capabilities.

For the future, I think scanning and 3D printing go hand-in-hand. That objects we’d like to re-create can be easily duplicated by scanning them and cleaning up the image in MeshMixer. The software may even become obsolete if scanners become more developed and increase their accuracy.