Class Wrap-Up

This Monday we ended our fantastic class with our portfolio presentations describing our semester-long projects. Elaine, Harina, and I were able to present to the class our GlassFlex design. I knew from the beginning of the semester a lot of people didn’t really understand our concept, nor did they think it would be useful in comparison to what other people were creating. But I was very pleased with the responses we got from everyone, such that not only would people be willing to use the product but actually purchase it as well!

The idea stemmed from a brief discussion at the beginning of the semester about the power of the Maker Movement, in finding small and subtle solutions to every day problems based off of what we could come up with in our heads. We were shown previous things that former students in the class had made. One that really stuck out to me was the dynamic door stopper, that could hold the door open at any angle. This idea wasn’t as glamorous as building an artificial intelligence robot or anything having to use arduinos period. But I felt a connection to this idea that it was something you didn’t even know you needed until you realized you were living without it. This shaped how I thought about what my project would be for the semester.

After diligently trying to come up with some sort of idea, I realized as I was lying in bed how uncomfortable I was when trying to carefully place my glasses against my pillow. And then the idea for GlassFlex was born. I spoke to Vishal about my idea and he mentioned that people have been finding uses for a flexible filament, but not much experimentation has been made with it. With Harina (a fellow glasses-wearer) joining the team, she was able to do a good amount of research when it came to understanding the variety of different flexible filaments available. The one she concluded would be best for our project was Ninja Flex, which worked out awesome. Elaine (another fellow glasses-wearer) joined the mission and assisted in coming up with some prototype designs.

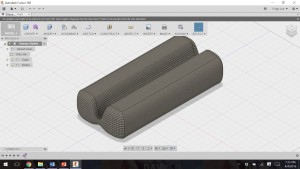
The first design we had created was a simple hot dog-style piece that fit on the brim of your glasses. It was too small, uncomfortable (because we hadn’t ordered the Ninja Flex yet so we used traditional plastic filament), and fell out easily and needed to be held in place. But that’s the beauty of trial and error!

The next design we made expanding upon the first one, with the opening having a little slit to keep the edge of the glasses from moving out of place. This was also quite hard and uncomfortable, as we still weren’t able to use the Ninja Flex. Even if we were able to use the flexible filament, we decided to keep expanding upon our models.

The third design was the first model we actually made with Ninja Flex. We had also made it taller for comfort, but tried using 20% fill density which was not sufficient enough for the level of comfort we were trying to achieve. So we kept on.

The fourth model was made wider instead of thicker, thinking that would be easiest to absorb the pressure from the pillow and keep your glasses in place. However, this was not the case. And it once again became an issue with the fill density. We had avoided increasing the density just because of the time it takes to print a model with anything more than 20% fill density. Printing with flexible material requires slower printing speed as well as a cooler plate temperature. All of these factors simply increased the time it takes to print exponentially.

Our fifth and final model we had decided to not only change the design but also increase the density to 50%. This model expanded more so upon our third prototype by fully enclosing the opening at the top so that the user would slide his or her glasses frame through the hole and then use the GlassFlex. This worked tremendously well. The 50% density was able to absorb the pressure from the pillow without shifting your glasses out of place, and the enclosed edge allowed for the piece to not move out of place. This was the most comfortable and successful model we had created.

Because of this class, we have been able to expand upon our thought process when it comes to fixing a problem in our every day lives. Through the sessions with Design for America, lessons in the FabLab, and lessons to understand software on how to make and mold products, we have been able to create something beneficial to all glasses wearers.

To see our presentation slides, click here.

Thank you for a great semester!

2016-05-01 23.51.23

Week 12

This week we focused on working on our final semester projects. It was great to hear the progress of everyone’s work and to see what great ideas people had come up with and are pursuing. Gwen’s heart still fascinates me with its complexity and attention to detail. While Anjali’s idea of an artificial intelligence mini-robot is something I couldn’t even fathom of creating, but the video of the little robot we watched gave me better insight as to what was hoping to be created. I also really liked the idea of a ukelele tuner, I didn’t even know a ukelele needed to be tuned (as I am not musically talented). Whereas the idea of an expanding/retracting cup holder is a great idea for everyday use.

As mentioned before, Harina, Elaine and I will be working on a project to make an insert between your head and your glasses for laying down comfortably while still being able to use your glasses. Elaine has made an awesome second prototype built off of my first one that has little slits that would allow for the piece to stay put more easily. She had made it with the hard plastic as the Ninja flex had not arrived yet.

We were thinking that for our next version (which we will hopefully be printed with the ninja flex material) we need to make the object more dense, as it would have more give due to its flexibility when being leaned against. We believe that increasing the density of the object will allow for more comfort while keeping your glasses in place. In addition to making it denser, we were wondering if instead of slits we should change the shape completely. The shape would be reformed from a hot dog-like shape to more of an egg with a hole through the middle. Of course it would still be ergonomically designed, but it will just take more testing. We will keep everyone updated on how these changes affects our project!

Week 11

This week we got to work with both the 3D scanners using iSense and MeshMixer to reshape the people that were scanned. I didn’t necessarily work with the scanners too much during this past class session because I was already familiar with them after manning the scanning station at the 3D Printing Expo we held in the atrium a few weeks ago. Because of this, I let other people learn how to use the scanners, too. I had not used MeshMixer, though, when I was working the station. And that was certainly helpful to learn about this past class session. Since we had been doing scans of people’s bodies, MeshMixer allows for us to reshape rough edges that were picked up by the scanner. MeshMixer would allow for us to actually give depth to people’s eyes as well as smooth out the rough parts of where the scan came together on the back of someone’s head. Just basic things to clean up the overall image.

2016-04-11 21.04.44
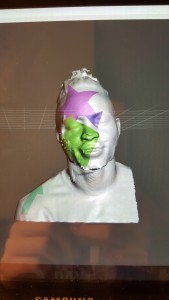
I found this software very useful for future scanning. I once received a 3D printed version of myself during a 3D printing expo held in BIF and just remember it looked like a very pixelated version of me. As if I was being carved into Mount Rushmore. With MeshMixer I can actually smooth out rough edges like my ears, nose, and stray hairs that the scanner picked up. MeshMixer simply allows us to create more accurate versions of our scans or do something completely crazy like combine body parts of different animals. Still not sure why that was a necessary feature someone thought to throw in there, but it definitely showcases MeshMixer’s capabilities.

For the future, I think scanning and 3D printing go hand-in-hand. That objects we’d like to re-create can be easily duplicated by scanning them and cleaning up the image in MeshMixer. The software may even become obsolete if scanners become more developed and increase their accuracy.


Week 10 Reflection

This past class we had our final session in the Champaign FabLab. I got to work in the final station with Duncan and the lasers. With the lasers, we were able to print designs on notebooks, pieces of acrylic plastic, or even wood. I chose to make myself a name tag with a reference from Mean Girls that nobody understood. 2016-04-04 16.05.13

I actually do have a name tag for being a board member on the Student Organization Resource Fee (SORF) Board that is wood cut by laser printing, and it’s really cool! I found this type of printing fascinating with how easy it was to make very cool looking and professional designs, espeecially for acrylic pieces. Despite the many safety precautions necessary to manage the printer, designing was easy!

Going forward, I now have a resource if I need to make very professional looking notebooks, name tags, wood designs, or acrylic pieces. I will not be using these tools for my final semester project, but learning how to use them helps me think about the maker concept even more.

Later in the week, I stopped by the MakerLab to print a prototype of my final project (glasses cushion for when you lay in bed with your glasses on). I think when I had transferred the design from Fusion360 to Cura I had accidentally scaled my design too small. We also did not have any of the flexible material I had planned to work with in the lab so I had to use the hard plastic. However my object somewhat works, but falls out of place easily. It also would be better if I had scaled it more properly. This is a part of the prototype process though, improving the design until it’s ready to be launched.

Update on Semester Project

I find myself strategically laying my head against my pillow when I lye in bed on my phone before going to sleep so that my glasses don’t move out of place. So Harina and I have been working with the idea of creating some sort of insert to place around your glasses so that they won’t move when you lay your head down. This project will not solve all of the world’s problems, but it’s certainly something I, and all other glasses-wearing people in our generation, would find useful. So far I’ve made this design for a prototype on Fusion 360:

Prototype

The slit in the middle is basically where the side of your glasses is supposed to go. SO that when pressure is exerted on the outside of your glasses, the cushioned part on the inside is able to push back and keep your glasses in place. At least that’s the idea, I’ve got to print this model first and see what adjustments would need to be made. We are also looking to experiment with the flexible material Vishal had mentioned we have in the lab. He had mentioned that some people had previously made a ball with the material and the ball was able to bounce. I think this sort of material would be perfect for my project since the traditional plastic we use would be uncomfortable. We don’t need anything super soft, just something with at least a little give. I’ll let you guys know how this turns out after I print it!

Week 9 – Build a 3D Printer

This past class session was held in the BIF Atrium for us to show other students what we’ve learned in BADM 395 – DMS so far, as well as answer any questions they might have about 3D printing. Our stations included

  1. A group of people building an Ultimaker 3D printer
  2. A small group upgrading one of the current printers we have in the lab
  3. A scanning station for people to print out 3D molds of themselves

I started off with the first group, but there were so many of us that it was hard to not be in the way if you weren’t already playing an essential role. I did the most that I could do to help find bits and pieces, but after the first hour passed I needed to set up the scanning. Since I had misplaced my laptop charger, I had to use my roommate’s laptop for the scanning. To do this I had to download the Sense Software to be used with our lab’s Sense scanner. People would sit in a spinning chair and I would hold the scanner steadily, grabbing the image frame between their chest and the top of their head. Before the person being scanned started turning in the chair, I would start aiming the scanner at the back of their head. This is because once the person makes a full rotation, the image sort-of “combines” itself after the rotation is complete. And it’s better for the image to come together on the back of the head so that the face doesn’t get distorted. Once the scan was complete, I would clean up the image then download it to Cura and prepare it for printing.

I thought the event was really fun but if we were to do it again I would suggest that we make the set-up for the event a little bit more open. I had believed the event was meant for other students to learn about 3D printing but our set-up made the event seemed private and closed off (especially with the separators). I had a few friends mention to me after the event that it seemed pretty cool and they wanted to come say hi, but they didn’t want to interrupt us. I also know we were supposed to build 2 printers but only 1 had arrived, that was why it seemed a bit crowded when working at that station. There was also a lot of frustration for people since the instructions didn’t exactly match the parts we had needed. Not much we could’ve done about that, but I admired how people tried to work around those obstacles at that station.

I did speak to some students who had come up to my booth about 3D printing and the class itself, overall people were very interested in taking the course next year and the possibilities 3D printing offered in general. I enjoyed explaining to them about scanning and how the process worked.

Week 8 – Soldering

This past Monday, we were taught by the awesome guest speaker Mitch Altman who is an engineering alumnae of UIUC and inventor of TV-B-Gone. He allowed for us to practice with soldering to create our Trippy RGB waves kit, capable of portraying light flashes in a sequenced pattern. 

Mitch says he uses these models to teach kids about electronics and engineering, which I thought was pretty cool. I had also never really heard of soldering before until this lesson, and didn’t even think about how each component was attached to the main frame. Through this lesson, I was able to properly use the soldering iron and attach all of the pieces myself. The most interesting thing I found about the process was that the soldering iron seemed to be a very basic tool, that was probably even used for decades if not centuries beforehand for various activities. I was pretty afraid to use it since I don’t really trust myself with tools like that, but Mitch’s guidance made me feel a lot more comfortable. His helpful tips like dragging the iron along the board helped me a lot as a first time user.

Going forward, I now know how to use the soldering iron and am able to make inferences on piecing together my own Trippy RGB waves kit. I find that after working with sensors in the FabLab as well as these kits, I’ve become very interested in sensory material and how it can be transmitted to either turning a light on and off or a motor run. Though this is not technology I plan to use in my final semester project, I am very curious as to what other uses we may possibly have for it. I just find it so interesting how something that seems so complex is actually really simple when you get down to the basics. Is this the same kind of technology used in our smartphones? Or is it at least somehow relative? I think I’ll do more research on this, just for fun.

Week 7 Reflection

Due to some confusion, this post is a little bit late.

This past week we had returned to the FabLab and got to work in a different section than we had the week before. This week, I was able to work with the digital embroidery machines and discovered how to take an image and digitally stitch it. With Suzanne’s help, I was able to understand the software, SewArt, to be able to complete my design.

Here is a video of the digital sewing machines in action:

At first, I had accidentally selected the wrong areas to be printed which completely messed up my design. Thankfully, the software is so easy to use that I was able to go back and re-select everything to ensure it was “printed” properly. This worked, and you can see the before and after image below.

I had no idea how these detailed stitch-images were created until learning about them at the FabLab. These technologies must have revolutionized the textile industry in cutting costs, re-allocating labor, and increasing its production outputs. I didn’t even know that there were digital sewing machines like the ones we had used to create our designs (since I had only used my mom’s electric sewing machine before). These technologies allow people to further pursue their creativity without the obstacles of hand-stitching and improper design tools.

Going further, I don’t expect to use these technologies in my final project. Not because I don’t want to (since I really like them!) but because they just won’t be relevant for my specific project. However, I would still like to use the digital embroidery services for my own personal use and am interested in coming up with and printing unique designs.

Arduinos Fun

This past class we visited the FabLab down in the South Quad. After wandering my way over there and 3 failed attempts to get into the building, I was able to visit the FabLab for the first time ever. I have to say, it’s quite an eclectic place. There are so many projects you can work on, no matter what your interests. And I loved how it was open to the community and doesn’t focus on making profits.

After touring the space and seeing all of the different stations – everything from screen printing, to fabric printing, to electronics – I got a better understanding of the purpose of the FabLab. I was very impressed by the space, and even more so by what people have come up with. I found the fabric station (and robotic-sewing machines) quite interesting. But I ended up spending most of my time in the Arduinos area with Colten Jackson as our instructor.

2016-02-29 14.50.20
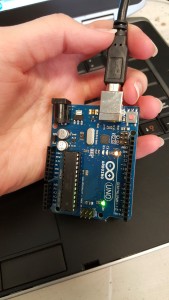
Arduinos basically uses coding to get electronics to do what you want. We practiced by figuring out how to set up the wiring of the board and experimented with the coding. At first, we made a light switch on and off at whatever frequency we set it to. Then, we worked with a motor and were able to experiment with the frequency and degrees to which it would turn. Finally, we were able to play with touch sensors – so that depending on how hard we were touching a certain wire, the motor would respond based on the touch sensor.

As someone who has never worked with electronics and has only gone as far in coding as HTML5, SQL, and SAS – I find Arduinos fascinating. I understand what we had worked on was elementary compared to what can really be done with the technology, but it’s meant to be that way to get younger kids interested in the technology at an early age. And I’m okay being at the same level as a 10 year old.

I wanted to experiment on my own with the technology. I had tried to set it so that every time I had touched the sensor, not only would the motor go off but the light would as well. After multiple trial & errors, I sought help from my more experienced classmates. Turns out it’s not as simple as copying and pasting a single line of text and calling it a day. Both Toheeb and Elaine were able to help me out with this, and after a little experimentation my sensor was also able to produce light when I touched it as well as make the motor turn.


Going forward, I’d like to work with Arduinos a little more to see what else the technology is capable of. Still not too certain about my semester project, but I am open to the idea of working with Arduinos again in the near future.

Week 5

The past two weeks have been filled with a lot of Fusion 360 Tutorials. On Monday, February 15th, Lucas Ewing of Autodesk joined us for our first tutorial and showed us how to build the tip of a mechanical pencil. I actually had great difficulty keeping up with his tutorial since it was my first time using the software. But after a little one-on-one help I realized my main problem was that I didn’t understand the controls of moving around the 3-dimensional space. That helped tremendously.

Bolt
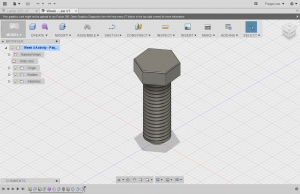
When I went home I was able to practice a bit on my own using another Autodesk tutorial. I had made a bolt, and surprisingly I didn’t have nearly as many difficulties as I did when trying to make the tip of the mechanical pencil.


Snapchat-5488057531534068942
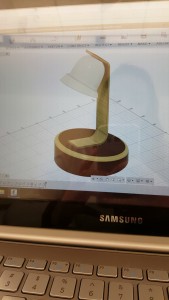
This past Monday, the 22nd, Gina Taylor and Nicole Chimienti demonstrated a tutorial for how to build a lamp. This seemed a lot more complicated, so I’m glad we had people to guide us through on how to do it. I learned a lot of valuable information when it came to using the software: like the difference between push/pull and extrude. This was also my first time using the design tools and took my abstract lamp idea and turned it into a plausible design idea.

These past two sessions and the on-our-own session in place of a reflection last week have certainly made me more comfortable with the software. Though I certainly don’t consider myself to be an expert any time soon, I am content with the amount of knowledge I have obtained within the past few weeks. I’m not really used to hands-on classes, so this style of teaching is very different to me. But so far I am really enjoying it!

In the next few weeks I’m hoping to become even better with the software. I need to start thinking of objects in the sense of how they can be designed in Fusion 360. When we first had our session with Lucas Ewing, his thought processes blew my mind in designing the mechanical pencil tip. I believe thinking in those terms will help me in my future semester project so that I can easily design whatever I’m going to make. Changing your thought process isn’t always easy, but that’s what learning is all about!