Week 4: Fusion 360

Image

This week we got the privilege of having an expert, Jeff Smith, come in and teach us how to use one of the most powerful CAD programs out there, Fusion 360. He structured the learning session by teaching us a lot of tools all at once, and then having us build on our own and seeing what we could create. It was really a privilege to have Jeff come in, and it amazed me the things that 3D printing was capable of doing. One of the things that really stood out to me was the sculpting mode of Fusion, where one could use several features to create complex objects that would take hours to create in normal CAD programs. Best of all, the creator of Fusion 360, Autodesk, offers the program as well as various others for free to students.

Fusion 360 Picture

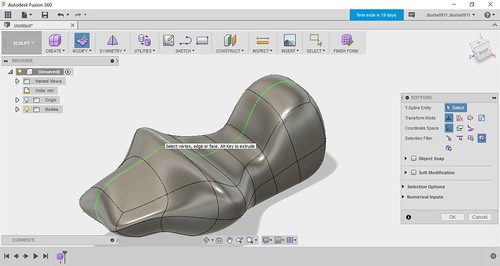
A design like the one picture above could take hours with standard CAD software, but only took several minutes for me to create on Fusion.

This experience was truly awesome because our class got to learn the true power and potential of Fusion 360. Complex designs and parts that would normally take hours to create or modify now can be done with several clicks of a button. This is especially helpful in the world of 3D printing, where there is no need to worry about typical manufacturing constraints such as the increase in cost with an increase in complexity. CAD software like this will lead the charge in the 3D revolution as much as the actual 3D printers will. As Jeff Smith said when he talked to us, “without CAD these 3D printers are just paperweights, and without 3D printers, these CAD designs are just stuck on a screen.” The development of each is important to the advancement of 3D printing and I know I will be keeping close track of developments in each field in the future. The fact that this revolutionary software is offered free for students is also awesome, as the future of 3D printing lies in our generation, and the more young students who have access to the software, the better.

Now that I have learned the basics of Fusion 360, I will continue to play around with it at home, as well as continue to learn how to use it in this class. Jeff will be coming back later in the semester to teach us more advanced Fusion concepts, and I am very excited to see what he has in store for us next time. If you’re interested in Fusion 360, click here for a video that further explains what Fusion 360 does.

If you’ve read this and are interested in learning Fusion 360, then there are some awesome YouTube tutorials found in the links below. I have also added the link for downloading the Fusion software as well.

YouTube tutorials

Autodesk(Website to download Fusion)

Week 3: The Design Process

Image

This week we took a step back from 3D printing for a little bit and instead focused on the design process. Our teacher organized a workshop ran by the Illinois chapter of the DFA (Design for America), which is an organization where members come together to help and inspire each other throughout the design process. We were first split into the same groups as our semester project groups from the previous week. We then were given a set of conditions and needs for a product, and then we had to design a product that would fill all of those needs and conditions. After that exercise we then learned about how to identify needs when coming up with a product. For this exercise, the products had to be a new idea that could help out the elderly. Our group made a prototype for a bracelet that could connect to ones phone through Bluetooth. It could then by synced up to other objects such as medicine, wallets, and shoes. If the user got too far from these things the bracelet would vibrate and show a message on it’s screen telling the user what they forgot. It could also do things like remind the user when to take medicine. This would help with senior citizens who are struggling with bad memories.

I learned a lot from the DFA workshop. Before this, I had always thought that really smart people just had good ideas out of nowhere, and then just took that idea and sold it to a company or marketed it themselves. I was not aware that there was an organized structure most people have when coming up with ideas and then developing them so they can be feasible, cost-effective, and useful. This workshop taught me the valuable skills of how to identify a problem that needs solving, and then how to create a prototype for a product that can effectively solve that problem in a cost-effective manner.

After the DFA group left, we then were assigned to design our logos for our groups. Our group’s name is IJK, as the three members in our group are named Ian, Jack, and Kenny. We then created our logo and printed it out. The print is shown below.

3D logo | by johnburke9
In the future, hopefully I can use the valuable skills I learned this week about the design process to my advantage. Hopefully one day I can use these skills to identify a problem I come across in my life and make a product that could effectively not help only me but also countless others. These skills along with the 3D printing skills I am learning in class give me the tools to make great changes in the world, and I will keep them in mind when thinking of ideas as I continue to learn more about 3D design.

First Day Printing (Week #2)

Image

This week was awesome, as we got to print the first of many cool objects in class! This was super interesting, but we also learned a lot about the impact of 3D printers beforehand, and even had a guest speaker come in and talk to us about the 3D printing resources available to us on campus, as well as the fablab, which is an awesome worldwide network of over 200 labs where people can go to design and print any object they can create. There are also community activities there, such as a summer camp for kids where they create items like light up backpacks.

After the guest speaker came in, we got split up into our teams for our semester project, which involves us thinking of something that would be cool to create that is also useful to many people. We then have to create this object and give a presentation about how we made it and what its use would be. Our team also got a chance to check out the website www.myminifactory.com

MyMiniFactory

MyMiniFactory is an awesome site where anyone can upload or download any of the 3D designs found on the website. The workers who run MyMiniFactory make sure that every design uploaded is 100% printable. That way users know they won’t be frustrated with a design that doesn’t print out correctly. This cuts down on users loss of time and material. The site also hosts various design competitions, in which a category is given and the best design gets a prize. These competitions are sponsored from companies ranging from candy companies looking for cool designs for 3D printing their candy to tech giants like Google.

Finally, we got to end the day with getting our hands on some of the 3D printers. Our assignment was to find an object design that was small and easy to make on any website sharing 3D files. I ended up choosing to make a cover for my toothbrush. Here’s a picture of it below.

My Toothbrush Case


4 Things Challenge

iPhone Amplifier– This small print gives you an easy to carry around speaker. I would love this, as I love to listen to music, and could take this anywhere, as it’s small and requires no electricity. I would definitely change the iPhone socket to be compatible with the iPhone 5, as that’s what I have.

Iphone holder for bike– This holder attaches to the front bar of your bike. I bike everywhere on campus, and back home I will bike ride for exercise. Having an iPhone holder makes it much easier to listen to music or check my texts at a stoplight. I would make the design a little bit taller so the phone would be closer to me.

Bass Guitar– A 3D printed bass Guitar! This is one of the cooler things I’ve seen. I play guitar and a big fan of music so having a 3D printed instrument would be so cool. If I could modify it, I would maybe try to change the design to be similar to an electric guitar, as that’s what I play.

Boomerang– I’ve never actually owned a boomerang, but this would be a cool and fun way to learn how to use one. If I had to change something, I would maybe just put my name on the boomerang instead of the Coca-Cola Logo.