
This week we engaged in the second phase of a continuous three-part series meant to offer exposure to the myriad of activities offered at the Champaign-Urbana Community Fab Lab. The Fab Lab, although the majority of the class was unaware of its existence prior to this semester, is a leading-edge open and collaborative workspace for design, creation, and printing through the use of computer-driven technologies, such as 3D printing, lasering, inkscape, and soldering. Below is a picture of one of the spaces within the workshop.

One of my favorite aspects of the Fab Lab is its openness to the entire community, irrespective of whether the makers are students or local community members. Everyone is welcome and simultaneously given the resources to collaborate, share, and implement their ideas. Since the making space offers such a vast array of opportunities to its various users, the class was divided into three separate groups during our first session, with each group rotating between the three main functions of the lab: laser cutting, soldering, and coding.
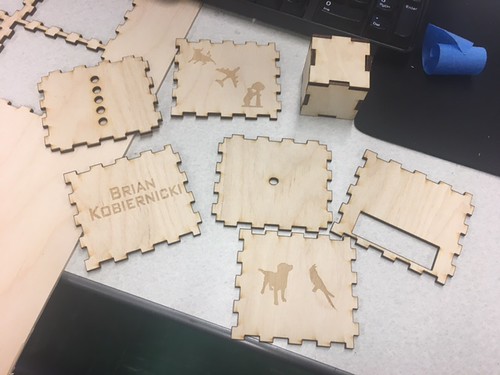
In Brian’s most recent post, he examines the laser cutting portion of the project. The objective of this part was to assemble the wood cube that would house the photo dependent LED light resistor. The software used to create the designs on the sides of the cubes was Inkscape, a completely free, open-source platform that appears to be user-friendly yet still able to make complex designs. Once the template for the wooden cube was downloaded, he initially needed to consider some alterations to guarantee the fitting of the wood. In order for the laser to properly cut the wood, certain formatting and thickness adjustments had to be made. Using Inkscape, Brian and the other members of his group traced images taken from online, and, once finished, the PDF file was loaded onto the laser cutter. The laser etched the designs into the wood which created the downloaded images, while also making the actual cuts to create the box. The cutting process lasted just a few minutes, as subtractive manufacturing such as laser cutting can be considerably faster than additive manufacturing, like 3D printing. Brian’s finsihed creation can be seen below.
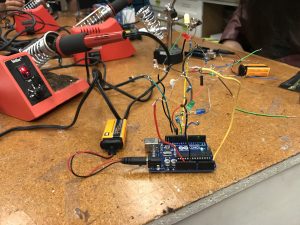
Carter’s weekly reflection focused on the soldering aspect of the project. While the initial instruction appeared to be very time consuming and required immense precision, concentration, and delicacy, soldering as a tool in the making and design process can be incredibly powerful and handy, as it offers certain advantages to a product that otherwise would not be available. Soldering allows for more accurate and uncluttered connections between various electronic parts, such as wires, resistors, and other components. An additional benefit of soldering is the ability to maintain the original shape of the soldered metals, considering that the solder has a much lower melting point than the adjoining metal. Since the fusing occurs at much lower temperatures (albeit still incredibly hot), the metals that are being connected do not warp in shape or size, nor do they melt. Lastly, soldering allows for the joining of multiple wires using a single focal point. This can allow electricity to be conducted, as all the wires have been bonded together. Below is a picture of Carter’s finished soldered Arduino circuit board and light dependent resistor.
Charlene’s post focused on the coding of the Arduino Uno circuit board, using Arduino’s open sourced software. Arduino’s simple platform allows for makers with only basic coding experience to still utilize the immense functionality of the technology. Her group was tasked with coding specific behaviors into their widget. In this case, the object that was being encoding was a photo resistor (light dependent resistor) with LEDs. By connecting the LED lights to the light resistor and being guided through some of the basics of the Arduino code, the LED lights extinguished in the presence of light and flashed during times where there was no light (when it was covered by a hand, for example). This first exercise with the Arduino technology was simple enough for us as first-time users to comprehend, yet was still an applicable and useful first attempt at the software, and definitely something that could potentially be incorporated into our end of the semester final projects. Personally, having the ability to view tangible, physical result of our efforts was something that felt gratifying. Charlene’s final product for this phase of the project is pictured below.

While each group has been focusing on a specific activity, we can universally agree that the experiences at the Fab Lab have been invaluable to our making journey. We are constantly attempting to apply what we are learning to not just our semester projects, but also outside of the classroom. I look forward to the rest of our time at the Fab Lab, as well as the rest of the semester!