
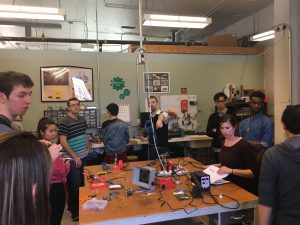
This week, we started our 3-week exploration in CU Community Fab Lab. I’m really impressed with all the cool things going on in this one of the oldest buildings on campus. There are three major parts in the Fab Lab: electronics room, prototyping room, and main lab area. In Fab Lab, we’ve seen exciting projects such as fabric customization, BioHacking and many more that I cannot name. Fab Lab opens to everyone in the Champaign-Urbana community. It’s purpose is not only to create cool stuff, but also to encourage and educate the community with the technology. It offers various programs for youth, professionals, or anyone who are simply interested in creating things.
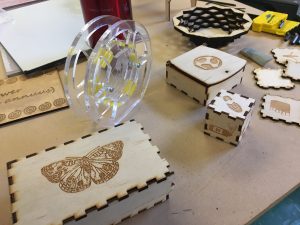
In this week’s lesson, I experienced the process of designing print for laser-cut boxes. As the photo above, the laser-cut boxes are made from pieces of wood board carved by the laser engraver.

According to Fab Lab’s website, the laser engravers are their most popular type of tool. From my own experience, I can totally see why it’s so popular. Compared to 3D printing, laser engraving is a reversed way of creating new things. Instead of stacking materials together to build an item, laser engravers takes away unneeded material and cut out connecting structures. Therefore, if you want to build a box, using laser engravers will be much faster. In addition, laser engravers can create extremely delicate patterns, which is hard to achieve using 3D printers. Last but not least, the skills needed for creating print or customization is easy for beginners to pick up. Laser engravers read PDF files, so instead of building a 3D model and using softwares to slice it to 2D prints, users can design prints for laser engravers using any vectogram editing softwares. The software we used during the workshop is InkScape, an open-source software that is free and powerful. It is easier to handle compared with TinkerCad and Fusion 360.
The process of creating the print for a box is simple as we learned in the workshop. After having the picture of the box you want to design in your mind, you can go to any websites that offer free customized box print (for instance this websiste). Then you can put your design on any faces of the box. The machines recognize certain colors, so it’s important to make sure the color settings are correct in your print. After saving your print as PDF, you can direct the engraver to the file to get started. One thing noticeable is that unlike using a 3D printer, you need to watch the engraver while it works in case of it (or the wood) catch on fire.
During the session, I’ve put together my design. In the next session, I’ll have my design printed out and assembled. Besides designing the box, I also tried to assemble a box printed out by Fab Lab.
Looking forward, I think the laser engraver can be a powerful tool for both designing prototypes (and making customized gift boxes). If a designer has a clear idea of what his or her design should be laid out on a flat face, it is easier to use laser engraver to build their prototypes than using 3D printer. In the future, I look forward to using laser engraver to realize my project ideas.
Hey Xinlu,
I really like how you compared laser engraving/cutting with 3D printing. I have never really thought about that, especially how laser engraving/cutting can be done significantly faster. For the box I made, that probably would’ve taken ~20-30 minutes? With the laser cutter, it took I think ~3 minutes. I have already started thinking about how I can use the laser cutter for my semester long project. I hope you had a great time soldering today!
Hey Xinlu,
You really did the CU fablab justice with your reflection on your experience there and the pictures that you included. I aslo liked how you compared laser cutting and 3D printing and contrasted between them. It is definitely cool new way of creating designs and objects. I see alot of potential for it with incorporating ardunios into it such as for the light sensor that we should be done with next class. This definitely sheds light on the benefits of fablabs and the possibility of the maker community which is more than just one fablab but a whole network of them globally. You could find out more here http://fab.cba.mit.edu/about/faq/ and https://www.fablabs.io/