
University of Illinois at Urbana-Champaign
Instructions for changing a profile picture on Lync 2013 and 2010.
MAC USERS: Lync pictures can only be set up using Lync for Windows. Once you have used Lync for Windows to place a profile picture in your Lync account it can be seen by users on Lync for Windows and Mac.
Link to CITES computer labs with MS Windows
Link to a picture on Box
On a Windows computer go to the Box folder storing your picture (or upload a picture to Box).
Click> Share (right of picture)> Advanced settings (gear icon)> Direct Link
![]()
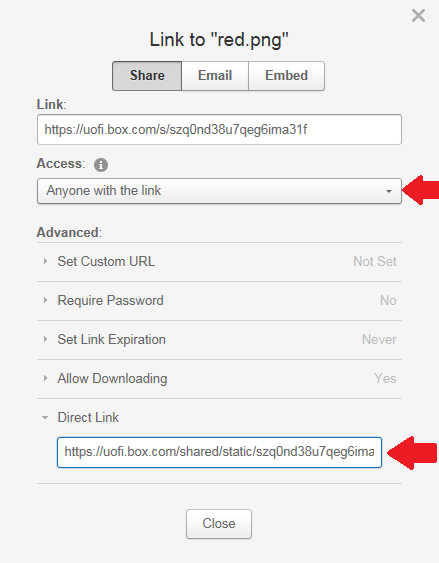
Copy the “Direct Link” URL. In Lync Click> your profile picture icon> Options menu enter the Direct Link provided in Box and Click> Connect to Picture. Click> OK.
Note: Access in Share> Advanced settings must be set to Anyone with the link to use this Direct link.
You should now see your image in place of the picture icon next to your name. Lync 2013 allows uploading images of 1024 KB and under, while Lync 2010 limits image uploads to 30 KB. The text below the link will change to a statement confirming your image has been connected to successfully.
Note. A picture cannot be uploaded directly from your PC. You must enter a web address for Lync to point to.
Link to the UI directory
Go to the Illinois Directory. Search for yourself.
Click> pencil icon (top of directory entry). Login with your netID.
Select> Custom (under General Information). Click> Image tab.
Upload a picture or enter the image URL. The image must be 30 KB or less to upload.
For an easy way to resize your picture go to www.freeonlinephotoeditor.com and follow these steps:
Note: freeonlinephotoeditor.com only works with GIF, JPG, or PNG files.
Click> Browse to locate your image on your PC, or enter a URL (right of Browse field).
Click> Ok button (right of field used in previous step).
Under Browse button there will be options to edit your image.
Click> Basic> Resize.
Use the scroll bar to resize your image to 30 KB or less. The width, height and approximate file size of the image (highlighted in yellow) will change as you move the scroll bar.
Note: The estimated file size is somewhat misleading. The saved file is often a few KB larger than the estimate. It may be best to create a file not much larger than 20 KB to avoid a redo.
Click> Apply and the pop-up window will close.
Click> File. Save the jpeg file to your desktop (or appropriate folder).
OR
Click> Share/Save Online > Save image online, and copy the Direct link.
The Direct link or the saved image can be entered in the UI directory.
Copy the Image URL given by the directory.
In Lync, click> your profile picture icon> Options menu enter the Image URL provided by the directory and Click> Connect to Picture. Click> OK.
You should now see your image in place of the picture icon next to your name. Lync 2013 allows uploading images of 1024 KB and under, while Lync 2010 limits image uploads to 30 KB. The text below the link will change to a statement confirming your image has been connected to successfully.
Link to a picture on publicly available website
Note: In order for your contacts to see the picture, they too will need to have access to the site where the photo has been placed.
Facebook (Lync 2013 users):
To upload your current profile picture from Facebook:
Click> your name (top left of Home page). Your browser’s address bar will now show your Facebook name in the path, as shown below. ![]()
In Lync Click> your profile picture icon> Options menu enter http://graph.facebook.com/YourFBname/picture?type=large but replace the highlighted portion with your Facebook name. Click> Connect to Picture. Click> OK.
Note: Your Lync picture does NOT change if you change your Facebook profile pic.
You should now see your picture in the picture icon next to your name. Lync allows uploading images of 1024 KB and under. The text below the link will change to say “Your picture’s been downloaded”, and your picture will show in the preview window.
Alternatively, any publicly available picture from Facebook can be linked to. However, you may have to change privacy settings for a picture in order to upload it to Lync from Facebook.
Right-click> your picture. Click> Copy image address.
In Lync Click> your profile picture icon> Options menu enter the image address provided in Facebook and Click> Connect to Picture. Click> OK.
You should now see your picture in the picture icon next to your name. Lync 2013 allows uploading images of 1024 KB and under. The text below the link will change to say “Your picture’s been downloaded”, and your picture will show in the preview window.
LinkedIn (Lync 2013 users):
Right-Click> your profile pic. Click> Copy URL
In Lync, Click> your profile picture icon> Options menu enter the image URL provided in LinkedIn and click> Connect to Picture. Click> OK.
You should now see your image in place of the picture icon next to your name. Lync 2013 allows uploading images of 1024 KB and under. The text below the link will change to say “Your picture’s been downloaded”, and your picture will show in the preview window.
Link to image saved on FreeOnlinePhotoEditor
www.freeonlinephotoeditor.com/ can be used to provide a link to enter in Lync provided the picture is under 1024 KB.
Note: freeonlinephotoeditor.com only works with GIF, JPG, or PNG files.
Picture size limits
Lync 2013: 1024 KB
Lync 2010: 30 KB
UI directory: 30 KB
Box: 250 MB
FB: 25 MB limit
LinkedIn: 4 MB
FreeOnlinePhotoEditor: 6 MB
Recommendations for changing a Lync picture:
The best method for a user depends on where their desired picture is at the moment and what accounts they have. Lync 2010 users will find the FreeOnlinePhotoEditor and UI directory methods most useful because of the smaller image upload limits of Lync 2010.
For Lync 2013, Most of the methods described here are not particularly quicker or less involved than all the others. However, I would avoid using the UI directory to change a Lync picture, since it will likely require extra steps to resize the picture before uploading.
For Box users, uploading a picture to Box and getting a Direct Link is simple, as long as the picture is within Lync’s upload limits.
For Lync 2013 users getting their picture from a social network (SN), it may be easiest to link to it from there, assuming the picture is public and privacy settings do not need to be changed. Linking to a picture from LinkedIn is simple and requires no managing of privacy settings. Some other SN may be as useful for this purpose.
Using the UI directory is possibly the most involved method. The directory has a 30 KB size limit for pictures. The user can resize their picture using FreePhotoEditor.com or some other application, but this requires extra time, effort, and some familiarity with the editing tool. FreePhotoEditor.com is a simple solution, and it can host the image online also. Still, I would only recommend using it if the user wants to change their UI directory picture and Lync picture in one sequence of steps; needs to resize their picture; or does not have their picture online already, for it becomes an even more roundabout method to changing a Lync picture in other instances.
If the user does not have their photo online anywhere yet, FreeOnlinePhotoEditor can be used alternative to Box. In a few steps, they can have a direct link to enter in Lync and the UI directory (if needed). Although, users should be aware of a couple things: The file size estimate it gives when resizing is somewhat inaccurate. An estimated 21-30 KB file showed actual file sizes over 30 KB once saved. Thus, an image should be saved as a file ~10 KB than the target to be safe and efficient. Also, the estimate is only representative of a jpeg file. When saving as a different format, the actual size is larger. Keeping these factors in consideration, this free online editing service is a useful way to format a picture and get it onto Lync.