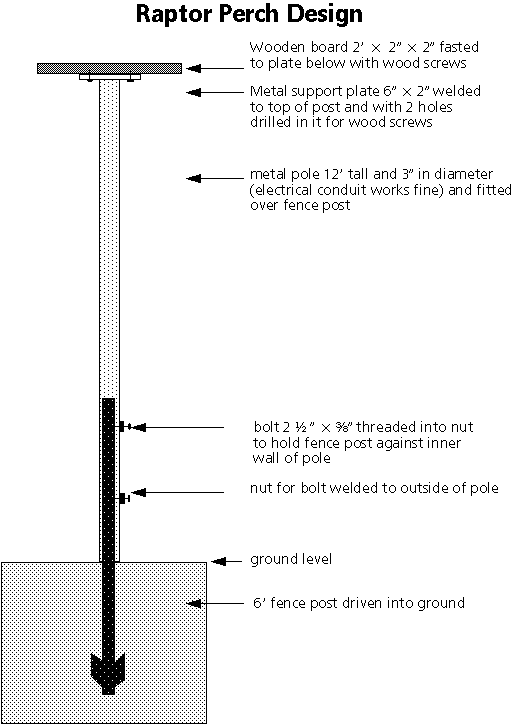
by Tod Fink, John Marlin, Patti Malmborg and modified by Illinois Natural History Survey shop staff
Developed for the Corridors for Tomorrow project
 Each raptor perch will require the following materials:
1 —- 12-foot length of hollow metal pole (could be any type of scrap tubing or pole that is between 2 and 3 inches in diameter; we used 3 inch electrical conduit)
1 —- 2-foot length of 2″ x 2″ untreated pine board (edges rounded if desired)
1 —- flat metal plate approximately 6″ x 2″ x 1/4 “
1 —- 6-foot long T-fence post
2 —- wood screws to attach 2″ x 2″ pine board to flat metal plate
2 —- bolts and nuts, 2 1/2 ” x 3/8″ (length determined by diameter of pole).
Perches should be assembled in a workshop according to the diagram on the reverse side. The 2′ length of 2″ x 2″ untreated pine board should be bolded to the 6″ piece of flat metal that has been arc-welded to one end of the metal pole. Two holes 1/2″ in diameter should be drilled in the pole approximately 12″ and 24″ from the bottom. Nuts for the 2 1/2 ” x 3/8″ bolts should be arc welded to the outside of the pole in alignment with these holes.
To install the pole, drive the fence post about half-way into the ground, making sure it is vertical. Fit the pole of the bird perch over the pole, with the post inside the pole. The pole should rest on the ground but not be driven into the ground. Coat the nuts with grease or other product to prevent rust, and then insert the 2 bolts into the nuts and tighten the bolts against the post; the post may have to be rotated so that the bolts rest against a flat portion of the post.