But Where Do I Hunt?? — How to Find and Scout Public Land Remotely
Finding a place to hunt can be difficult when you don’t know where to look. Utilizing public information provided by Illinois DNR, and other data sources, you can find and scout public land near you. Narrowing down sites and noting key habitat features before conducting boots on the ground scouting helps saves time and frustration you might have when entering a site “blind”. To aid in this process, I will be going over the steps I use when looking for a new public land site and detail my hunt planning process. I am going to be focusing on deer archery season in Region 2 (the Chicagoland area). I will then pick a site to use as an example and review satellite images to point out some key characteristics that should be looked at once you start on the ground scouting. Throughout this article we use a public Illinois DNR site and explain our hunt-planning process. While the areas we highlight do appear productive, these are not recommendations for specific hunting spots, but more so, to illustrate and share our thought-process as we select areas.
Finding a New Site:
Step 1: The Illinois DNR recently released a new website designed to assist hunters in the hunt-planning process. One new feature of this website, is the Hunt Planner tool. To use this tool, go to the new website: huntillinois.org and select the HUNT PLANNER button at the top center of the page.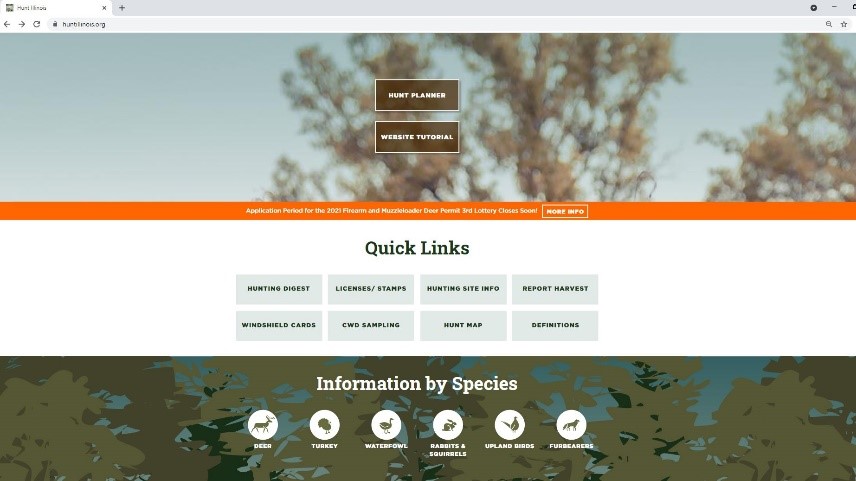
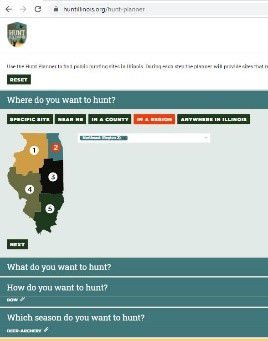
Step 2: This will open the Hunt Planner tool. Select the portion of the state you are interested in. This can be a specific site, a county, or you can use your current location to find sites near you. I used the region map and selected Region 2 in the northeast corner of the state.
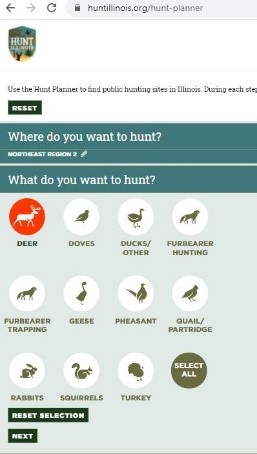
Step 3: Select the species you wish to hunt. This step will filter all the Illinois DNR public sites in the geography you selected that allow hunting for the species you selected. I selected deer so this will show all the sites that allow deer hunting in Region 2 (my selected geography).
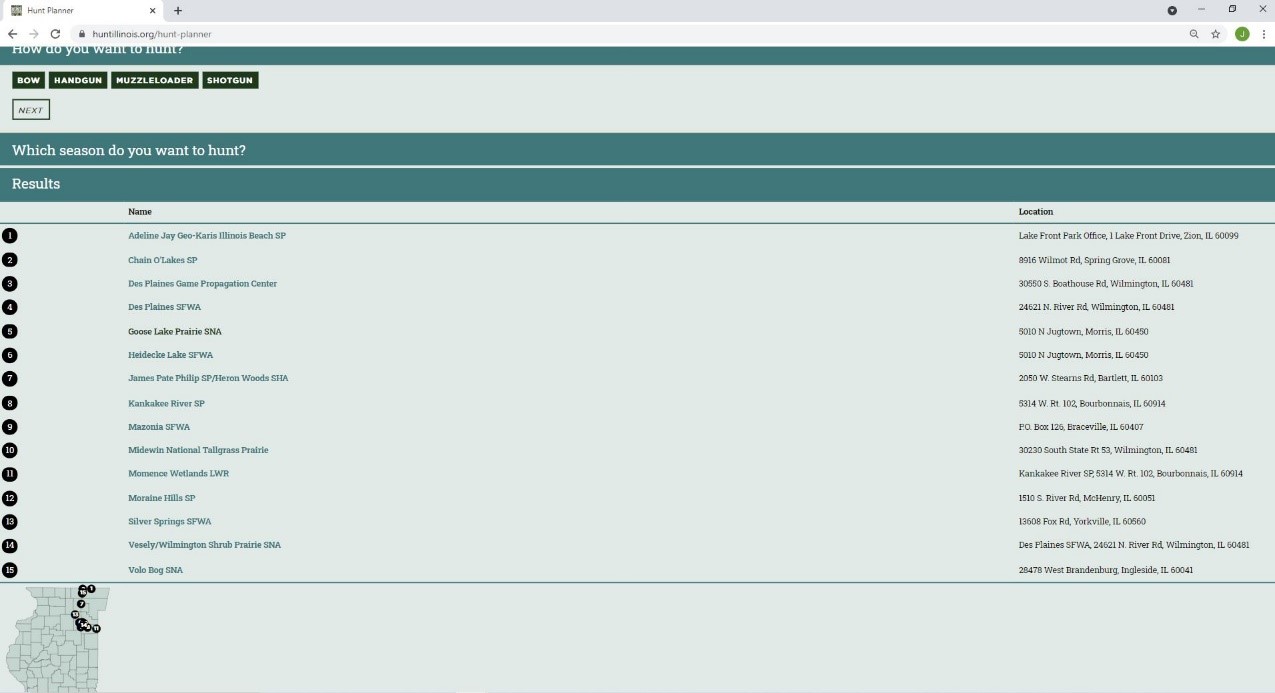
Step 4: Review the list of filtered sites. There are 15 sites in Region 2 that have archery deer seasons.
Step 5: After filtering a list of sites that fit your criteria, now you want to further research these sites. There are a few key pieces of information you will want to look up to help you differentiate these sites, so that you can focus on the ones that meet your needs or may be more productive for the species you are targeting.
The first thing to look up are the site-specific regulations. You can find information such as site contact info, site characteristics, amenities, and site-specific regulations (e.g., legal hunting methods, season dates). Site regulations can vary from site to site depending on various factors such as the site’s size and if the site has other uses. It’s important to mention that site-specific regulations can be more restrictive than the statewide seasons and regulations. You can navigate to the site’s web page by clicking on the site names listed. Some sites, such as Adeline Jay Geo-Karis Illinois Beach SP, are not very large and require you to enter a lottery to gain access for a two-week period during the season. Other sites, such as Des Plaines Game Propagation Center, are used for controlled pheasant hunts and limits access to archery hunters during the season. Depending on your preparation (you missed the lottery application period) or availability (you can only hunt weekends), some sites may be unavailable to you. Starting off reviewing site regulations helps narrow down your options without investing additional research and scouting time.
After reviewing the site-specific regulations and narrowing down your list of potential sites, you will want to look up a map of the site and start looking at its various characteristics.
Things to consider:
Habitat – Does the site have diverse habitat suitable for deer? Deer are edge species, so look for habitat transitions. Deer use transitions to feed and navigate across the landscape. Look for food resources (crop fields, oak flats), travel corridors, and bedding locations (overgrown fields, thickets, ridge points).
Topography – Your hunting plan should incorporate an understanding of how elevation changes in the landscape impacts deer movement. Look for ridge lines deer may follow, or steep inclines that naturally constrict and funnel deer movement to a pinch point. Remember, deer like to travel the path of least resistance. Get refreshed on how to read a topographic map here.
Site Access – Identify parking locations around the site. Not only is site access important for knowing how/where you can park and access the site, but it can also help you find areas that may not receive as much hunting pressure. The average hunter doesn’t travel more than a quarter mile away from their vehicle. Trying to get away from the parking lots so that you avoid other hunting pressure may lead to more productive areas. Note where you might set up at and plan your travel route from there.
Step 6: Use the annual Public Hunting Area Report to help narrow down your selection here. In this report you can find valuable information about public land sites in Illinois. It lists total acres, total huntable acres, hunting trips, as well as the number of each species harvested.

For convenience, I compiled the information for Region 2 sites from the report in table 1 above. In this table you can see which site is the largest, has the most hunting pressure, and had the most deer harvested the previous season. Some of these numbers maybe a little misleading. It is important to review the site map to see where you can hunt deer specifically. The total huntable acres (for all species) could include areas where deer hunting is not allowed. This also applies to the hunting trips taken. You will see sites like Des Plains has a lot of hunting trips taken, but many of these are for upland bird hunting. This means that the deer may not be as pressured as it seems. The good news is that there is about 20,486 huntable acres all about an hour outside of Chicago.
Step 7: Choose a site. As an example, I am choosing Momence Wetland LWR on site specific regulations alone. This site has the least restrictions that I found in Region 2. There is not lottery or restrictions on how many hunters can be at the site on any given day. You are also allowed to access the site by boat, which is cool. See site regs below.

Let’s look at a site map to note where we are allowed to hunt and where we can access the site from:

We can hunt the north side of the river, except in the narrow strip of trees located in the middle of the property. There are three entry points to the site indicated by the Parking Lot and Boat Access symbols (highlighted with a green circle). The parking lots are to the far north off E4000 N Rd and to the east near Co Rd N360 E. The boat access is located on the south side of the river.
Finding key characteristics through eScouting:
Using satellite imagery, we can note some key characteristics of the site. This will help us understand how deer might be using the property and where we might be able to set up to intercept them.
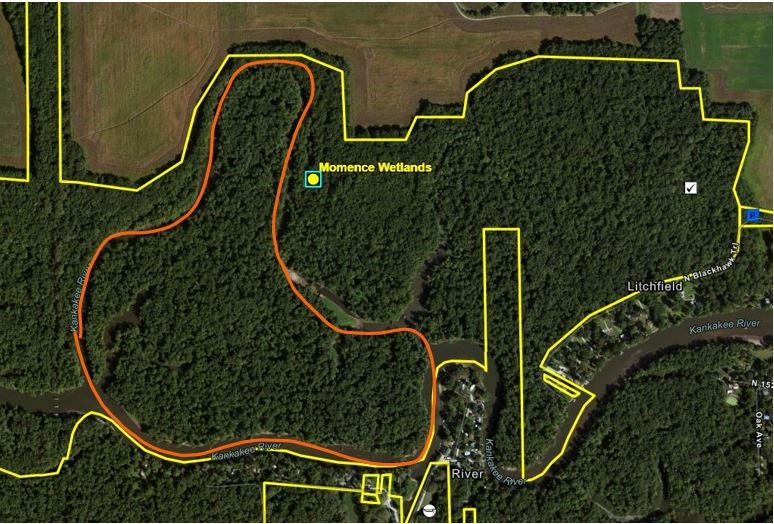
There is a large island (outlined in orange) in the middle of the property. This could be a great sanctuary not just for the deer, but for you too. Not many hunters coming from the parking lots will have access to this chunk of land. The privacy is worth taking a boat over to scout out for any deer sign. You may not have to compete with other deer hunters but note that there are duck blinds along the river at this site. Make sure to set up in a safe location.
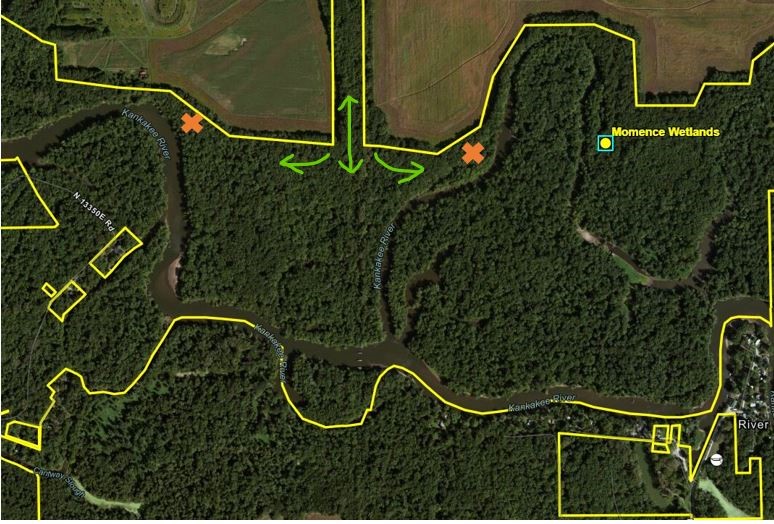
In the middle of the property is a travel corridor of trees between two agricultural fields. Referring to the site map, you are not allowed to hunt along this strip. You can still use this corridor to your advantage. Go in looking for deer sign and do some reconnaissance hunts to figure out how the deer are accessing these fields and meet them there. See if you can use the “pinch point” between the river and the fields to get deer in range.
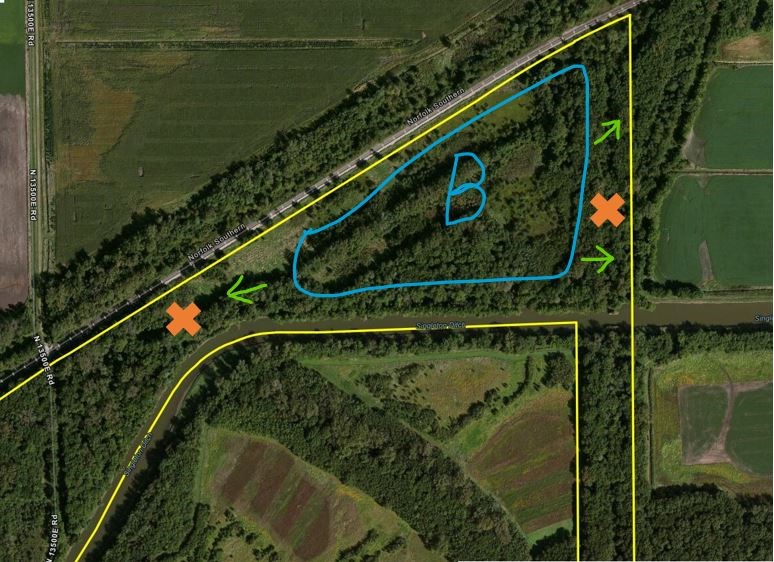
In the northern most section of the property we see some new growth. Railroad tracks run down from northeast to southwest on one side, to the south is the river, and to the east are agricultural fields. This area may be thick and secluded enough to be good bedding “B” area. If the deer are utilizing the ag field, you can intercept them in the woods. On a west wind using a boat, you could get set up in the tree line relatively undetected. Another feature is the funnel or “pinch point” to the west of the bedding area that is made by the railroad tracks and the river. If deer are moving along the bank, setting up there you have a good chance to get a deer in range when it passes by.
Each of these setups now requires boots on the ground scouting to gather more information. Scouting can take a lot of time and effort driving to and from a site. Knowing how to narrow down your sites and how to use eScouting to develop a plan will help you capitalize on your time afield. I hope the steps covered in this article gives you a leg up on finding your next hunting spot.