Hello everyone! Our team spent this semester creating a smart vertical garden. We were inspired the Growing Local Community project posted on Ultimaker’s website in which the challenge was to design and incorporate 3D printing into vertical garden. We decided to take this challenge even further and design a vertical garden that would be tailored towards college students as often times college students do not have access to a location that they can grow their own produce or flowers and therefore are less likely to eat healthy and participate in gardening in general. In addition, college students also are incredibly busy and do not have time to constantly monitor the status of something they are trying to grow so making this garden “smart” would make it even easier for students to be involved in growing their own food.
This idea led our group to the How Can We statement of “How can we give college students a convenient way to grow their own produce, leading to a healthier diet and lifestyle”. We decided to move forward and attempt to solve this problem because we are all college students and understand how busy our lives can and how constraining it can be to live in campus housing such as a dorm, apartment, or rental house. We were also interested in creating a vertical garden that was cheap and easy to maintain and was also easy to replicate. The idea is that any regular college student can walk into a maker space, such as the Maker Lab, and recreate our project without having any prior experience in 3D printing or small electronics at all.
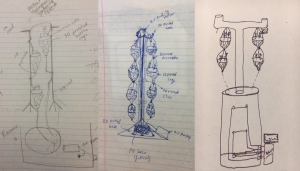
We started off our design process with a simple drawn sketch consisting of 2 planter boxes and some support beams with a box next to it to hold the electronics going into the garden. This sketch ended up really guiding our design as we began to model it in fusion as it gave a clear understanding of what we wanted our vertical garden to look like. We then began the process of prototyping our design by printing our a smaller scale of our first garden box. Needless to say, it did not go very well as we learned that we would need a brim to keep the print flat on the printer and that our design would need some changes so that it would print correctly. At the same time, we began tinkering with the sensors that we wanted to include in the garden by figuring out how to connect soil moisture sensors to an Arduino Uno and getting them to read values in real time and also connecting an LDR ( a sensor that detects light) and getting it to display values on the computer as well. The original concept of the smart aspect of this garden is that it would connect to the internet and send a text message to the user whenever the garden needed something but we soon found out that it would not be possible to acquire one in our given time frame and we had to adjust our plan. As we printed out the second version of our planter boxes, we connected a simple red LED to the arduino so that if the garden needed water or sunlight, the red light would illuminate. With that, it was time for user testing.
We decided to test out our prototype with 2 University of Illinois students since they were our primary focus. We showed the test subjects sketches of our design as well as the models we had created in fusion as well as demonstrating how the Arduino technology works. Both test subjects were impressed with our prototype and stated that they would use a finished version of our vertical garden if possible. The biggest take away from the user testing was that they both expressed interest in a display that told them more information about the status of the vertical garden instead of the simple LED. With that suggestion, we decided to add a 3 digit seven segment display to our garden that would display if the garden needed water, sunlight, or a combination of the 2. With the knowledge gained from user testing, we were ready to create our final product.
Final Prototype of Vertical Garden
This entire process led to the creation of a 2 tiered vertical smart garden. Our final version came out to be 6in by 6in and 4in deep with an overall height of around 12 in. This size is perfect for a desk or window sill but this design can also be scaled up or down and be printed out at whatever size the user desires and can include more planter boxes if desired. The smart features of the garden include 2 soil moisture sensors, 1 LDR (light dependent resistor), and a 3 digit seven segment display, all powered by an arduino uno. These sensors allow the garden to display to the seven segment display if it needs water (H20), sunlight, (Sun), or a combination of them (All). If all variables are satisfied, the display will be blank.
We hope that in future versions of this project we can include the things we learned throughout this process and things that we did not have time for. Some of these additions would include a WIFI Shield to make it a true internet of things device, using a pcb to make the electronics alot more organized, a bigger seven segment display so that we can display more information, and a better enclosure for the electronics.
The process of taking an idea and turning it into a functional prototype was very rewarding for us. We learned that prototyping really is an iterative process and that a project will come together step by step over time. We also learned that the maker community is incredible. All the knowledge that we used to create our garden was found online through people who documented their own journeys of creation. Lastly, we learned that 3D printing is the future. Over the course of this process we became familiar with just how powerful this technology is and understood the scope of how many problems 3D printing can solve.
Overall, we enjoyed learning so much in this class and we would like to thank you all for a wonderful semester!
– Team Money Makers
Instructable Link: https://www.instructables.com/id/3D-Printed-Smart-Vertical-Garden
Presentation Link: https://docs.google.com/presentation/d/1IDzFDHrQp4gE23HTlMCCMBqrQyKVJB0DUkna7VQseQ8/edit?usp=sharing

