
Introduction
When deciding what product we wanted to make for our final deliverable, we wanted to make something that we were all interested in and could help other students our age. When brainstorming, we realized we all drink coffee and find ourselves spending hundreds of dollars on coffee. We saw an issue with pour over coffee and thought we could find a way to help people make pour over coffee easier. Thus, we came up with the coffee pour over assistant. Essentially, our product would allow people to pour water into a water reservoir which would then slowly drip the water through the coffee grinds and pour a perfect cup of coffee.
Next, to make sure we were making a product that was useful and had a need we came up with a few ‘How Can We’ statements. The first one we asked was “How can we replicate popular, existing coffee brewing machines for a cost-efficient price?” We wanted to be able to make sure it was cheap enough, especially for college students, to buy. Next, we asked, “How can we make the process of pour over coffee the most efficient for the user?” The biggest issue we wanted to tackle with pour over coffee was the fact that the user has to slowly pour the water over the coffee grinds which can take a long time depending on the flavor you want your coffee. Lastly, we asked, “How can we match the coffee taste to the user’s need?” One of the benefits of pour over coffee is that you can determine how strong each cup of coffee is. We wanted to make sure we replicated this same benefit with our product. After we asked the ‘How Can We’ questions and found a need for our product, we started developing our product.
Product Development
After we identified the need for our product and how can we statements for this product, we started developing our product. The first thing we had to decide was how many different parts we wanted to make. For the first iteration we chose to make it into two pieces. The water reservoir was on top. We made it into a cylinder shape with large holes on the bottom with the hope that it would slow the water down. The bottom section had three legs attached to a cylinder with a funnel on the inside where the coffee grinds go. After testing the first prototype we decided to make a couple changes.
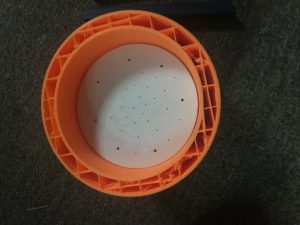
For the second iteration, the first change we made was to make the base bigger and eliminate the legs. The reason for this is because we wanted the person printing the object to be able to change the height of the leg if they wanted it higher for larger cups. We also wanted to make the base bigger so it would be easier for the user to fit more coffee grinds in the base.
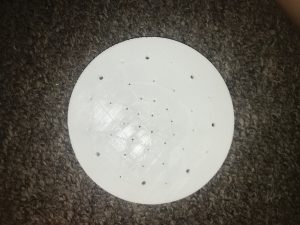
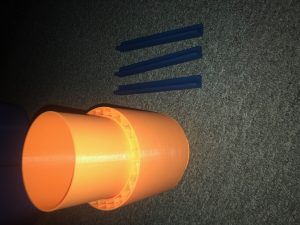
When we were making the different parts for the second iteration, we had to decide how we wanted to fit the top part onto the bottom base. Our options were to make it latch on, slide into the base, or twist on. After we printed the larger base, the water reservoir from the first iteration happened to slide perfectly into the base. Therefore, we decided to keep the water reservoir the same size so it can slide into the base, and just eliminate the larger holes on the bottom since it did not slow down the water at all. After we had our base and water reservoir we just needed to make the legs and the different slides we would place in the base to slow down the water flow. We made the legs 4 inches tall which worked well for an average mug size. The slide we made had several small holes in it which worked well to slow down the water. In the end, we had three legs, the base to hold the coffee grinds and also fit the water reservoir into, the water reservoir, and a slide.

Testing and Next Steps
Once we had developed our product and had a prototype, we had to test it. For the first test, which unfortunately we do not have footage on, there was a lot of leaking from the funnel because there were gaps I and the holes were too big that the water was flowing through. The coffee was very watered down and was not drinkable by users. Granted, this was a very rough prototype, and the goal for our first iteration was to see how users responded to the design of the product and the overall usefulness of a coffee pour over assistant.
When testing the second iteration, we found more consistency in the coffee. The slide that we developed for the second iteration made a huge change to the coffee. We also made the funnel on the second iteration smaller so that the water would not leak as much. Additionally, since we made the legs longer and not connected to the base, it was easier to fit the coffee cup under the funnel. Unfortunately, in the video included in the presentation, we did not have the legs glued on, but it shows the flow of the water through the funnel.
For the next steps of our project, we want to make the design more reliable and eventually make it available to users on Shapeways and other sharing websites so people can print our design with their own material that is more water-friendly. Additionally, make the legs and hole size on the slides easily adjustable so it can fit the user’s needs as closely as possible. Another idea we had was to make an attachment to an existing coffee pour over that would moderate the flow of water, so our product would not actually contain the coffee grinds and filters.
Overall, our team learned so much from this project, and we feel we all came a long way from the beginning when we were discussing project ideas. We had so many different ideas about the product and it could have gone several different ways. The greatest part was seeing our ideas being printed into an actual product. It would be nice to continue to develop our product and make something that users would be excited to make and use!
In the link below, you can find our final presentation and Instructables, respectively!
https://docs.google.com/presentation/d/1pgNcZblkNr9y7woUtYLUW6sKNjogF9PNVlDjK9BPyfM/edit?usp=sharing
https://www.instructables.com/id/Coffee-Pour-Over-Assistant