Project Showcase: The Adafruit Flora, What We Made From It and What’s Possible

The Adafruit Flora is a new addition to the foray of microcontrollers out in the market now, alongside Arduinos and Raspberry Pi’s.

ezgif-982726395

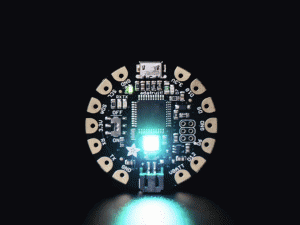
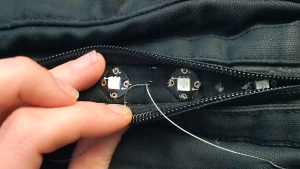
The Flora is made specifically to be compatible with wearables, with holes drilled into the contacts where conductive thread can be sown into to create circuits. This is one large leap in the steps that have been made to make wearable technology affordable and widespread.

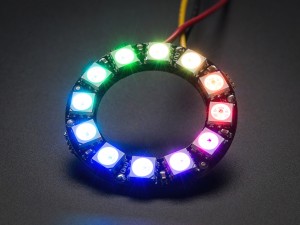
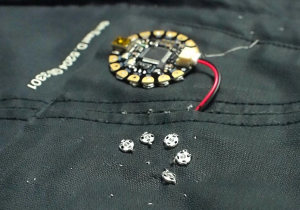
Along with the Adafruit Floras have come their NeoPixel RGB LED lights and a plethora of resistors and specialized sensors that are water-resistant. Below is a round band of 12 RGB NeoPixel LED lights that are individually programmable.

1643-01

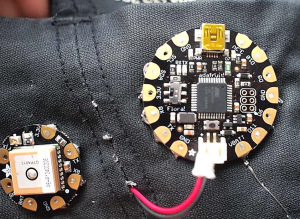
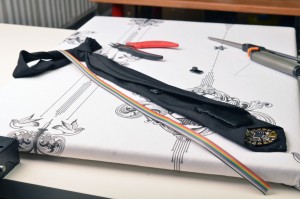
The Flora has many uses, and below is a showcase of all the things that can be done with them, beginning with the final project that Abhiniti Mahendrakar and I made:
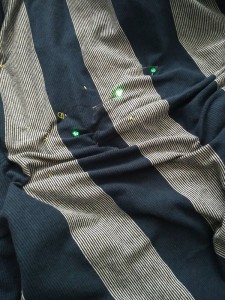
13138755_10153756148214671_8665567037327579363_n

A GPS Jacket:

flora_Screen_Shot_2013-01-09_at_1.29.05_PM

flora_Screen_Shot_2013-01-09_at_2.19.24_PM

flora_Screen_Shot_2013-01-09_at_2.24.49_PM


And a tie that lights up to the amplitude from a microphone.

flora_ampli-tie-21

Now while those may be entertaining, and some useful, this is just an introduction to how small we can make these controllers and the processing potential they hold for us in the future.


Week 12 Semester Project Update: Better Late than Never

While I was very indecisive about what my final project would actually amount to, Abhiniti and I decided to move on with what she dubbed “project mood shirt”.

Essentially, this would read the temperature and humidity of the person wearing the shirt, and based upon the heat index of that level of temperature and humidity, light up a set LED on the shirt to indicate whether the person is too cold, normal, or overheated. One use of this may be to roughly and instantly monitor potential overheating during the summer or during exercise, or, in more severe cases, if a person is becoming too cold, for example during the winter, and is on the way to hypothermia.

Below is the video I took during the final stage of coding the shirt. While it was taken before most of my progress was made, it is essentially the entire circuit that will be sewn into the shirt.

Week 10: Digital Embroidery at the Fab Lab

Making a logo. The fact that digital embroidery even exists seems fascinating to me. Considering that my final semester project is developing to become a wearable, this was a very fitting end to the past two trips to the Fab Lab.


I loved this concept, this idea, this product. Being from Bangladesh, I know how much of an advantage the workers at the tens of thousands of garment factories would benefit from a machine that automates the entire process of embroidery this efficiently.

Week 9: Making Ultimaker Makerbot Makeathon

Despite the title having far too many of the same letters, what we experienced was an amazing building/making experience, making the wooden Ultimaker. Such a team effort was exemplary, and we can all learn from this single experience.

To me, it felt extremely nostalgic, going back to the days of Lego and, less joyously, IKEA. But nonetheless, I must admit that making that 3d printer convinced me to get one for myself in the near future. Looking so closely at the components, you can understand that there is a lot of space for modularity when it comes to this 3d printing kit. We can potentially make this kit as large as possible, with the correct materials and measurements. I was fascinated in the coming days after we completed class as I thought about what more can be done from that kit.

It goes to show how ideas can go off on tangents and become so much larger than what we begin with. What I’m thinking now is, with the development of hybrid materials, integrated circuitry and living materials for 3d printing, how easy would it be to modify the printer-baby we’ve all conceived last week, to assimilate to, say, printers that use more advanced materials and printer heads that can make the amazing things that we see on the news?

Week 7: Fab Lab Arduinos.

Last week’s Fab Lab for me was tinkering with Arduinos.

Here’s the lab:

Now, this was my first time seeing Arduinos, and they were fascinating.

After the introductions to circuitry and arduinos, we proceeded to connect basic circuits

Finally, what I ended up with was a circuit with an LED indicator and a micro servo which would move so long as I avoided touching the purple resistor.

What I look forward to seeing is how we can use arduinos more effectively and in the real world. That’s what my outlook for this lab is.

Week 6: Fab Lab!

Last week was our first day at the CUC Fab Lab, Champaign-Urbana Community Fab Lab. It was an enlightening experience. Mainly because I got to work with lasers. That fact alone made this class the best one yet. The Fab Lab is divided into two weeks, one half being working with lasers, and the other will have digital embroidery.

We started off learning about Inkscape and how to fix document sizes, make vectors off of image formats such as JPEG, Bitmap and PNG. Making vectors avoids the distortion of pixels that happen in images. The lasers themselves can either raster or vector, meaning it can chip away a material to a certain thickness, or it can completely burn a hole (and eventually a shape) through the material. Every material has certain settings for different materials, and I used a Moleskine notebook to decorate the cover with the design in the image.

IMG_20160307_131432

Its amazing how similar I found this to 3d printing, mainly because of the rastered frosted glasses and acrylic pieces that had shapes and images made with the lasers. This feels like 3d printing, but almost in reverse: cutting away material to make an indentation and a shape top-down instead of creating a shape, figure or structure from nothing.

Next week: Fab Lab, Chapter 2.

Week 5: Model, save, create. Autodesk Fusion 360.

Last week’s Autodesk Fusion 360 tutorial was an eye opener to someone like me. I haven’t used a CAD software in 6 years, so seeing what Autodesk now has to offer blew my mind. Fusion is an amazing software, and though I wasn’t there to see through the basic tutorials, it was very enlightening trying to make a lamp from this software. In my personal opinion, its a lot easier than most of Autodesk’s other software, and I found it very intuitive to create the lamp we learned in class. It felt way easier than 3DS max (which may or may not exist anymore, I really don’t know), which I mainly used back in 2010.

The world of 3D printing continues to awe me. The mindset of being a creator that I have had most of my life felt like it was on the verge of staying a childish dream, and at the beginning of week 1 I felt as though I would move on from what I would learn from this class soon. But now the tables in my mind have turned, and I can’t wait to get started on designing things we may be printing out in class.

Everyone here is becoming a maker, and I’m glad to be a part of it.

It’s high time I start using a mouse, because finishing the massive amount of tutorials out there for Fusion 360 will require an evolution from touchpads. But honestly, I love the tutorials.

Week 1: Disrupting the Status Quo

The Digital Making Seminar was the last thing I expected to take this semester. I thought my last four months here would be absorbing semi-new knowledge about my major and minor from a traditional educational system. How I found myself picking this class is a blur to me. 3D printing is a technology I have seen on the internet in videos and articles since 2010, and from last week’s class, knowing that this technology has been around for three decades fascinated me. I honestly thought, prior to this that the 3D printing technology would be something of a consumer-based fad that would die out in the next five to ten years. John Hornick’s lecture opened my eyes to the facets of this technology and how versatile its applications are. Prosthetics, musical instruments, even food products are either being made and the industries are on the verge of partaking in the transition towards industrial 3D printing. I’ve learned from John’s lecture how beneficial 3D printing can be for many industries, and how potentially disruptive this tech can be for modern industry and society, handing the power of production from producers and manufacturers to consumers. I’m giddy with my eyes wide in wonder at how my perspective and skills will transform as I continue with the Digital Making Seminar as the semester progresses.

A few of the things I found as I searched for interesting uses of 3D printing are below.

One of the most interesting and, in my opinion, unconventional uses I’ve found is how musical instruments have been a focus in 3d printing. First, a 3d printed electric violin, and a piezoelectric violin. The latter was what fascinated me more than anything else because of how the creaters of these piezoelectric instruments, Monad Studio,are essentially using properties of different materials to modify how musical instruments work.

While searching for articles, I discovered this. Being able to 3d print a layout of dark matter in our galaxy, something that is still unobservable for us humans, blew my mind.

The applications of 3d printing are endless, and I look forward eagerly to see how this revolutionizes the world.